After a few decades of studying and making bacon, I want to share what I’ve learned to help you discover how to make bacon with accurate salt perception so you can enjoy it exactly how you like.
Key Article Points:
- Techniques include dry-cured or wet-cured, smoked or unsmoked bacon, with a step-by-step guide provided.
- Equipment needed depends on the chosen method, with options for hot or cold smoking.
- Dry curing involves saltbox method or equilibrium curing, while wet curing uses a liquid brine solution.
- Importance of accurate salt measurement for desired flavor intensity for equilibrium curing.
- Key spices and flavorings enhance bacon taste during the curing process.
- Various pork cuts are suitable for bacon making, each offering distinct flavors and textures.
Being a colossal bacon lover, I’ve tried ALL the techniques and styles on making bacon at home.
Dry-cured or wet-cured, un-smoked or smoked, here is a page with all my successes and learnings, along with a step-by-step guide to help you.
I’ll go over the fast salt curing method and the accurate method also.
Because bacon is the best!
Below, I will put links relevant to other bacon topics I have written about on this site if you want to read more about what I’ve learned over the years.
I will include the bottom three of my favorite styles, Sweet, Aromatic, and savory ideas for your
How To Make Bacon
- Dry cure or Wet brine cure
- Wash off cure (optional)
- Dry the bacon to form the pellicle
- Cold or Hot Smoke
- Wrap & store to intensify the flavor
Firstly, I’ll go over the variations, then the steps, and finally, the other factors.
A dry cure or a wet brine liquid is the first significant variation.
The second is to either cold smoke and dry it out or cook and hot smoke it.
Before you make your epic bacon, you need to decide which method, and I’ll explain which equipment is necessary for each method. I’ve used all methods with many variations, to see all this in detail you can check out my online ‘every bacon style video course here.
Bacon types or categories
With the steps below, I’ll highlight the variations in detail:
- Green Unsmoked/Liquid Smoked Bacon – great starter, no smoking, can use an oven or dry
- Hot Smoked
Bacon – if you have a hot smoker, indirect heat source, or gas grill - Cold Smoked Bacon – drying and cold smoking, most prolonged process, classic flavor
Green (Unsmoked) Bacon
It’s not green, it is unsmoked bacon; however, you can use a product to give it a smoke flavor without smoking it.
It’s still delicious since you can cure it and add lots of flavor with herbs and spices if you want.
I like to use smoked paprika to give it a certain angle.
You can hot smoke and finish this bacon off in an oven with liquid smoke.
Liquid Smoke is the condensation captured from a smoking fire. Once cured, you can dry it to intensify the flavor.
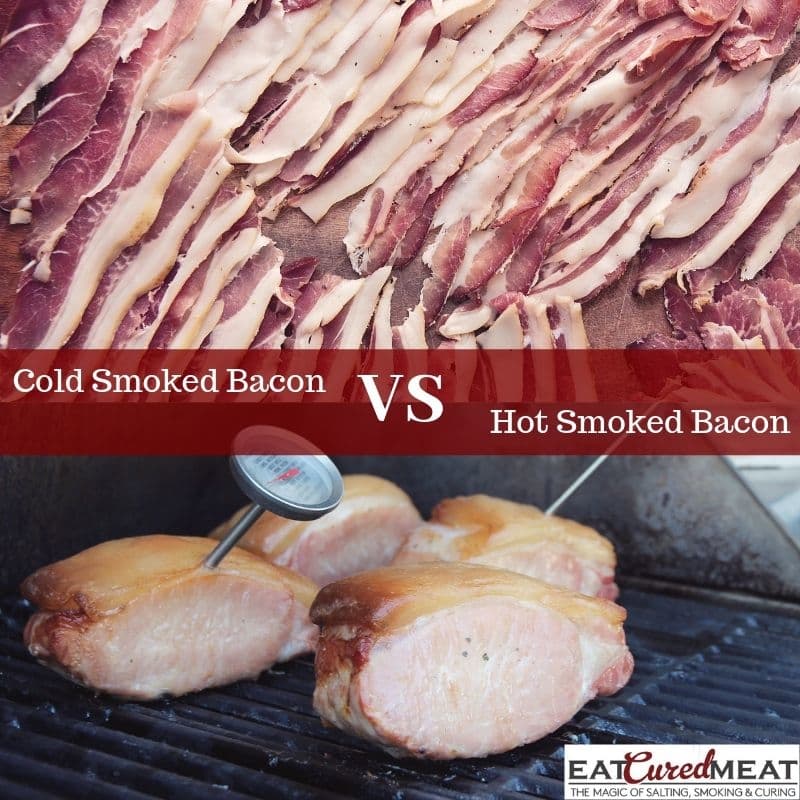
Hot Smoked Bacon Defined
Hot Smoked is cured, and dried to form the pellicle, then you low & slow cook it for several hours to get the smoke flavor into it.
Cold Smoked Bacon Defined
The key is to have the temperature & humidity (not as essential but helps) conducive for cold smoking.
Cold smoked bacon (yes cold smoking bacon is safe, I wrote an article about that here) is about curing (wet or dry), forcing a pellicle, then cold smoking whilst drying out the bacon to intensify the flavor.
Dry Vs. Wet Curing
In short, dry curing is a direct application of the salt cure mixture without water or liquid. I use two methods of dry curing: saltbox saturation and equilibrium curing.
Salt Box
Rub/]Sarurate salt in the meat and leave in a tray/container for some time (1 day per 1-2 pds of meat).
Equilibrium curing
Use a % of salt to the weight of the meat (my preference since you can ‘choose’ the salt level you want).
Wet Brining (Wet Curing)
A liquid salt curing solution with salt, potentially sugar, and spices. Depending on the thickness, submerge the meat for a while (saturation or equilibrium brining can be used).
I prefer dry curing because I can add more aromatics and spices, which I find come through in the flavor. Because moisture is drawn out of the pork belly, I think the flavor intensifies.
When I add plenty of herbs or other flavorings to wet cures, it always seems subtle, even if I use a lot of additions, versus dry curing.
Equipment for Making Bacon

Hot Smoking Bacon Equipment
Cooking Indirect Heat and Smoking at the same time can be achieved with:
- Any Charcoal Smoker – Kettle Smoker, Drum or Bullet, Offset
- Wood Fired Smoker – Offset, Pellet Grill (thermostat controlled)
- Electric Smoker (definitely easiest hot smoker to run)
- Gas Grill Setup for Indirect Cooking (Heat on one side, Bacon/Pork Belly on the other side)
Dry Curing is done either in a container of salt, Ziploc bag or a backpack bag
Wet curing is done in Tupperware or a bowl. A meat inject needle is very useful for speeding up wet curing and can half the curing time.
Having Ziploc bags or baking dishes, I presume people have in the kitchen already.
There is a range of ways to smoke bacon, depending on whether you want to cold or hot smoking bacon.
It’s generally hot smoking unless you have a device to keep the temperature below 30°C/86°F (I will list a few ways below).
Many simple tools can be used to cold smoke, you can even just use them with your gas grill.
I prefer to cold smoke below the threshold at about 20°C/68°F.
A lot of people hot-smoke bacon; it’s easier and quicker.
Then, when they eat it, re-cook it; the bacon will last 1 or 2 weeks since it is cooked, not preserved like cold smoking.
For hot-smoked green/uncured bacon, an oven can cook the bacon at a low temperature. Liquide smoke is a great hack/tip for smoking bacon without a smoker. More on this later.
Cold Smoking Bacon Equipment
Cold Smoking is more subtle if smoking is under 8 hours. It’s simple – but there is a theory to understand.
Less old smoke, I’ve found, is better than too much, with cold smoking (and smoked goods in general, I find). Excess smoke can lead to bitterness and isn’t good for you, either.
Different Equipment for Cold Smoking:
- Pellet Tube Smoker (Bacon Smoking with a Pellet Tube Smoker – How to Use One Here)
- Pellet Maze Smoker
- Smoke Generators (More info)
- One lit piece of charcoal, with sawdust sprinkled
- Sawdust in the pan, lit and smoldering in a large smoke house
- Smoking chamber piped into a cold smoking area (DIY)
- Accessory Cold Smoker to an electric/gas smoker (depending on the brand)
If you don’t have a smoker, you can also use a product to give the bacon the smoke flavor – read about this method here.
If you want to read about different smokers in detail to get your head around how they work, I covered that here.
Depending on where you live, cold-smoked bacon is what you would probably buy most of the time from the store!
Before getting to the step-by-step guide, I will review the main basics so you can choose what to make. Bacon is done many ways, so
An article on equipment in detail here.
Nitrates
Using pink curing salt no. 1, otherwise known as instant cure no. 1, Prague powder No.1 it has many other names. It helps the curing process in many ways, but I prefer always to use it for bacon.
What Pink Curing Salt does for Bacon:
- Reduces risk of botulism bacteria
- It gives bacon that nice pink color
- Cures faster
- Gives bacon that ‘ham’ flavor you know and love
But the biggest reason is that it helps keep the meat safe from harmful bacteria.
If you want to read more nitrate information, I created a page summarizing scientific studies. Please find that link here.
Salt
In this video, I will highlight the saturation vs equilibrium curing process for bacon making.
Salt size can vary a lot regarding any type of cured meat. Size doesn’t matter for the saltbox method. I generally use coarse Silician sea salt because you are saturating and rubbing the meat in salt.
If you are using the EQ method, fine salt is best since you
When it comes to the type of salt, the short answer is to use pure sea salt or kosher salt. This will mean the salt doesn’t contain any additives, like anti-caking agents. Iodized salt is also not the kind that should be used for curing meat since it can create off flavors in the finished product.
Different types and salt brands have different sizes; hence, they have different weights.
Salt can also vary greatly in shape and density. It sounds crazy, but salt from one type to another can sometimes nearly double in space or volume.
So if you measure salt by volume, for instance, like a tablespoon, your recipe can have very different outcomes; you may have come across this in recipes and never noticed it, I didn’t realize it for many years.
I love equilibrium curing because you get precision.
Accurate kitchen scales are necessary; most scales go to 0.1 oz or 1 gram or 0.3-0.6 oz or 3-5 grams. This isn’t accurate enough if you want to get into EQ meat curing.
For instance, if you have a 2 lb (900 grams)pork belly to make bacon.
Using metric because it’s easier,
Sea Salt @ 2.0% x 900g
0.02 x 900 = 18 grams of sea salt
&
Pink Curing Salt No. 1 is applied at 0.25% of the meat weight for equilibrium curing (see below)
Pink Curing Salt No.1 @ 0.25% x 900g
0.0025 x 900 = 2.25 grams of pink curing salt no. 1
Step-by-Step Illustrated Guide
- Dry Cured or Wet Brine
- Dry Curing
- Salt Box Method
- Equilibrium Curing Meat
- Wet Brining
- Dry Curing
- Wash Off Cure
- Dry the Bacon
- Hot or Cold Smoke
1. Dry Cure or Wet brine
Dry Cure
It’s a personal preference; I use equilibrium curing because I know that all the ingredients are absorbed and intensify the pork.
Salt Box Method
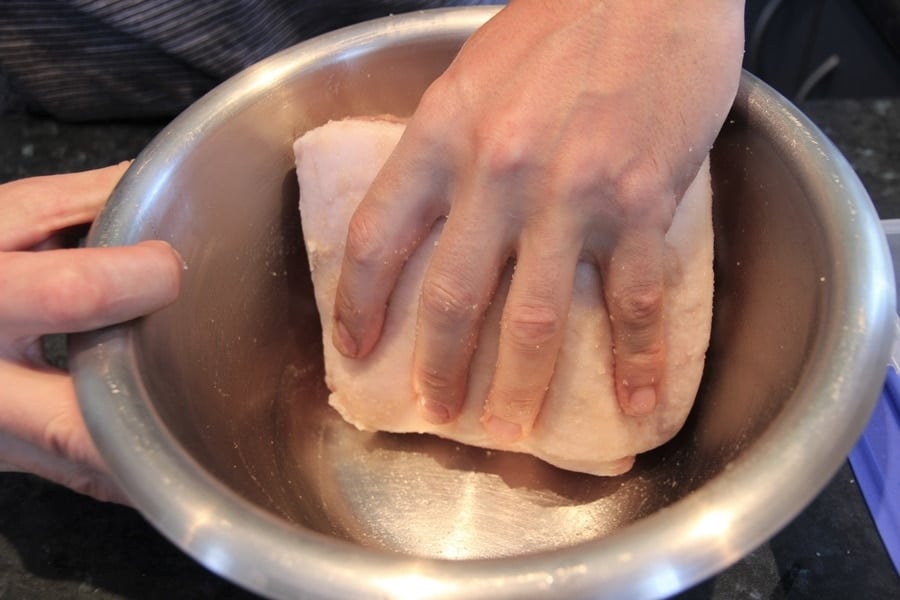
This is the traditional way of salt curing; you have a pan or bowl of your curing mixture, which includes salt, pink salt & spices.
Coat the pork thoroughly with salt on all sides and in all areas. Then, place the pork in a Ziplock bag or on a waterproof-rimmed tray.
The salt will draw out moisture; all you do is flip the pork every day or two.
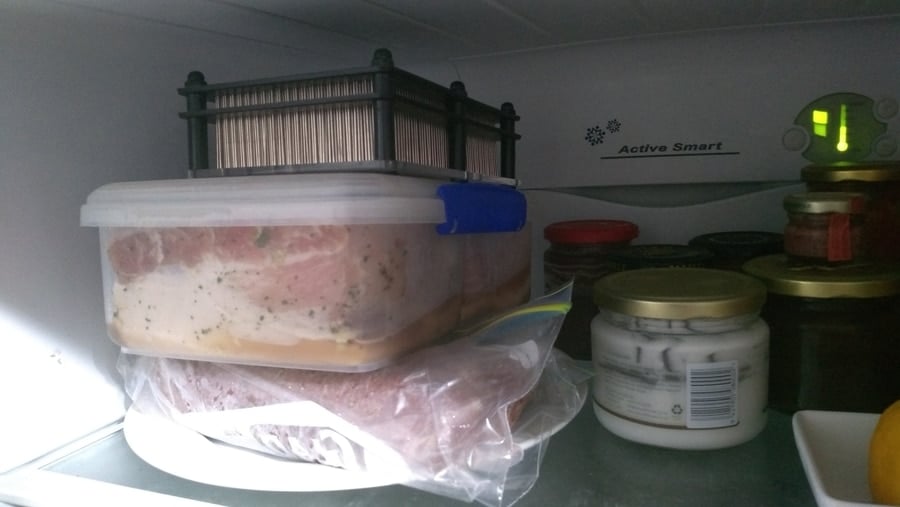
The pork must be kept in the fridge or in a cool area during this process.
A weight can be applied about double or triple the pork weight to squeeze out moisture.
Length of Time with Saltbox Method
The general rule is:
1 day for every 1-2 pounds / 0.5-1 kg of meat.
Too Salty after Curing, Soak & Test
If you use the salt box method, it’s a good idea to fry a slice up afterward and see how salty it is after washing it. If it’s too salty, place it in a pan of fresh water for 20-30 minutes, then fry it up again until you get the preferred salt level.
Equilibrium Curing
My preference for the
As mentioned previously, if you have accurate scales, you can work out the percentage of salt to whatever the weight of the meat is.
Most guys I know now use this method, which varies from 1.5% to 3.5%, depending on what they like. Salt is
I generally use 2.25% salt to the weight of the pork. The thickness of the slice will also have a big difference in the perception of saltiness.
Use a bowl to mix in the EQ cure. Make sure the mixture is evenly distributed and put it all in a Ziploc bag. Squeeze out as much air as possible, seal the bag, and store it in the fridge to cure.
Adding Some Flavor Angles
Some flavors I like to play around with:
- Brown Sugar/Honey – 0.5-1.5% of the weight
- Juniper Berries – I like to use 3 or 4 per pound of pork
- Dried Thyme – 1% of the
weight - Cracked Pepper – sometimes toasted – 2% of the
weight
Many recipes I have found online add a lot of sugar, which is not my preference.
I try to balance the salt with the sweetness.
Length of Time with Equilibrium Curing
With EQ curing, you can leave it for a few more days, and it won’t over-salt the meat. A week is generally enough for most sizes of pork belly I have seen, but it will depend on how thick it is. With equilibrium curing, leaving it a few days longer doesn’t matter.
A couple of times, I have left it another week, with no issues. I may have even infused more of my spice bomb flavors into the meat!
Wet Curing or Brining
The old term for this was ‘pickling’; you dissolve the salt mixture in water and then submerge the pork in the salty brine for some time.
I generally use a weak brine of 5% salt (50 grams) to 1 quart/1 Litre of water as a base for bacon or other things I am wet curing before smoking.
It helps to heat the mixture to dissolve it, wait until it is fully room temperature, and then it is ready for use.
Place a plate and weight on top so the pork stays under the liquid; it tends to float.
So, for a 2 pound/1 kg pork, I use as a base:
- 2 Quart/Litres of Water
- 3.5 oz / 100 grams sea salt
- 0.35 oz / 10 grams / 2 teaspoons of pink curing salt no. 1
- 1.7 oz / 50 grams brown sugar
Pink Curing Salt No.1 = 5 grams / 1 teaspoon per quart/liter of water
Length of Time in the Brine
A minimum of 10 days, up to 2 weeks, is good for complete curing.
Equilibrium Curing Bacon Calculator Tool (or any Meat Curing)
I created an equilibrium curing calculator to make it simple for anyone
Comparing wet and dry curing, I wrote about both of these here.
Equilibrium curing is something I’ve been using for dry-curing meats, like more classic Italian Salumi. It took over the way that I cured bacon or when I did a pancetta-style bacon.
This is really just a little bit of a calculation to work out the ratios. Once it’s done and recorded, it’s pretty straightforward.
The most important thing you can remember is that the total amount of saltiness will include the pink curing salt (@ the recommended 0.25% pink curing salt quantity to the total weight).
So, for example, you are aiming for 2% total salt to the weight of the meat. Then I would use 1.75% sea salt +0.25% pink curing salt.
So, if you want to check out some scales, here is a page that does a good job.
For wet curing
2 tablespoons or 27 grams = 4 cups or 1 quart or 1 liter of water
So if you you are making more brine, just double the recipe, etc. It is a good idea to put the pork in the container and pour some water in first to determine how much brine you need. Then make the brine amount based on that.
2. Wash off Cure
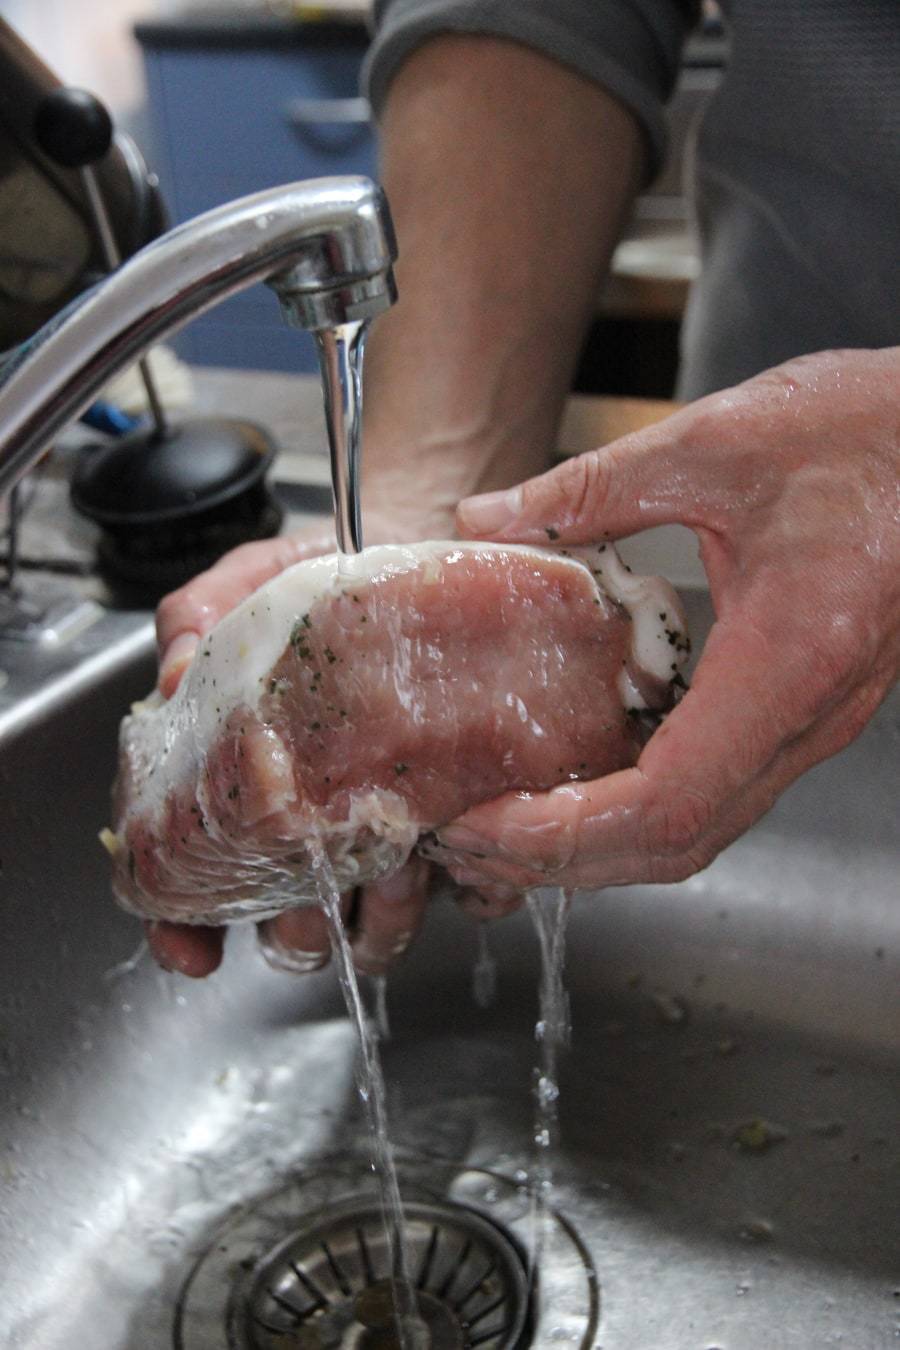
Regardless of the method above, you want a firmed-up piece of pork ready for a good rinse after the allotted time.
I have always used tap water to take off most of the cure. I rinse for 2-3 minutes and rub off most of the spices I see.
Optional – Spice Layer
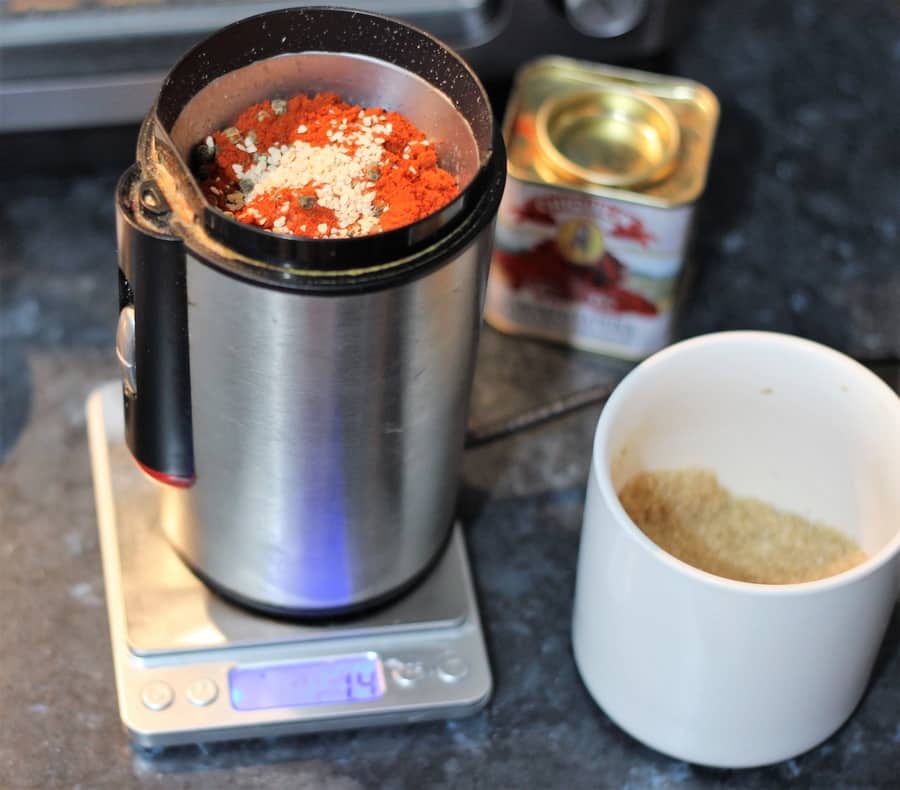
Whilst the meat is still a bit wet from the rinsing, this is a good time to give the bacon a flavor hit if you want. When I combine spices, I get pretty excited and love to vary the combinations. Spice grinders (coffee grinders) are really useful for this.
I generally follow some basic rules, but I just throw everything in the
I always use cracked pepper unless I have to appeal to someone’s sweet tooth. Real maple syrup can get lathered in sometimes, so I won’t use pepper.
Other common spices I like to pack on:
- smoked paprika
- garlic powder
- finely ground bay leaves
- finely ground up clove (like 1 or 2 max)
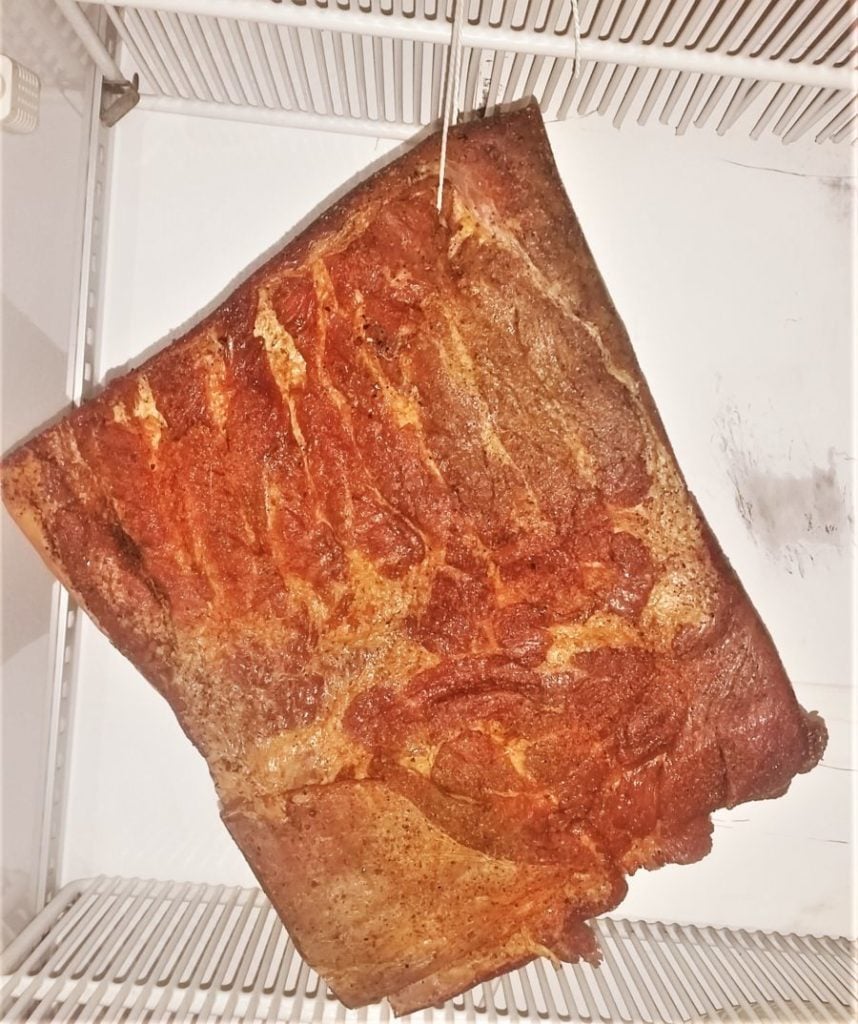
3. Dry the Bacon
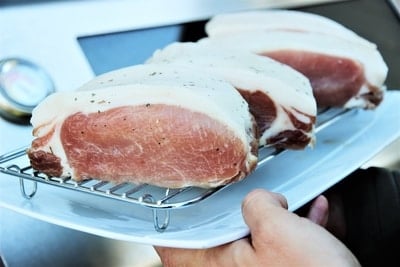
Whether you are smoking or not, it is important to leave the pork belly uncovered in the fridge for at least one day. This will firm up and dry out the belly, intensifying the flavor more.
The pellicle allows the smoke to stick to the meat more easily. This is especially important for hot-smoked bacon, which is smoked/cooked over a shorter period of time.
Green Un-smoked Bacon
Unsmoked can still have great flavor if you don’t have a smoker or don’t want to use one (I wrote about the easiest smokers here, if you are interested).
I use Spanish smoked paprika to add another layer of flavor and make it baconier.
This can be done in a cold cellar or a normal kitchen fridge. Using a cooling rack to do this.
4. Cold or Hot Smoke the Cured Pork
If you are smoking your pork, here is a quick guide on how I like to hot or cold smoke.
Cold vs Hot Smoked Bacon article here to clarify what you might prefer.
How to Hot Smoke Bacon
- Complete the drying or pellicle formation on the surface
- Use a thermometer to get the
hot smoker to 200°F/95°C - Smoke until the internal temperature of 150°F/65°C
- Storing bacon in a
container overnight will intensify thesmoke flavor
Generally, most pork I have smoked, either with charcoal (snake method), electric, or pellet smoker, will take 2 1/2 to 3 3/15 hours, depending on temperature.
Its indirect hot smoking or low & slow bbq style smoking
If you haven’t smoked food before, I have a beginner’s guide to smoking to introduce the basics; check it out here.
Smoking bacon is much easier when hot smoking; it is shorter, and pretty much everyone cooks the bacon while adding some smoke flavor. I then refry it up when I want to serve it.
Putting the fridge wrapped up for at least half a day intensifies the smoke flavor.
Cold Smoking Bacon
How to Cold Smoke Bacon
- Make sure smoke is out of the direct sun
- Start the smoke-generating device
- The temperature of smoker under 30°C,
pre ferably 20-25°C - Put in a
container & refrigerate overnight if continuing smoking - Cold smoke for 1 to 7 days, approximately 4-8 hour sessions
- 10-20% weight loss is expected
, and bacon will be dry so it can be preserved slightly also
Cold-smoked bacon is the real deal; it generally takes longer, but the equipment you can use is super basic.
To cold smoke bacon properly, it’s about cold smoking until it has dried out thoroughly since you’re getting to a point where bacon has dried enough to be preserved. This is an ancient traditional form of preserving.
Often it gets asked whether cold smoking is safe, I wrote a complete article on it here.
I like to do it in winter since you have to have a maximum temperature of 30°C/86°F. That is the upper end since things can start to cook around that temperature, and it’s also when bacteria multiply.
So I like to cold smoke around 59°F/20°C; humidity is another factor that seems to come into play with cold smoking. I read an old smoking book called Home Smoking & Curing by Keith Erlandson, which talks about humidity factors in the commercial smoking industry. Since you are drying out the bacon, you ideally want lower humidity.
For an article specifically about cold smoked bacon, check it out here.
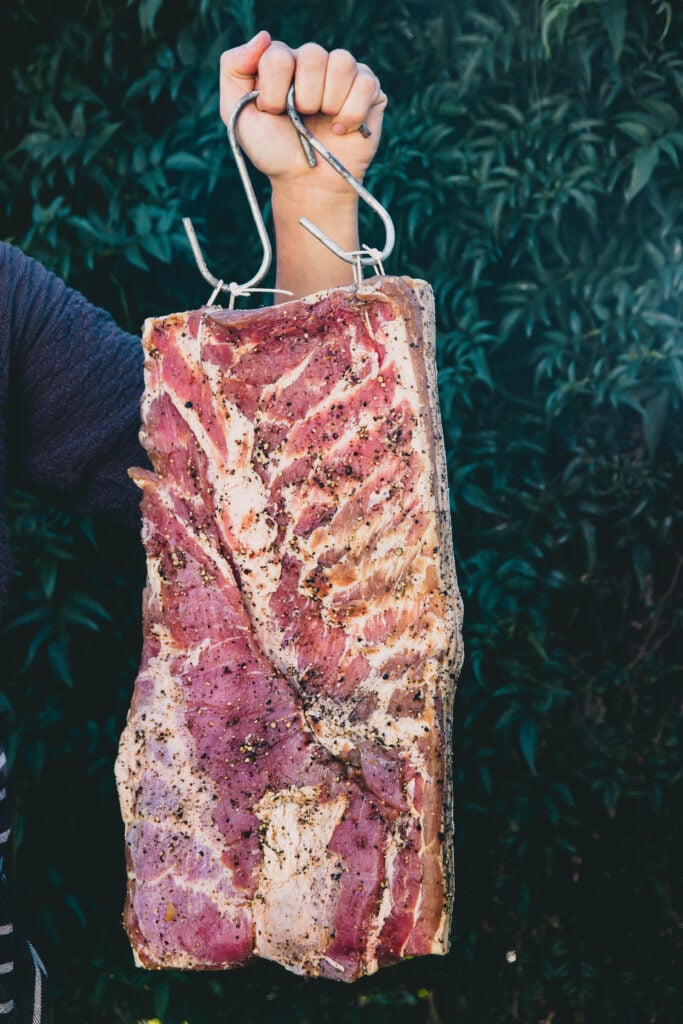
Store to Intensify the Smoke Flavor
I like to let the bacon rest for a few days in the fridge after smoking it, and then I get the deli slicer out to cut and package it.
Worth letting the smoke permeate after smoking; it always tastes better.
Different Pork Cuts for Bacon
Streaky is classic, but there are other styles!
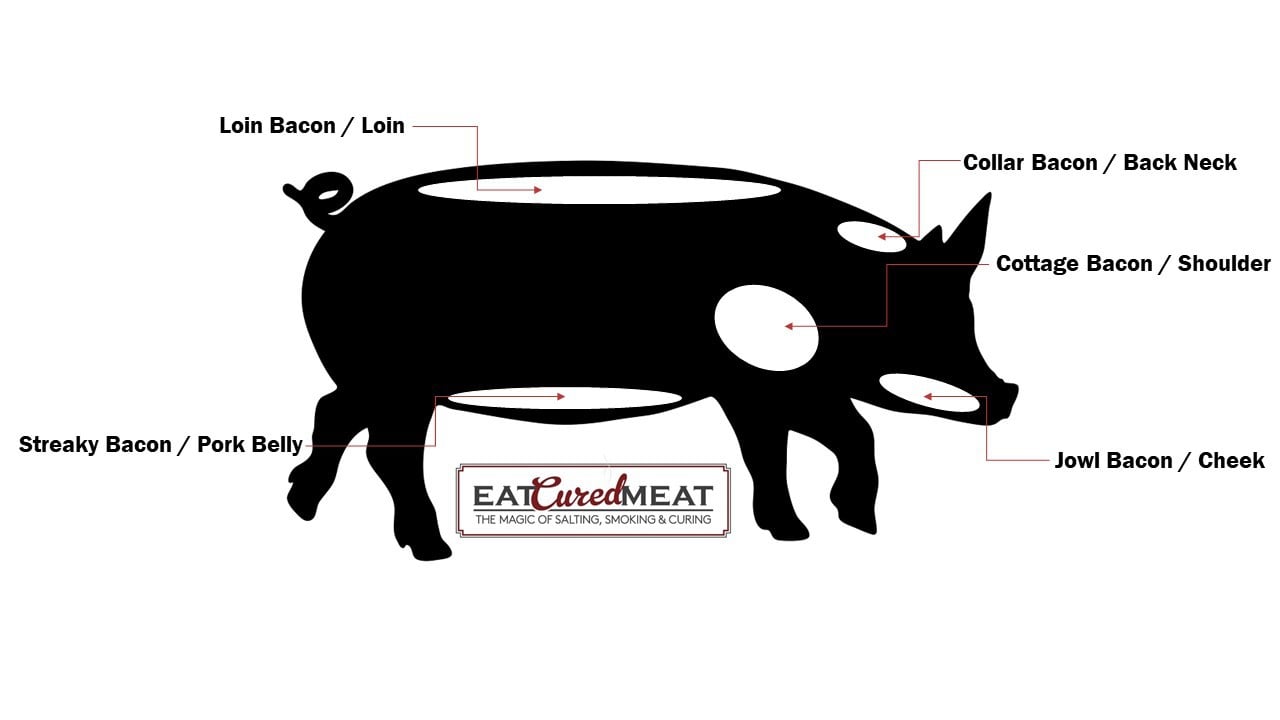
Streaky / Side Bacon (Pork Belly)
Pork belly (streaky or side) bacon is the most common, and I get excited just typing it. It has a much higher fat content than loin (back) bacon. That is probably why many people enjoy it so thoroughly.
Being quite narrow, it cures nicely and easily, too.
Loin Bacon (Back)
The leaner cut typically has a streak of fat and more meat. I also like to make loin bacon quite often.
Middle Bacon (Back & Belly)
A combination of streaky and loin bacon, connected. It’s a nice decent size, too.
Jowl Bacon (Cheek)
Full of flavor, you won’t easily find this cut of meat unless you are butchering your pig or know someone who is
Cottage Bacon (Shoulder)
There are lots of flavors, too, and no solid fat runs as many other cuts. I find a fair bit of marbling in this cut of bacon, though. Great flavor from this working muscle.
Gigot Bacon (Leg)
This muscle gets a lot of work. It is very lean. It produces solid runs of meat and has the lowest fat content compared to other bacon cuts. I have only encountered this in the United Kingdom.
So many people seem to think of only streaky, but these various cuts of pork can produce quite nice variations in flavor, even using the same curing recipe.
The texture varies a lot too I have found between cuts when making bacon (here are some other cuts I wrote about) variations.
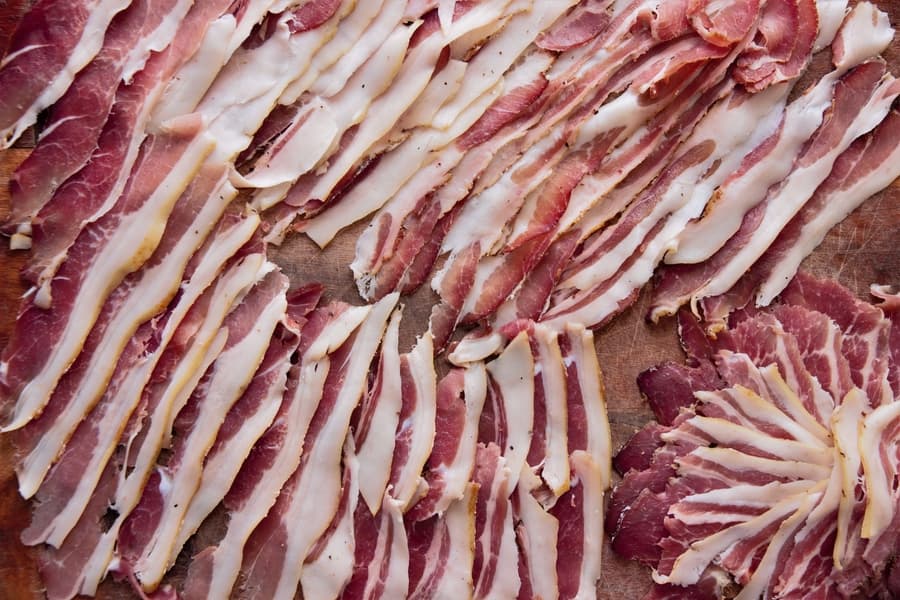
Best Ways to Slice Bacon
One way to get bacon firmer is to throw it in the freezer for 30 minutes, which makes it easier to slice.
I have a Sirman slicer, which does a fantastic job. If it’s a small patch, I use a ham knife (or brisket knife). I did a page on some decent cured meat knives I use often; check them out here.
Bacon Rind – Skin On or Off
I have tried both options; the skin can actually be super useful for flavoring soups and casseroles if it’s part of the finished product. So, keeping it on can make it useful later; once the bacon is finished, I chop up the rind and freeze it in a bag for later on.
For an article on the 4 ways you can make smoky bacon, even without a smoker check out this article.
Cold smoking and Hot smoking bacon, and how do they affect flavor and preservation?
Since hot smoking is cooking, and cold smoking is drying. Cold Smoke bacon has more potential shelf life, it may also last outside the fridge for weeks or months in a moderately cool environment and when cured effectively to start with
What are the Benefits of Equilibrium Curing Bacon?
Choosing the level of saltiness, Flexibility with time in the cure, precision, and repeatability of the recipe.
What is the Essential Beginner equipment for Making Bacon
An indirect smoker for low-temperature smoking or a simple cold smoker with a suitable smoke chamber with airflow. Alternatively, liquid smoke can be used instead of a smoker to create the smoke flavor without a smoker.
I look forward to hearing about your success and learnings. Feel free to leave a comment below; I always read them.

Tom Mueller
For decades, immersed in studying, working, learning, and teaching the craft of meat curing, sharing the passion and showcasing the world of charcuterie and smoked meat. Read More
Tom — Enjoyed the website. I just hot smoked my first pork belly using the salt box/dry method. The finished bacon tasted wonderful as far as smoke and spices, but it was way, way too salty. I thought I rinsed it well before smoking. Is there anything I can do to reduce the saltiness in the finished bacon? I will do this again and try the equilibrium method. Thanks
Howdy – Saturation/Saltbox was mainly used for long term dry curing (like prosciutto), not cooking/smoking. With Salt Pork/Beef/Fish which is heavily salted to preserve it, you simmer in water or soak it. You could try the same I guess, but it’s just a guess! Cheers Tom
very insightful and good reading Tom, always appreciate enthusiast people,
will try my hand a bit and make use of your learning curve,
all the best from Holland,
Fer
Thanks Ferry, I have some bacon smoking right now 😉 hickory – and my garlic/juniper recipe.