You can make bacon without a smoker, and I have a technique and process below for those that do not have a smoker!
I’ve been curing and smoking bacon and other cured meats for decades. Since this site eat cured meat is my passion project. I know not everyone has a backyard or a smoker, so this method will get you the outcome you desire.
Bacon without a smoker is all about curing with some salty, sweetness and of course getting that smoke flavor happening as well in my opinion.
To make bacon without a smoker first, use a salt dry cure method to perform the salt curing of the pork. Then, use a quality liquid smoke brush before and after curing. Once the bacon has dried, smoky bacon without a smoker can be achieved.
I’ve put together an online bacon course, and one method in it, I will explain in detail using salt curing and liquid smoke to achieve a decent smokey/sweet bacon for yourself.
Making Smoked Bacon Without Smoker
First the steps and then an explanation of each step.
- Pork or Meat Selection
- Curing
- Curing Time
- Liquid Smoke Coat & Hanging/Drying
- Weight Loss and Drying Time
- Slicing and Storage
This is a very similar process to making dry-cured bacon with the smoke flavor – I’m going to give you an accurate curing method too that really is a game-changer.
The details and process are probably one of the biggest differences between a recipe for cooking and a recipe and the craft/process for dry curing.
Pork or Meat Selection
The obvious choice for making bacon (other cuts I wrote about here) is using pork belly, and what makes bacon is fat so of course, you want a reasonably good ratio of meat to fat.
However, there are many variations in the world like Canadian bacon which is a wet brined/hot smoked pork loin (more hammy bacon).
In the United Kingdom shoulder bacon is popular, and for many of the pigs that I have processed I have noticed the shoulder is good since it has a fair amount of fat throughout it.
Because of the square or rectangular shape of the pork belly, this can make it easier if you are placing it in a ziploc or vacuum-packed bag. Or even if you are using a Tupperware container during the curing process.
I’ve used wild boar and some other leaner types of meat that aren’t pork. The thing about using pork for bacon is the fat is generally quite neutral this is the same for making salami. Things like lamb or beef fat over much stronger flavor in my experience. When you use a dry curing method, you are always intensifying the flavor of the meat, however, adding smoke flavor does overwhelm aspects of it.
Skin – On or Off
Quite often I like to make bacon with skin on, once it has dried I’ve been taking a bit of time to cut it off, The hard skin, we cut into chunks and then put it in a bag. Freezing it so and using it to add flavor to stocks, stews, and broths.
Skin does create a barrier for the curing, but if you’re equilibrium curing and you’re following this method it won’t be an issue, as long as you give it enough time in the cure.
Just be very careful if you are going to take the skin off before curing your pork, makes slicing easier. Some prefer the rind/skin on!
Curing
Some calculations are below but what you’re really looking at doing is working out the:
salt percentage to the weight of the meat
This is called equilibrium curing, and it is the cornerstone of getting accurate curing to make sure that you have enough salt two inhibit and create that bacon flavor.
As opposed to surrounding the pork with salt and then draining off the water that accumulates in a container, that has being sucked out of the meat by the salt.
Equilibrium curing creates an equalizing type of wet cure inside the bag where you place the meat in it.
This allows some precision and curing so you can choose the level of saltiness for instance.
This is a really good base to start from:
2.5% Salt – 1.5 Tablespoons
1.25% Sugar .75 Table Spoon
Additionally –
0.75 garlic powder Tablespoon
0.75 Any other dried spice
Per 1 kg / 1000 grams of Meat
Formula
Salt % of the Total Weight of the Meat
Example for Bacon
2.5% salt to the weight of 1000 grams
25 grams of salt per 1000 grams of pork
1.5 Level Tablespoons per 1000 grams of pork
- Fine/Coarse sea salt will take up different volumes (why weighing is more accurate)
- metric calculations make this much easier
Salt Seasoning Vs Salt Curing
If you think in terms of seasoning a dish rather than salt curing, you could say 0 to 0.5% added to meat for seasoning.
For dry curing, like for this bacon – 2% up to 3% is what I use. Some use 3-5%, but I find this too salty.
What I’m trying to say here is there is salt for flavor versus salt for flavor and curing without being too salty.
Key to Succesful Salt Curing with Liquid Smoke
Equilibrium curing – it’s about having enough salt cure as I said without being too salty.
You have to let the salt and other spices and sweetness get into the pork. Then the smoke!
The spice cure is in a way like marinating the meat flavor.
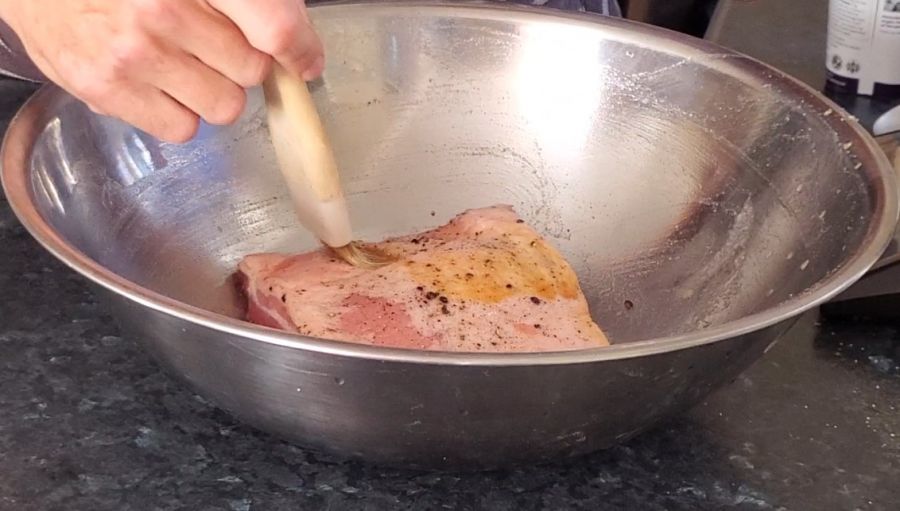
What I like to do is a very thin coat of liquid smoke before I place the equilibrium cured pork and a bag or vacuum packed. This will start the smoke flavor being inhibited in the pork.
Curing Time
I like to go by an easy guide of 5 days per inch thick of pork belly
What is great about equilibrium curing, it doesn’t matter if you leave it for a much longer period of time. An extra week or two will make no difference since there is an amount of salt that will disperse through the meat.
One thing I’ve noticed is in New Zealand where I am based, a lot of the pork does not have much fat because the pigs are slaughtered at a younger age.
Fat has much less water content in it, so takes longer for salt equilibrium curing to occur if there is an excessive amount of fat – say 70% plus compared to 30% meat. This type of product is like a smoked speck famous in many parts of Europe.
Liquid Smoke Coat & Hanging/Drying
Another incredibly translucent coating with a brush of liquid smoke before the hanging/drying or just another layer of smokiness is what I like to do.
It also depends on the type of liquid smoke wood you’re using. Often I have seen the stronger types like hickory or mesquite which are stronger in flavor and great for bacon.
Whether it is naturally created liquid smoke, which is in a way the condensation that is created from smoking wood (I wrote about different woods for smoking in this article). I watched a whole bunch of YouTube videos about it, but I decided to actually buy some good quality liquid smoke for the recent batch which turned out very nice.
You can get away with drying the bacon on a nonreactive rack inside your normal kitchen fridge.
If you’re in most areas of the world in winter you could potentially also just hang meat somewhere so that the bugs won’t get at it – like a garage or cellar.
But if this is your first time, I would recommend you place the pork belly just on a non-reactive rack with a tray underneath in your fridge -uncovered. Because the humidity will be quite low in your fridge 1 to 2 weeks will be enough to dry it out a little bit before you can slice and fry this bad boy.
You don’t want hard dryness on the outside, just a firmer touch. Keep an eye on it every 2-3 days, since ‘case hardening’ or excessive drying can happen faster in some fridges.
Why I Use Dry Cure Instead of Wet Cure
I have always found that using a wet cure or brine for making bacon would generally mean not-so-intense flavor because you’re diluting with water added to the cure.
Which ends up binding some of the water inside the pork. This helps if you’re using a method of hot smoking (sometimes this is why people say the bacon tastes like ham – I wrote about the difference here) the bacon, or cooking bacon to an internal temperature. Because as the meat cooks at a low temperature, it’s retaining moisture.
However, I would not use this for making liquid smoke bacon, because you want the smoke flavor to come through stronger and I have found that if you dry cure using this method I’ve explained, you’ll get a a lot more smoke flavor!
Weight Loss and Drying Time
I have started slicing my bacon after only for 5% or 10% weight loss before slicing and frying is bacon and that’s perfectly fine. Most people prefer about 10 to 20% weight loss.
What are you doing with drying you’re bacon is intensifying the flavor of the salt sugar and liquid smoke inside of it.
So you at least want some level of drying to occur first.
Key to Successful Drying of Bacon
As long as you just leave the pork to do its thing you can expect the bacon to be done within one to two weeks in the fridge.
If you were to hang it in the cellar or basement you can leave it for 2 to 4 weeks depending on the temperature and the amount of airflow.
Using 2% salt to the weight of the meat up to 3% salt, and giving it enough time in the bag to fully salt cure will me this product has enough salt for preserving either short or long-term.
To give you some idea I will use 2.5% salt to make Italian pancetta, which is a dry-cured product using pork belly and spices.
The difference is that the weight loss is about 30 to 40%, and then the finished dry-cured pancetta is sliced wafer-thin and enjoyed on charcuterie boards for in the more classic context antipasti board.
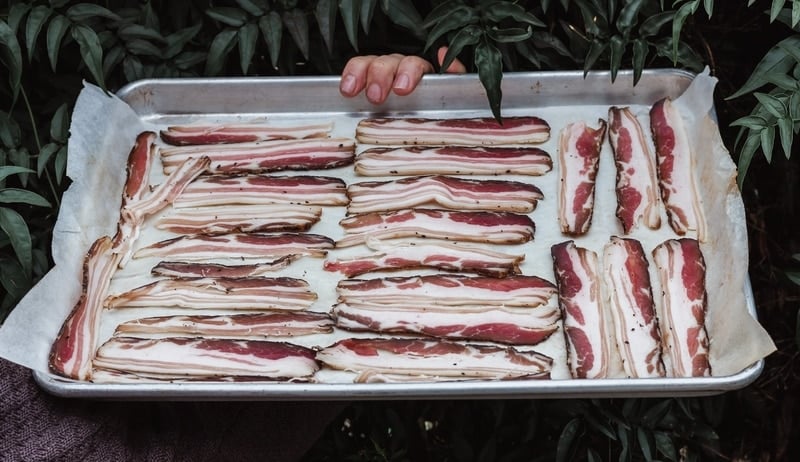
Slicing and Storage
Since you’ll have a salt-cured preserved product, you can leave it hanging and just take slices often as I say only in the cooler months I’m talking about in around 50 to 60°F or 10 to 15°C. It will dry out fast in the fridge, however.
But what I’ve come to do in the last few years, is use a chef’s knife or brisket knife to slice up the bacon and then place it on baking paper on oven trays. And because I’ve got a reasonable size chest freezer, I just freeze individual slices on trays, once they are frozen put them in a bag and they don’t stick.
when I want to fry some bacon, I can just throw the frozen slices straight into a pan and within a few seconds it defrosted and they start sizzling up.
Just to conclude a few notes:
There are many ways to make bacon, but I’ve found this to be straightforward and we don’t really need a lot of stuff or equipment as long as he can get your hands on some good liquid smoke and have a rack for the fridge drying.
You do want a digital scale that’s accurate to at least one decimal place (X.0) to get the precision of equilibrium curing.
Using regular sea salt with no additives is always the best as well as anticaking agents or iodized.
Due to the different shapes and sizes of sea salt, weighing it accurately helps get that precision.
But if you don’t want to get an accurate digital scale then you could start off with a leveled tablespoon
per 1000 grams or 2 pounds of meat = 15grams per tablespoon = 1.5 = 22.5 grams of salt per 1000 grams.

Tom Mueller
For decades, immersed in studying, working, learning, and teaching the craft of meat curing, sharing the passion and showcasing the world of charcuterie and smoked meat. Read More
Hi, I’m considering doing this with boneless chicken thighs. What are your thoughts?
I would only dry cure for a few days, and then cook whole in the oven at 200° until safe temperature, then slice and eat, or slice first and then fry.
HEY! sure if you cook it, you will avoid issues of higher (potential) bacterial count in chicken.
Hi
We apparently purchased 100% uncured bacon and quite a bit of it. I want to find a way to add sweet/salty/smoky flavor without the intense curing process? Any ideas? Help!
cold smoke! if the surface is dry, many ways to cold smoke – here’s a link –
Many recommend baking the dried bacon to an internal temp of 150° f. Before slicing / frying / storage. Could you please give us your opinion on this?
Hi, thats hot smoked bacon/or with liquid smoke/baking acheiving a similar result! Cooking low temp so fat doesnt render – Mr Bacon Baker – Regards,
Tom