Over many years, I’ve converted all kinds of fridges into dry curing chambers — from compact wine coolers to large commercial bar units. Each build has been a step forward in refining how I create the ideal curing environment, and I’ve shared these experiences with many others in the meat curing community and helped friends.
The goal is always the same: to maintain stable temperature and humidity (with airflow) for weeks or months at a time so meat can dry and develop flavour safely.
Fridges make an excellent foundation for meat curing (full steps and guide for salt dry curing here) because they’re already insulated, energy efficient, and designed to hold a steady temperature. With the right components, you can adapt almost any fridge into a chamber that works year-round, regardless of the weather outside.
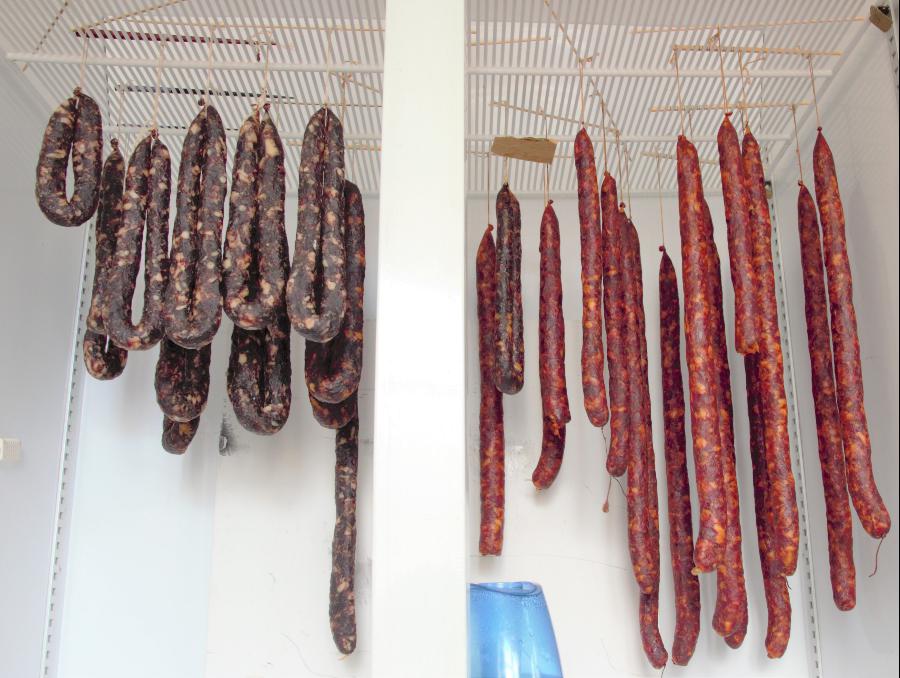
Whether you want to make dry cured whole muscle, salami, or explore different charcuterie styles, a converted fridge offers full environmental control — something a shed or cellar can’t always provide consistently.
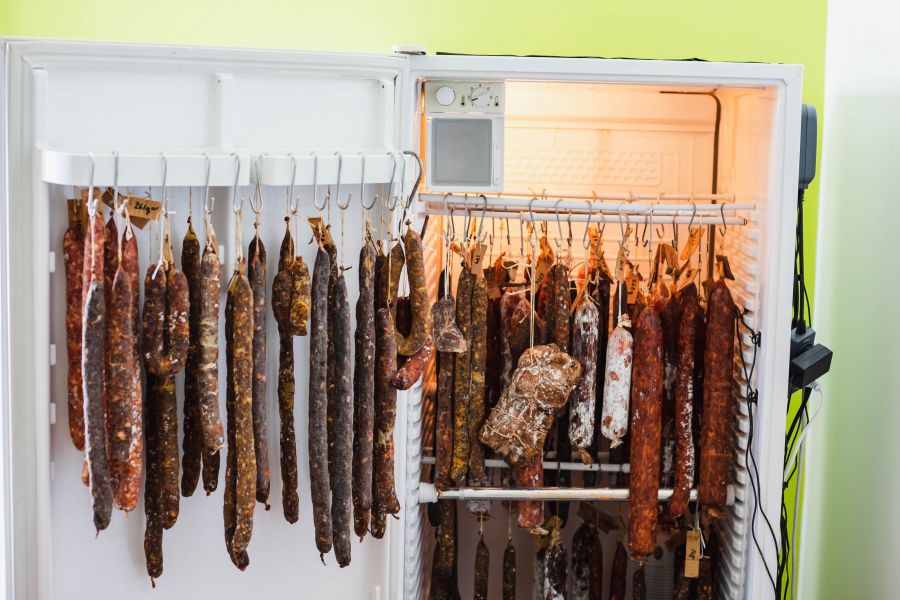
My first build was a used commercial double-door fridge that I picked up for a few hundred dollars. Since then, I’ve experimented with six different designs, learning how minor adjustments to airflow, humidity, or hanging space can make a big difference to the end result. This guide distills those lessons so you can start your build with confidence, here is that fridge below:
Key Components of a Curing Chamber
While the fridge itself forms the base of the chamber, the real magic comes from adding components that let you control and balance the environment inside. The core setup can be pretty simple, but there are a few essentials that every build needs:
- Temperature control — using a controller to switch the fridge compressor on and off within the curing range.
- Humidity control — maintaining 70–80% relative humidity with a humidifier, dehumidifier, or both.
- Airflow — ensuring fresh, filtered air exchange and gentle circulation inside the chamber.
- Hanging space — rods, brackets, or racks for keeping meat suspended and free from surface contact.
- Cleaning and maintenance access — designing the interior so that equipment can be cleaned regularly to prevent unwanted mold or bacteria.
These core elements work together to avoid problems like case hardening — where the outside dries too quickly — and to keep conditions stable from start to finish. In the next section, we’ll look at how to choose the right fridge or wine cooler as the starting point for your chamber.
Choosing the Right Fridge or Wine Cooler
Used Fridge vs. Wine Fridge
A second-hand full-size fridge is usually the most practical option — it’s easy to find, affordable, and gives you the space for whole muscle cuts, large batches of salami, or mixed projects. Wine fridges, especially those with a “red wine” setting, can naturally sit around 55–65°F (12–16°C), which is already close to ideal curing temperatures.
If you’re not ready to invest in a full chamber build, you can still learn the basics by curing meat in a regular fridge without modifying it. This approach is perfect for testing how temperature and humidity interact before committing to a dedicated conversion.
Ideal Fridge Features for Curing
- No freezer compartment – maximises hanging space and avoids complex cutting or pipe work.
- Frost-free design – simplifies humidity control compared to models with cooling panels at the back.
- Good door seals – are essential for maintaining consistent conditions.
- Solid interior walls – make it easier to mount brackets or racks securely.
Even with the right fridge, most models will still need environmental controls to reach the target 70–80% humidity and 50–60°F (10–15°C) range. Without a humidifier or dehumidifier, frost-free units typically run too dry for curing.
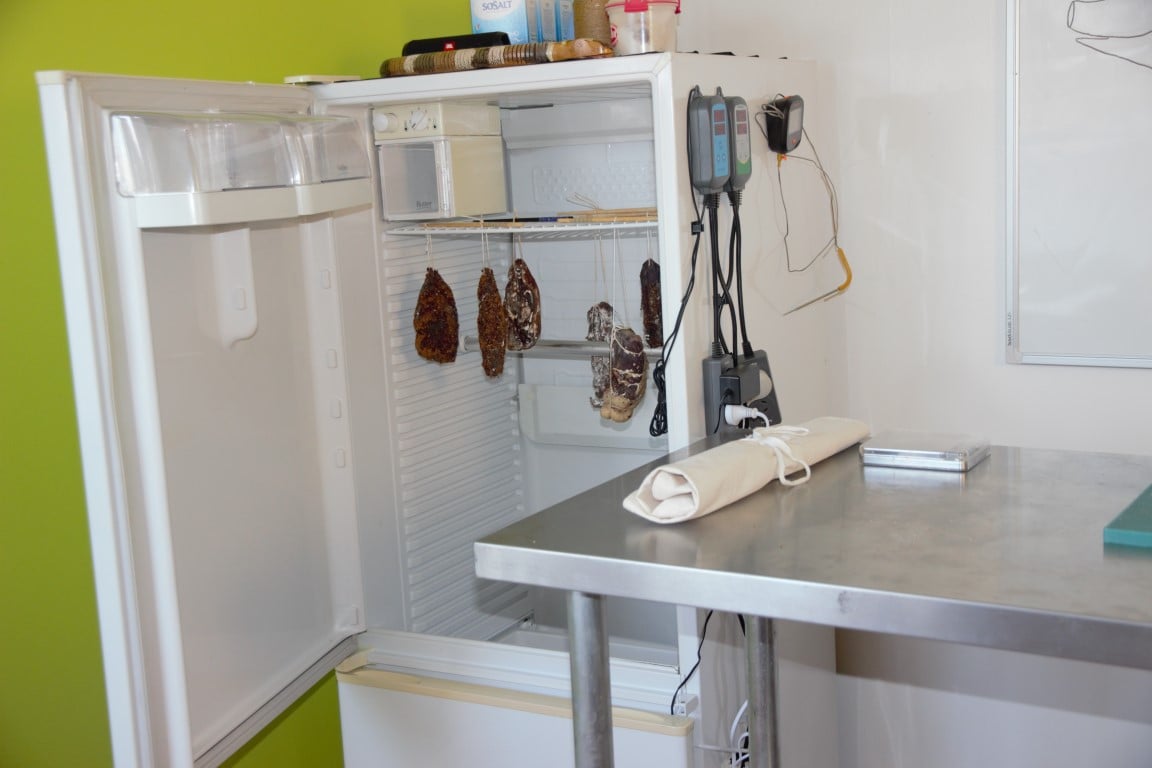
The fridge below was not a frost-free, you can see the cooling panel on the back, it often has water condensation on it, it makes balancing the environment alot more challenging, especially when we had 160lbs/80 kg to dry!
Some of the finished results, I had a leg of wild cattebeast which went into alot of this:
(An interesting story, clearing out wild bovine from a forestry block on a farm, helicopter and truck used to carry 2x 1000lb animals out)


Alternative Locations (Cellar, Garage, Shed)
Before buying a fridge, it’s worth checking if you already have a naturally cool, humid environment you could use. A cellar, basement, or shaded garage can work for part of the year, especially in cooler climates.
The drawback is that seasonal changes and weather fluctuations can throw off your curing schedule, making it harder to achieve consistent results.
For predictable, year-round curing, a converted fridge remains the most reliable choice. If you want to understand the full budget range for this kind of setup, see my cost breakdown of a curing chamber. You might be surprised at how little the difference is between a basic setup and a fully kitted-out build.
Next, we’ll go through the essential design factors that make or break a curing chamber — temperature, humidity, and airflow — and how to control each one effectively.
Essential Design Factors
Temperature Control
The sweet spot for most dry-cured meats is between 50–60°F (10–15°C). Within this range, drying happens slowly enough to preserve texture and flavour while reducing the risk of spoilage. Lower temperatures slow the process, while higher ones can encourage unwanted bacterial growth or cause the exterior to harden too quickly.
Choosing a Temperature Controller
Most fridges can’t maintain these curing temperatures on their own — even at their warmest setting, they often run below 45°F (7°C). A temperature controller overrides the fridge’s thermostat, cycling the compressor on and off to keep conditions where you want them. For detailed guidance, see my article on how temperature and humidity are key to balancing the system.
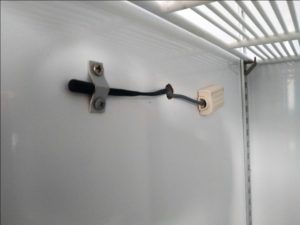
When positioning the sensor, place it around the middle of the chamber to get an accurate reading. Avoid placing it directly in front of the cooling vent or too close to the walls, as these spots can give misleading results.
Humidity Control
Target Ranges
Humidity plays just as significant a role as temperature.
Too low, and the meat will dry unevenly with a hard exterior; too high, and you risk unwanted mold or spoilage.
The ideal range is 70–80%, with a tolerance of about ±5%. This keeps drying gradually, allowing moisture to escape evenly from the center to the surface.
Remember, though this isn’t a precision task, some variations is fine.
Humidifier and Dehumidifier Placement
In a frost-free fridge, the air will be dehydrated without added humidity. An ultrasonic humidifier provides a fine mist without heating the air, helping maintain your target range. Placing it inside the fridge is easiest, but if space is tight, you can position it outside and pipe the mist in — just keep in mind that the tubing will need regular cleaning to prevent mold buildup.
If you live in a naturally humid climate or use a non-frost-free fridge, you may need a dehumidifier instead. In either case, check the unit’s tank size so you’re not constantly emptying or refilling it. Many people find that weekly maintenance is enough once the chamber stabilises.
Airflow Management
Fans and Ventilation
Gentle, controlled airflow prevents stagnant air pockets and helps maintain even drying conditions. A small fan running for just a few minutes a day is often enough for a standard kitchen fridge conversion. More airflow isn’t always better — too much can dry the surface too quickly.
Filtering Incoming Air
Any fresh air entering the chamber should be filtered to keep insects and dust out. I’ve had good results using repurposed HEPA vacuum filters, which are easy to cut and fit over an intake vent. This protects the beneficial white penicillin mold that will naturally establish itself in a well-maintained chamber.
Next, we’ll cover the different hanging rack and hook options, so you can make the most of the space inside your curing chamber.
Hanging Rack & Hook Options
Brackets, Rods, and Expandable Bars
How you hang your meat inside the chamber is just as important as how you control temperature and humidity. Hanging allows for better airflow around each piece, reduces surface contact, and makes it easier to check progress or weigh cuts during curing. I’ve used a variety of setups over the years, from heavy-duty metal L-brackets mounted to the sides of the fridge, to sliding rods that can be removed when loading or unloading meat.
Expandable shower curtain rods can also work surprisingly well. They’re quick to install, require no drilling, and can hold a reasonable amount of weight when fully extended. For smaller fridges or wine coolers, a single rod mounted high up can maximise vertical space and make the most of the available area.

Maximizing Space for Large Batches
When working with a large quantity of meat — such as after processing a whole animal — space efficiency becomes crucial. I’ve filled a chamber with over 75 individual salami before, and planning the hanging layout was the only way to make it work. Drilling small holes in the door’s condiment shelves allowed me to thread extra hooks through and take advantage of every inch of available space.
For high-volume curing, it’s worth investing in sturdy hanging hardware and hooks that can be removed quickly for weighing or rotating pieces. This is especially important when you’re working with varied products, as smaller items may finish curing earlier and need to be taken out without disturbing the rest.
If you’re still planning your chamber build and haven’t decided on hanging hardware, take a look at my guide on what equipment you need for meat curing. It covers both essential and optional gear, allowing you to choose what works best for your space and curing style.
Next, we’ll go over controller options, looking at the difference between plug-and-play units and hardwired systems, and when each makes sense for a curing chamber.
Controller Options
Plug-and-Play Controllers (Beginner-Friendly)
When I first started converting fridges into curing chambers, plug-and-play controllers didn’t exist. These days, they make the process far easier for beginners — you simply plug your fridge, humidifier, or dehumidifier into the controller, set your target range, and let it do the work. This simplicity means you can have a functioning chamber up and running in just a few hours, without the need for electrical wiring skills.
Many plug-and-play units now include Wi-Fi connectivity, allowing you to monitor and adjust your chamber from your phone. They’re an ideal choice if you want to start curing quickly and learn the finer points of environmental control as you go. The main limitation is that each controller is dedicated to a single function, so you may need multiple units to manage both temperature and humidity.
Hardwired Controllers (Advanced Builds)
For those comfortable with electrical work, hardwired controllers offer a more integrated and durable solution. These controllers are mounted in an enclosure, with wiring directly connecting them to the fridge, humidifier, dehumidifier, and fans. They’re the kind of setup you might see in commercial curing rooms or butcher shops, where reliability and long-term performance are critical.
The trade-off is that hardwired controllers are less beginner-friendly and require either electrical skills or help from an electrician. Programming can also be more complex, with multiple parameters to set for upper and lower thresholds, cycle delays, and hysteresis. Once dialled in, however, they provide rock-solid stability and fewer external components cluttering the space around your fridge.

In the next section, we’ll go through the step-by-step process of assembling your chamber and balancing the environment before adding any meat.
Step-by-Step Assembly & Setup
Cleaning and Preparing the Fridge
Before any equipment goes in, the fridge needs a thorough clean. I recommend wiping the entire interior with diluted bleach or plain vinegar to start with a sterile environment. This helps prevent unwanted bacteria from taking hold before your beneficial mold establishes itself. Over time, this “good” mold becomes a natural part of your curing environment, helping protect your meat and improve flavour.
If you’re not familiar with the difference between good and unwanted mold, see my guide on good and bad molds on cured meat. Understanding this early will save you from unnecessary panic the first time you see white bloom forming on your salami.
For the best results, switch off and unplug the fridge during cleaning, and remove all shelves and drawers. These can be cleaned separately before reinstalling or replacing them with your hanging system.
Installing and Connecting Components
Start by positioning your temperature and humidity controllers outside the fridge for easy access. Run the sensor probes inside through the door seal if possible — this avoids drilling into insulated walls, which can damage coolant lines. Place the temperature probe in the middle of the chamber and the humidity probe away from direct mist output or vents to get the most accurate readings.
Next, install your humidifier and/or dehumidifier, making sure the mist or airflow isn’t directed straight at the meat. If you’re using a fan for airflow, mount it where it can move air gently across the chamber without blowing directly on the meat’s surface.
A fan can be used to ‘draw’ air out, thise may suffice.
Hanging racks or rods should be secured before adding any electrical gear to avoid knocking components out of place. Test their stability with some weight before trusting them with your first batch of meat.
Balancing and Maintaining the Environment
Humidity Fine-Tuning
Even with a controller, humidity will fluctuate slightly throughout the day. I aim for around 75% relative humidity, allowing a margin of ±5% without concern. The key is slow, steady drying — sudden drops can cause the exterior of the meat to harden before the center has lost enough moisture.
Humidity needs often change as a batch progresses. Early in the curing process, higher humidity helps prevent case hardening, while later stages can tolerate slightly drier air.
If your humidity is too high, running the fridge compressor more frequently or using a small dehumidifier can bring it down. If it’s too low, an ultrasonic humidifier is your best option for raising it without adding heat.
Temperature Cycling & Compressor Longevity
Fridge compressors aren’t designed to run constantly, so it’s important to set your controller with a short “rest” period between cycles.
This prevents unnecessary wear and extends the life of your unit. In most builds, a 2–3 minute delay between cycles is enough to keep the temperature steady without overworking the system.
Temperature variations of 2–4°F (1–2°C) are perfectly normal and don’t harm the curing process. In fact, a little fluctuation can help move air within the chamber naturally. The goal is to stay within the 50–60°F (10–15°C) range over the long term, not to hold a perfectly static number.
Case Hardening Solutions
Case hardening happens when the surface of the meat dries too quickly, forming a barrier that traps moisture inside. If this happens, don’t panic — the meat can often be saved. My go-to method is to vacuum-seal the affected pieces and store them in a standard kitchen fridge for 4–8 weeks.
This allows the remaining internal moisture to redistribute evenly, softening the exterior in the process.
To avoid case hardening in the first place, keep your initial curing humidity high, avoid placing meat directly in the path of airflow, and ensure your chamber isn’t overcrowded. Over time, you’ll learn how small adjustments to airflow and humidity can make a big difference in the texture of the final product.
Extra Uses for a DIY Curing Chamber
Growing Mushrooms
A well-controlled curing chamber isn’t just for meat. The consistent humidity and temperature make it an excellent environment for cultivating gourmet mushrooms like oyster, shiitake, and lion’s mane.
For mushroom growing, cleanliness is even more important, as the substrate is sensitive to contamination. A wipe-down with vinegar before introducing mushroom blocks will help prevent unwanted mold or bacteria from taking hold.
Fermenting Alcohol and Foods
The stable conditions inside a curing chamber are also ideal for fermentation projects. I’ve used mine for brewing beer and making wine, as well as fermenting vegetables like sauerkraut and kimchi.
For alcoholic fermentations, temperature control is key to developing consistent flavour and avoiding off-notes caused by excessive heat or cold swings.
Fermented foods benefit from the same steady environment. The ability to hold a specific temperature for days or weeks at a time can transform your results compared to room-temperature fermentation in a fluctuating household environment.
Drying Herbs, Spices, and Vegetables
With the addition of gentle heat, your chamber can be used to dry herbs, spices, and vegetables for long-term storage or to make flavourful powders. I’ve dried chillies for homemade paprika, garlic for seasoning blends, and even tomatoes for concentrated powders.
The same airflow and humidity control that keeps meat drying evenly also helps preserve colour and aroma in plant-based foods.
When switching between meat curing and plant drying, it’s a good idea to give the chamber a deep clean. This prevents flavour carryover and ensures that different types of projects don’t affect each other’s quality.
Next, we’ll move into some expert tips that will help you maintain consistent results and avoid the most common pitfalls in curing chamber operation.
Expert Tips
Cleaning & Mold Management
Regular cleaning is one of the simplest ways to keep your curing chamber performing at its best. I recommend wiping down the humidifier and dehumidifier monthly with vinegar to prevent mold buildup. Over time, a thin layer of beneficial white mold will naturally establish itself inside the chamber — this is a good sign and part of what helps protect your meat from unwanted bacteria.
When starting a new build, you can “seed” the chamber with beneficial mold by hanging a finished salami that already has healthy white bloom. This encourages your curing environment to develop a stable, protective microflora more quickly.
Equipment Placement Strategies
Where you place your gear inside the chamber makes a big difference. Sensors should be in the middle of the fridge, away from direct airflow, while humidifiers and dehumidifiers should be positioned so their output disperses evenly without hitting the meat directly. Fans should run on short cycles, just enough to refresh the air without drying out the surface of the meat.
For large batches, arrange meat so there’s space between each piece. This ensures airflow reaches all sides and prevents moisture pockets from forming. If you have cuts of different sizes, group them together so you can remove smaller pieces as they finish without disturbing the rest of the batch.
How Much Maintenance is Needed for a DIY Dry Curing Fridge?
Monthly cleaning with vinegar is important for the humidifier and dehumidifier since mold will inevitably form. Once a layer of beneficial white mold establishes in the chamber, it can actually help protect new batches from unwanted bacteria.
What Can a DIY Dry Curing Fridge be Used for?
Besides curing meat, these chambers can be used for growing mushrooms, fermenting foods, fermenting alcohol, and — with gentle heat — drying spices, herbs, and vegetables.
What Temperature and Humidity Should I Aim For?
Aim for a temperature range of 50–60°F (10–15°C) and a humidity level of 70–80%. These ranges allow for slow, even drying and help avoid case hardening.

Tom Mueller
For decades, immersed in studying, working, learning, and teaching the craft of meat curing, sharing the passion and showcasing the world of charcuterie and smoked meat. Read More
Hi
I am a beginner on this, converting a fridge to a drying chamber for our son. I found your article the most helpful so far, easy to read, not too much tech. Stuff and a clear step be step guide
The one thing I need now is to put the fridge to a test on drying a piece of meat, but where can I get some practical advise on that
Thank you a million for your article
Bob
Hey Bob, glad you found the post useful!
If you want to see if it works, it’s generally trial and error. If it was me, I would start with a small piece of meat definitely so see how it goes.
Sometimes it just takes time for ‘natural’ white powdery penicillin to grow inside the curing chamber. But if you get a little bit of non-‘flour’ looking mold, you just wipe off whatever else with some vinegar.
If the curing chamber can operate around 70% humidity (variation of 5-10% doesn’t matter too much) and you can keep the temperature around 52F / 11C (some variation doesn’t matter either – 2-4 C deg or + or – 35 deg F. You will be on to the right track. Whenever you put in new cured meat, obviously the humidity will be higher due to moisture on the meat.
This post may help if you haven’t seen it – How to Cure Meat at Home
Hope this helps,
Tom
Thanks for the article. I am following your suggestions and have ordered the relevant bits and pieces. This will be my first attempt at Salamy etc. Your directions are simple and easy to understand. Thanks again. Lockie
Hi Lockie,
Hey thanks, heaps, appreciate your comment and glad its be helpful.:-)
If you need any help, just fire through the questions.
All the best,
Tom
Hi, this is a great article and website, thanks for making it!
i’ve just set my curing chamber up but having problems with the humidity controller (WH8040, i think the same as linked), it just displays the HHH error but i can’t for the life of me find anything in the instructions or online on how to fix that. Any advice would be greatly appreciated.
Cheers
Hey Patrick, I dug this up for you -….” PU:Delay to start,When relay stop output and start timing,the interval of time must greater than delay start time to avoid start frequently.HP:temperature upper limit alarm:when temperature exceed upper limit alarm,digital tube display”HHH”,temperature lower than alarm setting it will return back from alarm automatically.”
Hi Tom,
in the section of the testing of the fridge, you give the temperature range, for Celsius i think it is okay but for Fahrenheit don’t you mean to say 52F + or – 5.4F? Because while it is true that 3 Celsius is 34F as a temperature, 1 degree Celsius change is 1.8F so 52F + or – 34F would mean that a temperature between 18F and 86F is okay. That would translate in to -7.8 Celsius to 30 Celsius. While you mean to say somewhere between 8 and 15 Celsius (which is what you do on the Celsius part of that section but not on the Fahrenheit part).
For the rest this is a wealth of information! Thank you and keep up the good work!
Thanks Laurens, I did make it confusing! I change it to a table. Did you check out the DIY curing chamber ebook? Cheers, Tom
I’m just starting out with a new curing set up but I’m finding it difficult to control the humidity during the compressor cycling. I have it set to 11C (+2/-1) and 70% (+10/-2). It takes it approx. 45-60 min for it to climb from 11 to 13C which is the upper limit that I set. during this time the humidity is fine. But once the compressor and fan kick on the humidity drops to ~58%. It jumps back up to ~75% relatively quick (few mins). I;m running it empty at the moment to get the timing down before trying bresaola. My humidifier is on the bottom. would it help to move it up in the chamber?
Any other thoughts or suggestions?
depends on the fridge/compressors. I had a commerical type that did dry out things a little fast too. Can try diffusing the fan if the compressor has one, so its not so direct. This is the variation one gets with fridges and part of the challenge!
Hello, I have a small refrigerator that I’m looking into converting I did my research and downloaded the instruction Manuel for it. The only thing concerning me is it says in the notes that if the refrigerator is turned off or unplugged at all you have to wait 3 minutes to turn it back on or it will not work. Will this be affected by the plug and play controllers that were suggested for this build?
Thanks
Brian
not sure! lots of variables in this craft my friend. From what I’ve seen compressors on ‘most’ fridges are fine. And usually due to the insulations it shouldn’t cycle on for 10 mins + anyhow! Cheers Tom
Why would you avoid a Thermoelectric fridge?
I live in a very small apartment so I am looking to make a curing chamber out of a wine cooler fridge.
This fridge will be in the living area so noise will be a factor I consider. I have seen most wine fridges seem to be about 42 decibel range for the small size I am considering.
Haven’t tried one, but supposedly with no drying effect from the compressor, it may take a lot of controller work with a dehumidifier and humidifier to keep in a good range.
im going for the wine fridge route. do you have a bit more details on the frequency and how long he opens the wine fridge door?
couple a mins every day maybe, they all seem to be a bit different. avoid thermoelectric as mentioned, go for compressor. Cheers Tom
Hi,
Firstly, love the website. Finding it super useful as a reliable, consistent source of fact-based info.
I’ve been curing smaller, whole muscles for a while now and would like to move on to larger projects (e.g. coppa) and salamis that may take 3 months or more to cure fully. I only have a small fridge and don’t really want to occupy it entirely for so long with these bigger pieces.
So my question is; how sensitive are larger cuts/salamis to temp/humidity variations later >1 month into curing – my gut feel is ‘less so’ but would welcome your opinion, based on experience of other products/techniques. Reason for asking is that I live in a warmer, humid part of the world and I can probably achieve 60-80% humidity and 18-22 degrees C for half the year in a storeroom. So I’m wondering whether after the first month or so, when water concentrations decrease most rapidly, and relative salt/cure concentrations have increased along with the acidity a bit, I could shift salamis etc. to this warmer, less controlled environment. Or would I the case hardening/spoilage risk be simply too high in this range of conditions. Cure 2 would be used by default for salamis, cure 1 would be optional for coppa and could be used if it would add significant protection in this specific application.
I realise there’s no absolutes here, but some help understanding the relative risk and whether this idea is a non-starter would be appreciated!
Hey Gareth, glad you’re getting amongst it, nice!
Please note these are guesses/observations!
I’ve often come across dry cured meats in Italy and Spain where meat is just hung in the Salumeria (Italian dry-cured delis) and cafe/restaurants etc. Though this is after prob 30+ % weight loss.
That white penicillin, if you have a decent bloom, helps a lot with the moisture loss regulation which prevents case hardening. Case hardening can be countered, by vacpac after weight loss to equalize the dry/moist bits.
You could try and just keep a very close eye on it….
Sliced salumi that I’ve put on boards, seem to start ‘sweating’ the fat around that 20C ish
I remember in some airport in Europe, they had a Jamon specialist deli, they had about 50 dry-cured pork legs hanging, it was prob 22-24C – but the skin was likely to by stopping excess drying too
I’ve always found up to 17-18C ok, 20+ not sure.
Parma prosciutto producers I’ve visited (in Parma) have controlled environments for 3 months, then – when it’s not raining they leave the windows open, when it’s raining they don’t (80,000 pork legs a year, this is for 9+ months), again skin regulates moisture loss better (and the sugna lard paste they put onto exposed meat). FYI 2-3% pork leg wastage is acceptable in the dry curing pork leg industry! Reasons unknown…we can’t control everything!
You have to make the call my friend!
Cheers
T
I used a Chest freezer because I could get a cheap one. I found I needed a dehumidifier rather than a humidifier since there’s no drain and the cooling coils and all embedded in the walls. It was very easy to run all the wires in the back and it’s doing a great job so far. I’ll update when I get some meat out of it. The inkbird controllers are working pretty good, might do some more tinkering with the settings to get it to track a bit closer to my set points.
sounds good, did you create airflow in / out? my chest freezer is just walls, I havent converted a chest freezer, but i used one as a ‘meat safe’ when harvesting wild game in the back of the truck, I ran it off a inverter. It didnt like the controller cycling it and had a fault. So i just hope the cycling of a freezer on/off wont wear out faster then a fridge, cheers Tom
Hi Tom,
Great article.
If i have a Glass Front Wine Fridge that has a temp range of 5 c – 20 c will i still need an external Temp Controller.
Thanks
… did you get my pdf on diy conversion? should be on this page somewhere. dont think so, but depends always on design. humidity is key for long term. also too much light on a glass door can make fat go yellow rancid, a friend had this on a large commerical double door stagionella fridge! Cheers TOm
Hi ! Thanks for your Blog it is really interesting.
I made ine chamber already with a chiller. I would like to make a second one. I’m hesitant to get a Chiller with a inverter to save energy. Will it still work with a chiller with a inverter?
Thanks for your insight
Did the chiller run at a lower humidity? They generally do if compressor.
I’ve ‘heard. you will need more control of humidity since inverter wont be running as dry.
All the best,
Tom
Sorry to be so thick, but………
I got a non functioning 60″ tall wine cabinet off of Craigslist for nothing and want to use for a cabinet. If there is no cooling capablities because the compressor is failing can I still use it for my purpose? I live in the PNW, not too hot, not to cold, but want to make sure I can do this without breaking the bank to modify.
maybe test it? temp goal as per article – 10-15C or 50-60F -some air exchange helps too – really it’s just a insulated box you have. Tom
What do you think bout using a freezer? I have an existing converted chamber that is no longer chilling. It’s very old and I’m not surprised. The upside to a freezer is a single space so more room to hang if shelves are removable. I have some salami almost done so I need to make a move on a new unit soon.
From my experiences cycling a freezer on and off has lead to a short life for the compressor
Tom, Good day to you. My question to you is…I have a used LG Bottom Freeze French Door Style refrigerator that stopped working. It’s not even 5 years. I do electrical work building boilers and cooling system along with food and beverage monitors. Can I use the not-working refrigerator or does it have to be working? I thought since not working, I can add a controlled fan?
Hey Carlo, fridge is all about cooling and dehumidifying, if its cool enough, you could use a dehumidifier and fan – extraction of air always helps too. Did you get the pdf on this page? https://eatcuredmeat.com/curing-course-page/ – has some info I wrote – all the best, Tom