Over the past twenty years, I have converted various fridges for dry-curing meats in environmental chambers. I’ve advised many in the community on designs and decisions related to dry-cured meat.
These converted fridges create environments for many curing or food-related projects – which I’ll also mention.
This fridge conversion was one of the first ways I began curing and drying meat many years ago. I make, study, teach, and seek out cured meat worldwide.
Key Points
- Building a dry curing chamber (more on chamber design) is easy. Repurpose a regular fridge or wine fridge. You can also test conditions around to see if a wine cellar, shed, or garage would suffice.
- Functional Components include plug-in controllers, humidifiers, racks, filters, fans, and heaters for certain-size applications, such as used fridges.
- Avoid lighting in the fridge; it can deteriorate the meat fat during drying.
- Mold inside the dehumidifier and humidifier must be cleaned with vinegar monthly.
- Expandable rods can help minimize drilling holes into the internal walls of the fridge.
You can do this project for under $300 (USD) most of the time. A second-hand fridge or wine fridge forms the base for building the DIY chamber, all cover what type of fridge below I’ve found works effectively.
The fridge insulation is suited to holding a temperature that solves one part of it.
If this seems like a project, you’re not willing to pursue, but you still want to cure meat with a beginner project. I have some trial and error but eventually figured out a technique that produces consistent results; check out the full post on dry-curing meat in my regular kitchen fridge here. Also, a conducive environment around your home may suit you as well.
The main aspect of a DIY chamber is to use controllers to control the humidity and cycle the fridge temperature on and off to reach desired ranges.
It can take some testing. It’s not about an exact temperature. It works within a specific range to consistently produce delicious dry-cured meats (and many other projects – dried spices/vegetables, fermenting alcohol, growing mushrooms, fermenting salami etc.).
Approximately – 50-60°F or 10-15°C is the target temperature in the fridge.
The whole point is to avoid the outside of the dry cured meat going hard before the center has dried out enough – by keeping the moisture/humidity high (70-80%) this can be achieved.
My first fridge, out of six I’ve built, was a commercial double-door 250 gal bar fridge ($ 400 USD- second-hand).
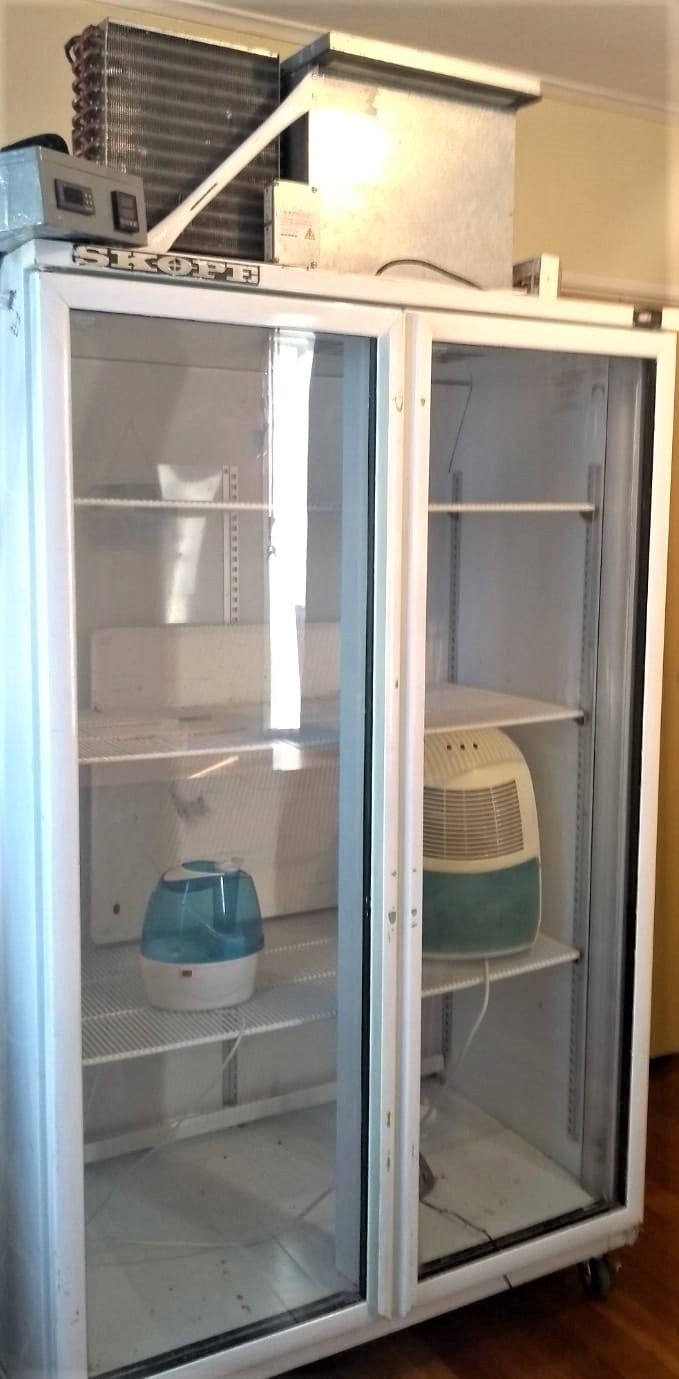
It can be a straightforward setup because many components are plugged in directly to the controllers. However, I want to share subtle aspects of balancing the fridge environment.
Another approach: I hardwired the electrics with an Electrical Engineering friend, and we put it together many years ago – thanks, Andy!
Full Detail – Building A Dry Curing Chamber
1. Design
I have experimented, researched, and tested many designs. The most accessible options I have found are:
- Using a Used Fridge
- Using a Wine Fridge
- No Fridge, Winter/Autumn
The difference between these two mainly comes down to size and temperature; you can get large wine fridges, but they seem harder to find second-hand.
Some wine fridges have different settings, and the ‘red wine’ setting can be just about perfect for curing meat, i.e., 55-65°F/12-16°C.
Wine Coolers/Fridges may have either compressors or thermoelectric (best avoided because it’s harder to control the humidity) based cooling.
For both these options, you must control the humidity mainly to keep the fridge in a ‘moist’ environment (70-80%).
If you are not sure about the financial investment into this, it doesn’t have to be much – I wrote about a breakdown of the costs here.
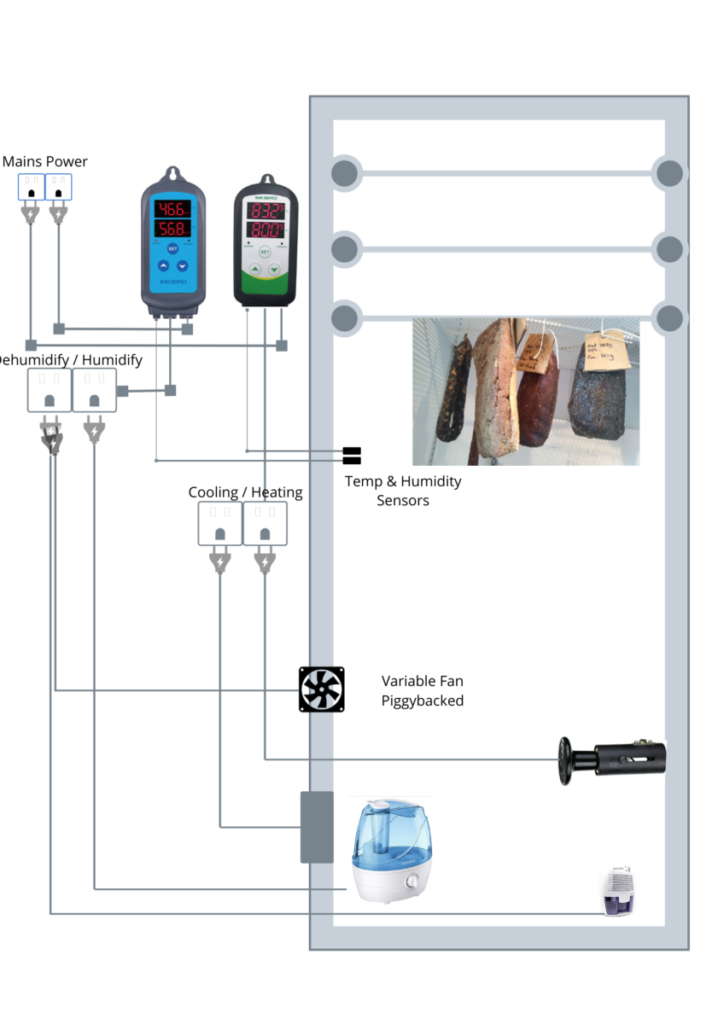
I have created a pdf ebook about DIY fridge meat curing designs, you will see links to it on this page. Here is a picture of the design used widely in the home meat-curing community:
Other options include hanging dry cured meat in a cellar, basement, or other area around the home. If the temperature and humidity are suitable, it can work—however, one must expect some variation in results.
I have also used these converted fridges to:
- grow mushrooms
- hang meat to age
- dry fruit/spices/vegetables to make powders
- ferment beer/wine
- make jerky/biltong. (Needed heating for some of this, though)
You may need to install a few components into the fridge to have enough space to hang your cured meat. Another option is piping to keep the humidifier outside the fridge area.
Used Fridge Design
Ideal Style of Fridge to Convert:
- Full Fridge, no freezer compartment for more straightforward conversion
- Frost-free design (doesn’t have coolant inside the fridge at the back , older models do have this) – panels often have more moisture
- Racks installable in some way
- The door seals are in good condition
If the whole area is a fridge (no freezer area), you don’t have to pull out the reciprocating saw or another cutting device to join the areas, which may have coolant pipes or other internal structures inside the fridge’s wall.
You don’t need a freezer area for this project, though many fridges will have them. I have worked on a few.
Cutting a hole between the two chambers will allow you to control the environment in both areas. (This is often a messy job, with insulation, wiring, and coolant pipes.)
If you can obtain the schematic plans and wiring of the fridge, you will have more information to work with. Once you have identified the wiring/coolant pipes, the modification will be much easier.
I’ve also got another article about designs and conversions, check it out here.
Some more modern versions of fridge,s like LG fridges now, have an air flow system that vents from the fridge ceiling towards the door holders; this has more air circulation, which means no need for airflow control – (LG LRONC1404V – read more about that here)
Important Factors for Design
Temperature
My kitchen fridge operates around 36°F/3°C, but you want approximately 52°F/11°C for most dry-cured meat projects.
The design must consider turning the fridge’s compressor on and off (with a temperature controller). Even in the highest setting, most fridges will not reach above 45°F/7°C in regular operation.
Some basic DIY skills will be required for this job.
Lower temperatures can mean slower drying.
| Low | Ideal | High |
| 46°F | 52°-60F | 60°F+ |
| 8°C | 11-15°C | 15°C+ |
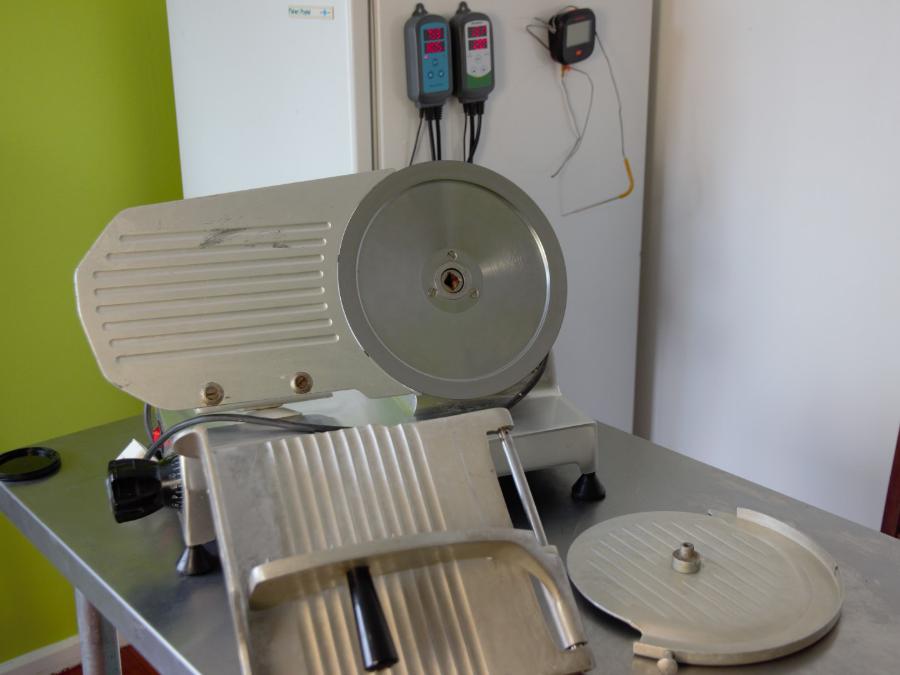
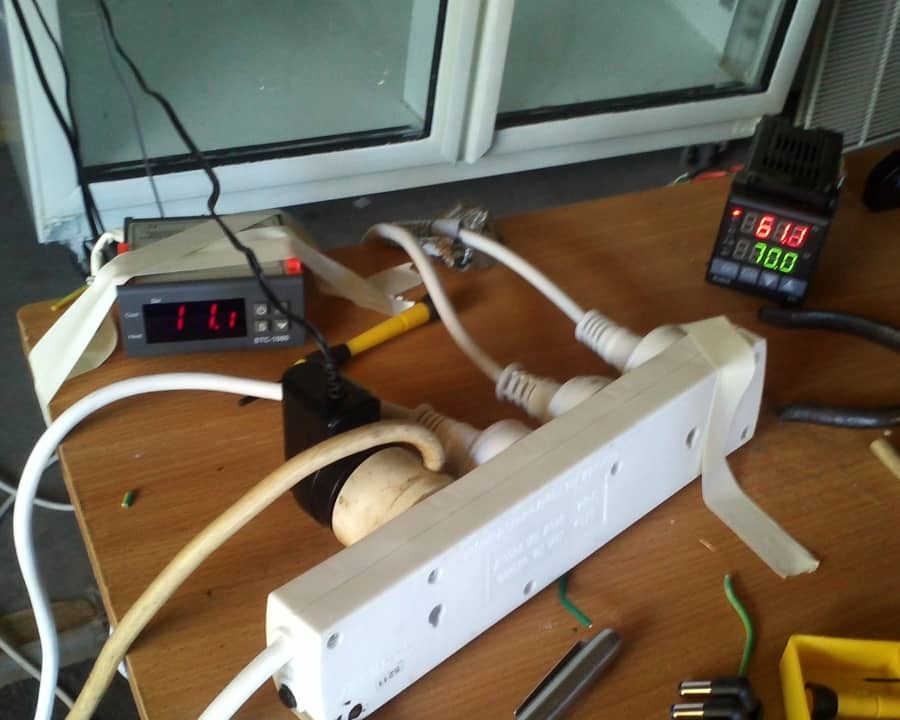
Temperature Controller
A temperature controller (full detail on these components here) does the same job as the built-in fridge thermostat. You are in control and can cycle on the fridge on/off to reach the target dry curing temperature.
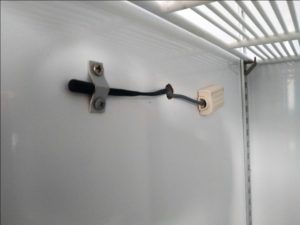
Think about where you want this component mounted outside the fridge. Then, you will have a wire for the temperature probe/sensor running in the fridge. You will want to use the sensor around the refrigerator’s middle to give an accurate reading.
There are even some Wi-Fi options for remote monitoring.
Getting to the 50-60°F/10-15°C range for longer-term cured meats is as simple as switching the compressor on and off through the controller (I wrote a page on this also).
Humidity
| Low | Ideal | High |
| 60% | 75% | 85% |
Most modern fridges are frost-free; if you acquire an older fridge, ensure it is frost-free. Frost-free means you have a dry environment, so you will need a humidifier and a humidity controller (hydrostat control) to get the humidity in the target dry-cured meat range (70-80%).
I’ve used non-frost-free, which is doable, too; you have more moisture from the cooling panels and need a dehumidifier.
When I have measured cycling fridges, the air that comes into an unmodified frost-free fridge seems to run at 20-30% humidity.
I aim for about 5-10% variation in target humidity (75% mostly) and a 36-40°F/ 3-4°C variation in temperature.
It will depend on what you are making, but let’s generalize.
Moisture/Humidity is the more challenging variable just remember that this factor isn’t independent of temperature.
Target 75% plus or minus 5-10%
(70-80% is where I like it generally)
It can take some fine-tuning to get this consistent, and it will change as it passes through the chamber.
The key is not to have an overfull fridge; I have found the salumi doesn’t like it. Once it has lost most of its weight and moisture has been removed from the cured meat, fridge variables are easier to control.
Getting to know the cycling of the compressor will take time to test.
Airflow
Airflow in and out, is also essential. Fresh air coming in that is filtered or at least can keep bugs out of the drying chamber is key.
This is one reason why traditionally dry cured meat was made in winter across Italy; the insect population that disturbs the cured meats is absent.
A fan that can ‘pull’ air out of the chamber is often used, I’ve found it only needs to 5 mins a day for an average size kitchen fridge.
Hanging Rack Options
Methods I’ve used:
- L Bracket metal bars
- Metal bar/wood the same size as the shelf to slide in
- Racks with S hooks or chopstick/twine
I’ve found that planning how you will hang the meat is important before even buying a fridge. Hanging means less contact with any surface, keeping the cured meat cleaner. Gravity also assists in the drying process.
With smaller units, using a metal L bracket on both sides of the fridge at the top is possible.
You then can slide in and out a bar/wooden stick.
Or, in one instance, I used the rack and chopstick method below.
Your hooks will then go onto this bar or wooden stick.
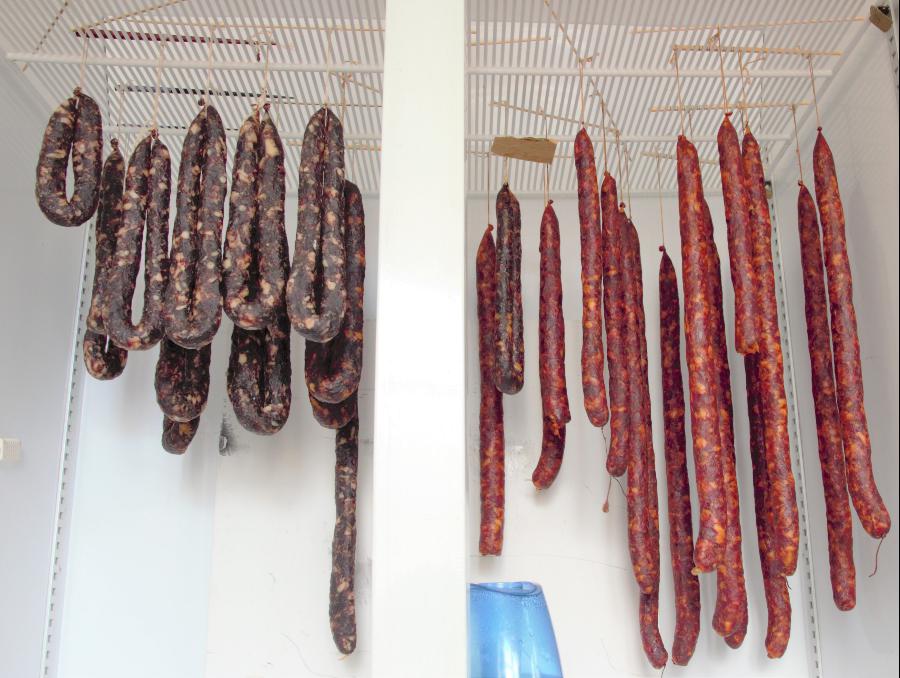
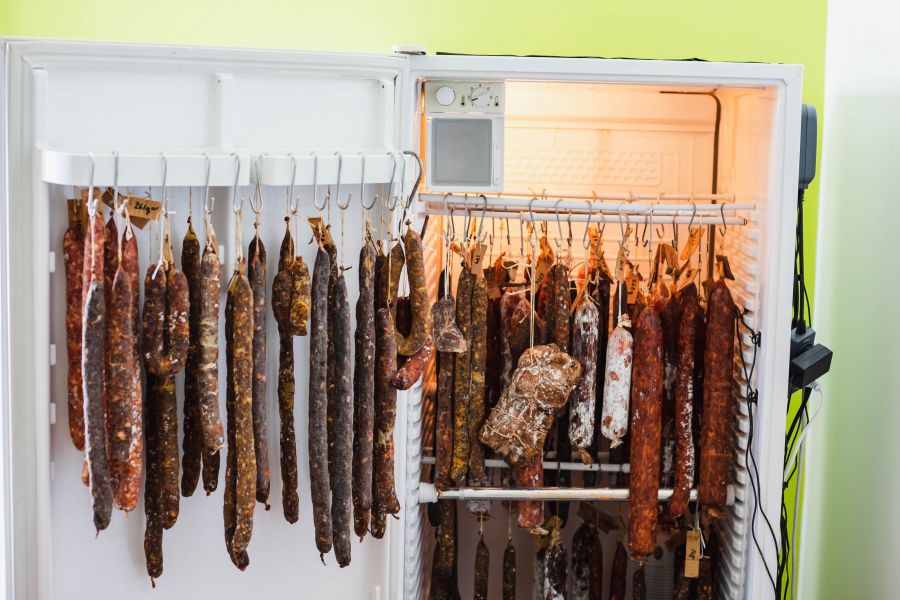
I had too much salami after processing 80lb/40kg of wild beef (cattle beast), venison, and pork. I drilled holes in the ‘condiment holders’ on the door. This allows me to thread more salami up through the holes and secure it with chopsticks, of course.
I also needed 75 hooks for this batch! Below are excessive amounts in a converted fridge.
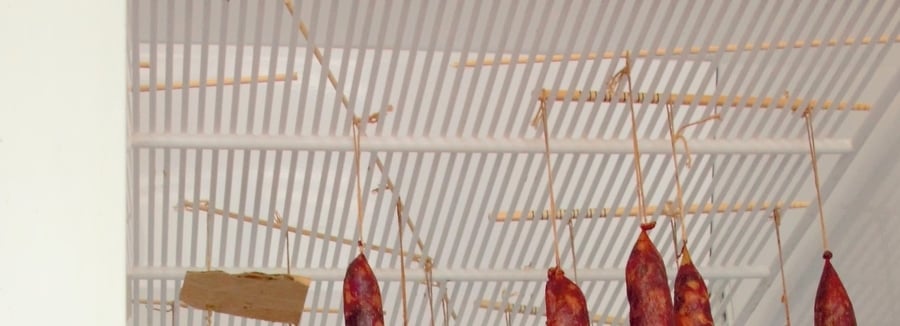
An original idea I had was that an expandable shower curtain bar like this pictured below could work. I have a page on hooks/racks here! Thicker varieties definitely can hold more weight.
Controller Designs
When I began meat curing, the plug-in controller did not exist.
Plug-In Controllers – Easy Way
Humidity Controller
Controllers for turning on/off humidifiers and dehumidifiers to reach a target range inside the fridge.
You want to mount a humidity controller outside the fridge.
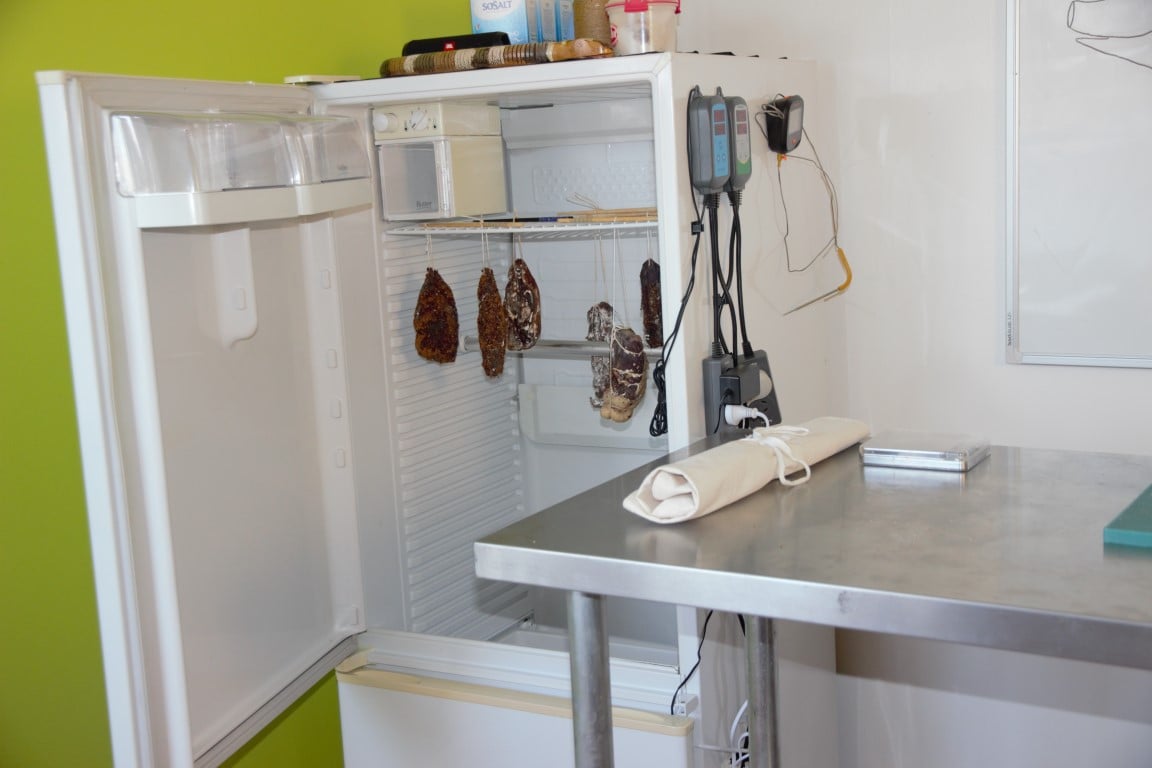
Then, for the most accurate readings, have the probe/sensor positioned inside the fridge around the middle, not directly where the humidifier points. Here is a picture of the sensors inside the refrigerator.
When drilling holes, consider the internal wiring/pipes through the insulation. This is crucial. I have ruined fridges due to drilling coolant pipes in walls.
Hardwired Controllers
My first DIY conversion was before plug-in controllers were available.
I had to enlist the help of an electrical friend to do this part on the fridge.
An enclosure to keep the controllers makes my setup much tidier for a hardwired option.

Wine Fridge Option
Wine fridges seem to keep in the proper temperature range often. My friends have a setting for champagne, white, and red wine. It even maintains about 55-75°F/12.8-23°C. However, even though a fan is built into it, it doesn’t seem to get the airflow needed or air exchanged for dry-cured meats.
The designs I have seen involve a hydrometer hooked up to a humidity controller. This worked great for her, but she had to open the door daily.
2. Components
I’ve written pages for many of the components. Links to what I’ve used or can recommend:
Optional:
- Outlet Fan
- Inlet Fan
- Dehumidifier
- Heating
- Backup hygrometer
Wine fridges can be compressor vs thermoelectric for cooling – compressor wine coolers sometimes have designs that can recirculate the moisture also; I’ve not tested this.
Thermoelectric should be avoided since controlling humidity is hard; compressors generally dry while cooling.
Another article I wrote about what I consider you ‘do or don’t’ need for this project, you can find here.
Tools
- Drill and Drill bits
- Food-grade sealant (for holes)
- Screwdrivers
You can run the sensor cables through the fridge door if you don’t want to drill into the insulated walls.
Hanging & Rack Design
I got lucky with my large fridge the first time because I could easily set up hooks with versatile and adjustable shelving.
Metal bracket system along the top of the fridge works well. Since you will be hanging most of the meat, you want to get the maximum amount of hanging space. Fridge shelves aren’t generally close to the ceiling of the fridge.
S hooks are a great way of hanging meat. Because you will be checking the weight loss often, you want something quickly taken off and hung back up. I have gone through a phase of tying and untying, which isn’t very efficient.
I also came up with an expandable rod idea for no penetrations; you can check it out on the curing chamber rack system page here.
Controllers Plug & Play / Hardwired
It is important to have controllers that can handle all the various plugs. Some friends opted for simpler controllers and needed to add more components.
Plug & Play Humidity Controllers
Some excellent plugin controllers have been proven for specific applications and do great for DIY meat-curing chambers.
An issue you may have is not being able to reduce humidity; you may be relying on the fridge’s cooling compressor to help decrease the humidity (or a heat source, if you go down that track).
You could look at the variable-control ceramic bulb heat option to help control this, to be honest, a dehumidifier is a good option.
1/16 DIN Humidity Controller (Hardwired)
This is the hardwired option. I would only suggest it if you are electrically qualified or have an electrician friend.
I have used this device for temperature control (but they also do temp or humidity versions), and it has worked well for many years. However, the programming is not user-friendly, so we have to read the instructions seriously. I know it’s a pain, but I think it’s because of this humidifier controller’s commercial application.
For instance, I’ve seen this controller in butchers’ and delis’ controlling walk-in chiller rooms.
You need to understand how the buttons and options work, including how to set the higher and lower humidity thresholds and the variations when it turns the circuits on.
I would still recommend these for a hardwired option. If I ever wanted to go even bigger, I know this controller would be reliable.
It would be best to have an enclosure for the controller like this..
Drilling holes of the right size and putting some conduit connector fittings on will hold it all in place.

3. Assemble & Balancing Environment
Sterilize Once the Fridge is Empty
Wiping the inside well with diluted bleach or plain vinegar before using it will get the chamber off to the best start.
Remember, you are trying to control natural variation in outcomes that may happen.
Once the penicillin finds an invisible home in the curing chamber, you will indeed have ongoing success! It can bloom naturally or innoculate the chamber with a culture.
As you progress with learning about dry-cured meat making (full page on guides across the site here), you’ll become familiar with mold. (The white powdery substance on quality dry-cured salami you may have seen is this good mold!).
Using plain vinegar (white, malt, or red wine – anything that works) to wipe off the not-so-good bacteria may be more necessary at the start when good mold is still developing a home on your cured meats. – here is an article I wrote about cured meat molds.
Please ensure all the power is off to the fridge before commencing any modification for safety’s reasons.
4. Balancing the Environment and Tips
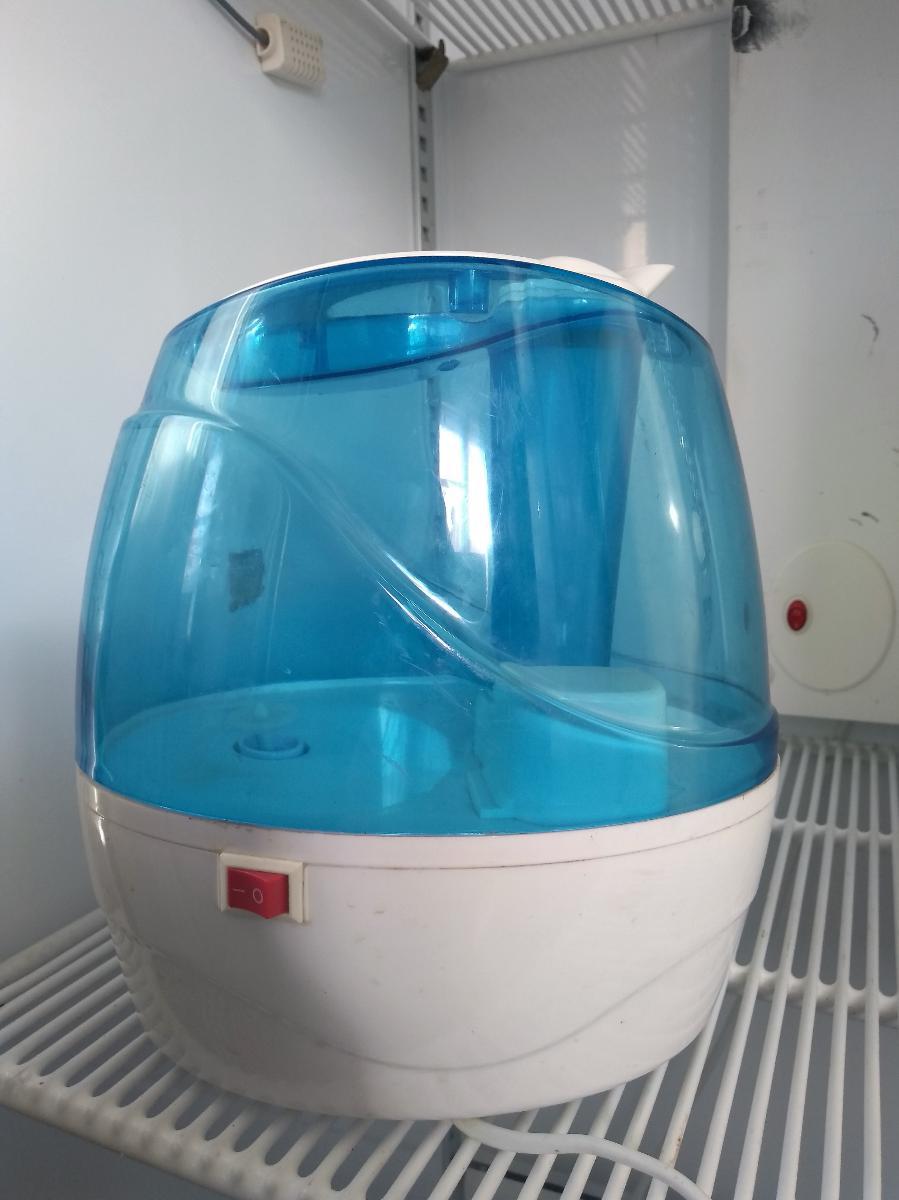
Humidifier – Ultrasonic Type
Both humidifiers and dehumidifiers will start to accumulate mold; you will need to clean them regularly.
Ensure the humidifier is ultrasonic since it has a much finer mist output.
The tank size is a 2-quart minimum; you don’t want to fill the humidifier daily. If you get the temperature cycling and design right, maybe only every week or two you will need to refill. But it will also depend on your space inside the fridge.
Humidifier Internal or External
You can put the humidifier outside of the fridge. Then, you use some hosing or pipe to enter the curing chamber. This can create more space for hanging cured meat!
The humidifier can generate heat for smaller curing chambers, so having it outside can help keep
The downside is that the moisture can build up and grow mold in the piping. Regular monthly maintenance is needed to avoid unwanted mold and bacteria.
Mold, whether it is good or bad – thrives in moist environments.
Dehumidifier (Dependent on Design)
It is essential to get the right size in proportion to the chamber. You also want to consider the tank.
Some humidifiers have external drainage outlets, which can also be used in the design. I didn’t worry about this, and most people will find you don’t need to empty the tank that often, maybe once every week or two, if the environment is reasonably stable.
Most people end up getting one, I have written the reasons and some links to a few that people have used, check out the dehumidifiers here.
Cooling Function – the Right Temperature
Because I went a bit crazy with the size, my issue is the compressor pumping much drier air into the chamber; this hasn’t been an issue with frost-free second-hand fridges. I find that cooling cycling takes entirely some time to keep the temperature around 52°F/11°C; covering the area where the cool air gets pumped has improved my results.
The delay functions on controllers are essential; you want to ‘rest’ the compressor between cycles for longevity.
With smaller units like bar fridges, the small area should also be easier to control, with less cycling of temperature or humidity.
Heating – for Fermentation, Humidity Control & Drying
Several designs I’ve used have included some form of heating.
A regular light bulb can be used; through experience, I have learned this isn’t a good idea.
Light in the curing chamber affects the meat’s bacteria and fat.
If you think about those giant Parma Ham and prosciutto hanging in Italy, they tend to be in darkened areas.
A non-light-emitting bulb (ceramic) will work very well. When you put this on a variable controller or hook it up to your temperature controller, you can produce some heat to cycle on and off, slightly lowering humidity.
These types of adjustable ceramic bulbs are used in reptile enclosures. They are not the easiest to find, but I wrote a page on them about factors to consider when choosing one.
Air Flow
Fans are a great way of bringing air into and out of the curing chamber. If you choose a plug-and-play design control system, you can have the plug share
The fan will run when the cooling happens to exchange some of the air in the chamber.
Filtering Air – HEPA
After a few years, I decided to dissect a new HEPA filter for a vacuum cleaner. I used this to filter the incoming air. For obvious reasons, having filtered air helps protect that precious white penicillin culture that will eventually thrive in your curing chamber.
Testing the Temperature and Humidity
Having a secondary testing apparatus for temperature and humidity can help a lot. Apart from positioning sensors around the middle of the chamber, you will find different readings in different areas of the chamber.
You may want to think about equipment placement before starting alterations, of course. The plans I can email you show example diagrams & pics).
Case Hardening on the Exterior
If the cured meat is hard on the outside but hasn’t lost 35% weight, you can vacuum seal it and leave it in the kitchen fridge for 4-8 weeks. This will help it equalize evenly (it is often done for salumi and salami produced at home).
From my experience, this can be done for years. I have 4-5 years of vacuum-packed finished dry-cured meats in the kitchen fridge.
For someone beginning this projects, I’ve put together tips to help you, you can find those here.
Meat Curing projects can vary in time frames and how dedicated you are, here is some further detail about how long things take to make!
How Much Maintenance is Needed for a DIY Dry Curing Fridge?
Monthly cleaning with vinegar is important for the humidifier and dehumidifier since mold will inevitably form. Depending on the project, once the ‘positive’ mold has developed in the fridge – it may assist other projects introduced into the drying area.
What Can a DIY Dry Curing Fridge be Used for?
Drying cured meat, growing mushrooms, fermenting foods, fermenting alcohol, with heat – drying spices and other foods.

Tom Mueller
For decades, immersed in studying, working, learning, and teaching the craft of meat curing, sharing the passion and showcasing the world of charcuterie and smoked meat. Read More