Making salami at home can be challenging and hard due to the complexity of the product and project.
I have learned a lot of lessons over the last 10 years of making many different varieties of salami at home.
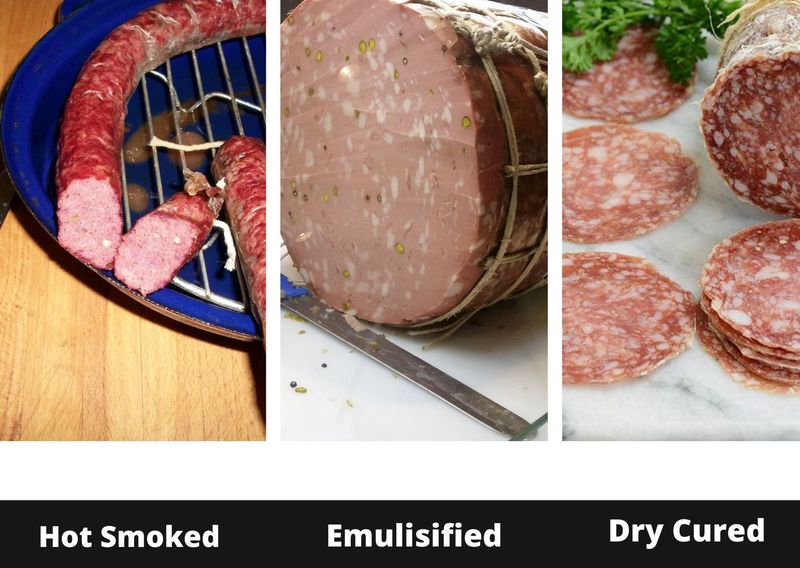
Certain types of salami are a lot easier to make than others as well. Any type of cooked or hot smoked salami, is more about producing a cooked maybe hot smoked product rather than a fermented and dried product, which is sometimes cold smoked.
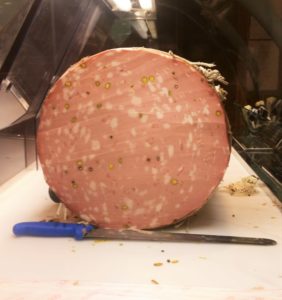
Included with cooked and hot smoked salami, are also emulsified salami like baloney, hot dogs, and mortadella. And if you don’t know, emulsified sausages has ice-cold water added and after vigorous mixing, to the point where it becomes a kind of generic meat paste, then is stuffed.
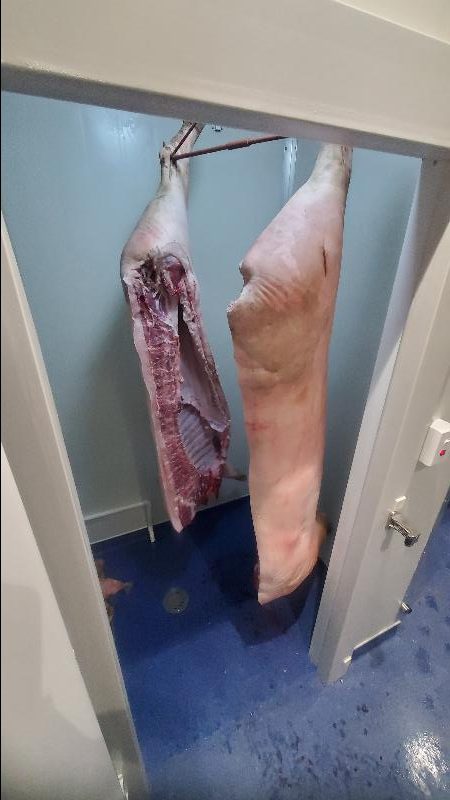
Recently a friend acquired a large Stagionella Italian dry curing chamber for his house charcuterie den (major renovations!). He raised pigs on a friend’s property, and we performed a whole pig salumi and salami project.
Since all this salami-making is fresh in my mind, it was a good time I thought to share some of the key learnings that we had over the last two or three months of progressing the projects.
Why is Homemade Salami So Hard to Make? The many factors of the recipe type, casings, pH levels, external mold, fat, meat bind, and potential case hardening make salami a challenge to make at home.
This article relates directly to dry-cured salami, which I often ferment before the long drying process of 1-6 months. Many aspects below are not related to cooked, hot smoked, or emulsified salami making!
Main Challenges of Making Salami at Home
- Meat Binding and Mixing
- ph Levels for acidification for Salami
- Types of Casings Used
- Hanging and Drying Salami (here are the main reasons why salami is hung) Challenges
There are many other challenges to the above, but I feel very often when I read online about salami making online. These are the types of challenges that are not addressed in detail, or I haven’t come across.
So, on the site Eat Cured Meat, I’m always trying to help others in their journey to creating charcuterie, whole muscle dry-cured goodness, and dry-cured salamis back home.
Meat Binding and Mixing
I found this one of the main challenges when I started making salami. If you do not get this right and makes a lot of your salami destined for the rubbish bin.
(lastly, you might notice there is an uneven moisture level from the inside to the outside)
(you may also notice the green mold on the side salami above; this was sometimes mildew mold and sometimes developed white good mold)
Depending on how coarse or fine you grind the meat, this has a big impact on the mixture. I have now leaned towards a preference of 3 to 5 mm mixing plates to create more surface area before mixing in the fact.
Afterward, my friend decided to invest in a robo-style meat mixer (these are a sizeable investment, definitely not necessary, but he does not do things half-heartedly!).
It is always quite nice to have the showcase style of fat, we can see it defined throughout the salami after it is dried. Because of this, I am generally aiming for 6 mm or more for the showpiece fat embedded throughout the dry-cured salami.
The old traditional way of seeing many nonna (Italian grannies) and other Italians mixing salami is to create a meat mixture to the point where you form a ‘pattie’ that can stick to the palm of your hand when turn your hand upside down it sticks.
If the ‘pattie’ does not fall over an extended period, the blind is considered to be good enough for stuffing.
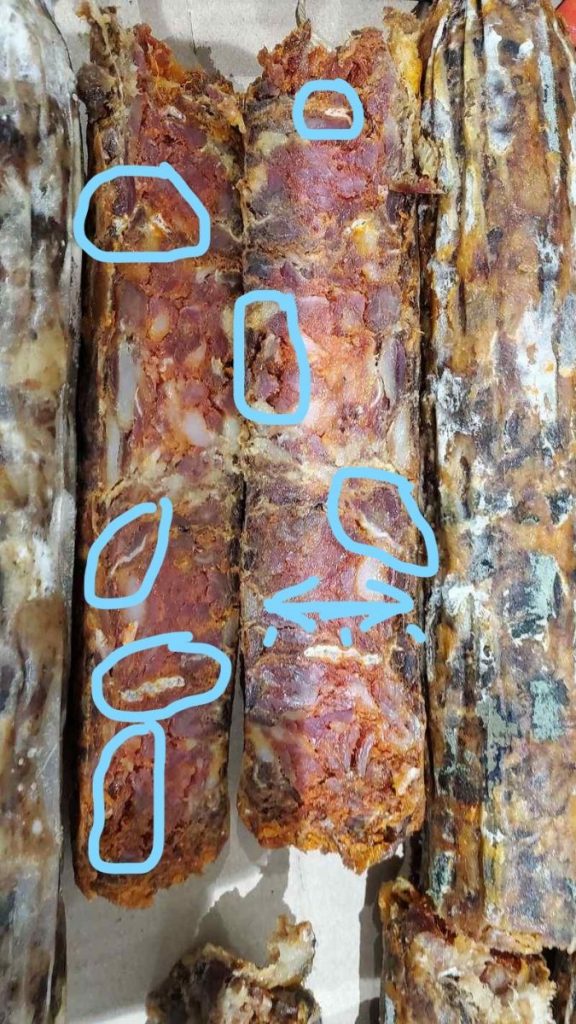
Over the years I’ve learned the reason for this is when you mix, squash, knead, and punch the salami mixture – you are extracting a type of protein called myosin. Myosin is kind of like glue that will assist in binding together the salami to create no air gaps.
The air inside the salami mixture can lead to many negative effects and unwanted bacteria can take hold, or good mold can get in and ruin the flavor (as per the above pic).
Often, for a batch of, say, 10 pounds or 5 kg of salami, it will be needed and worked for at least 10 or 15 minutes, often with a buddy and myself on either side of the bench.
You should end up having something that does have a smeared-type texture.
This is also a reason why adding salt and spices to the pieces of meat, mixing them, and placing it in the fridge overnight may assist in extracting myosin.
Another technique is adding the salt and spices before commencing the meat, which can also assist in letting the salt do its work. Then, grind with the salt and spices.
The goal is a meat mixture that has a slightly paste-like texture.
Challenges of pH levels in Salami
pH is another tool used to produce salami, when pH is below 5.2, it is considered a relatively inhospitable environment for unwanted bacteria. The other tools are salt and cold smoking. Many salami recipes combine all these preservation techniques.
You could also say that certain properties of spices/herbs have beneficial effects on a side. Black peppercorns and chili/pepperoncino carry antibacterial/antifungal properties so I’ve heard.
I’ll be honest. For many years, I’ve done meat curing without testing pH levels. I do remember the first time we used a higher humidity area to do the fermenting part after stuffing without any starter culture inoculation. I thought starter cultures like CNR Hansen cultures (available across the Western Wold) consistently lower the pH level.
Anyway, we ended up placing racks inside my friend’s bathroom, we took some measurements and we were relatively in higher humidity (85%) and room temperature setting.
This was definitely during the cowboy years of making salami, and I do not advocate doing it this way.
More recently, I came across a pH meter that got upgraded to have accuracy to two decimal places that would be ideal for salami making (here are some simple salami kits) at home. Considering it was $100 US dollars, it is a much more economical purchase than many of the two or $300 options that are on offer. Which seems to do a little too much for the home charcuterier.
Nowadays, we have a completely controlled environment and consistent, precise humidity levels and temperature to create favorable conditions depending on the starter culture that we use. A commercial drying fridge has accurate air exchange and a filtered humidification system.
One of the most interesting finds in the 4 different types of dry-cured salami we made was that the pH dropped to a safe level for a recipe that had started culture, red wine or no red wine.
The results:
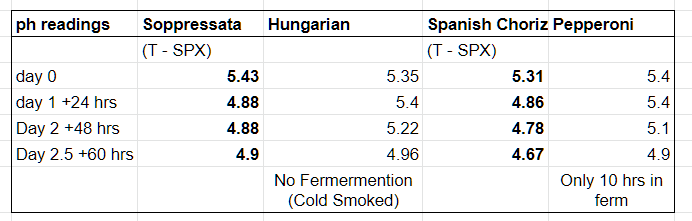
Now I’m going to say this is always the way the pH will change. But it was surprising to us since most people would expect the pH to not change as much without inoculating the salami with a starter culture.
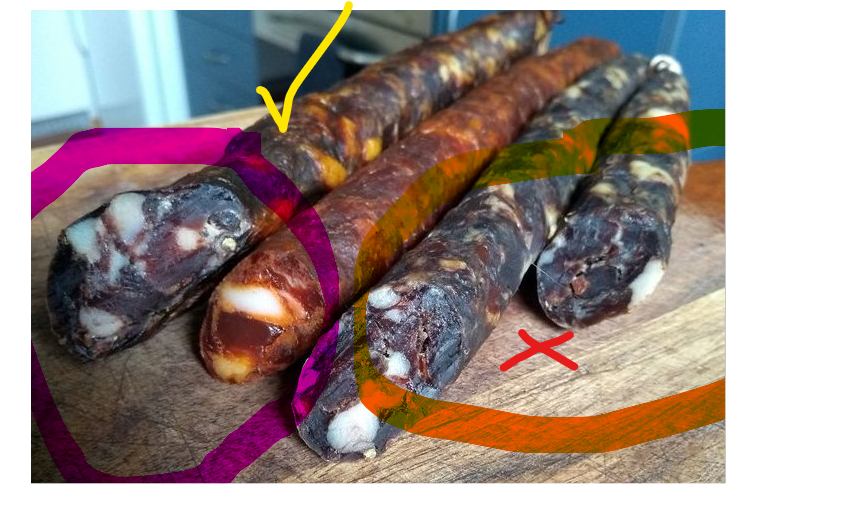
I was also interested in measuring the effects of red wine, which is the ‘old school’ method I have come across. In a future post, I will test different types of wine. The above salamis had a delicious White Verdejo in the Chorizo, the Pepperoni had an Italian Red Sangiovese or Montepulciano, I can’t recall after a few tastings during the salami making!
This statistically cannot be extrapolated since it was only one batch! We had ideal fermenting conditions as per T-SPX instructions using the Stagionella Drying Chamber.
Casings Can Have a Big Impact on Salami Outcomes
In the last batch, we used fibrous inedible casings as well as natural casings. We had some issues with the population of mold 600 on the outside of the fibrous casings.
What I think happened here is the mold 600 went a little crazy, creating too much of a barrier therefore we did not have a permeable environment, which is old because the mold should be permeable.
Secondly, the fibrous casings did not adhere to the meat, creating a gap between the outside of the meat and the inside of the case.
This again led to undesirable outcomes, and quite a large amount of the salami projects which had these types of casings, we had to throw away. Considering we were using a rather expensive commercial drying chamber at precisely 54 Fahrenheit and 78% humidity. These results were very surprising.
But I do not believe that was the curing chamber, I think other factors at play created these outcomes.
Another thought could maybe be oversoaking the fibrous casings, 2 minutes is the guide – due to the amounts of Sangiovese wine in the salami and myself – this could have been a factor. But considering some soak these for 30 minutes I believe it wasn’t the case (you can even dry out fibrous casings and reuse them, which we did).
Challanges of Hanging Salami
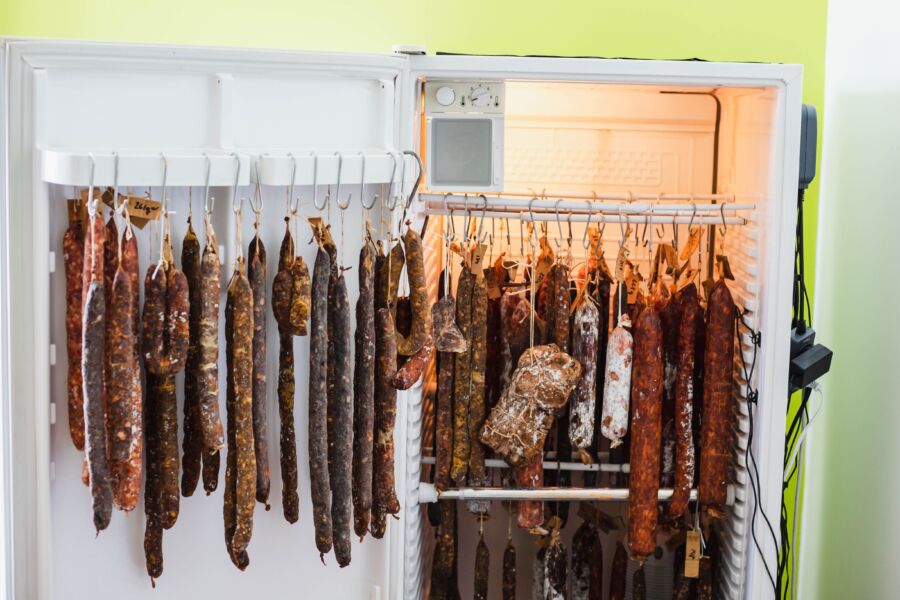
For many guys in the meat curing community, getting into the hobby involves converting an old secondhand frost-free fridge and using controllers to turn on and off the temperature and humidity.
The humidity is turned on and off, often a humidifier and dehumidifier used. The fridge gets plugged into a temperature controller (review I wrote of decent one here) that cycles and keeps the fridge at the 50 to 60°F or 10 to 15°C that you are targeting.
Then there is the challenge of airflow, you do not want stagnant stale air in the fridge all the time so ventilation holes are often needed to push fresh here or suck out the old air (holes can be challenging with coolant pipes running through the insulated walls of the fridges).
And then there’s the aspect of how air exchange reacts and changes the humidity inside the chamber.
For me, I have had 4 fridges over 20 years converted for drying whole muscle and salami meat. And I would say all of them have had their challenges.
Even one of the dry aging and dry curing fridges that was sent to me for review also has some issues of case hardening which I will mention below as well.
(here is more info on DIY curing chambers)
One of the good things is if you keep using a drying chamber and it’s holding the right conditions. You end up having your own invisible good penicillin white mold established so that when you add things into the chamber they will self-inoculate on the surface of your cured meats.
I have found over the years salami is often a little bit more sensitive and can produce quite a few different types of molds.
I’ve found this a challenge, that can be dealt with in some way by carefully and closely paying attention and using your senses of touch, smell, and vision to work out often what is going on. These are quite useful survival tools as well!
Mold on Salami
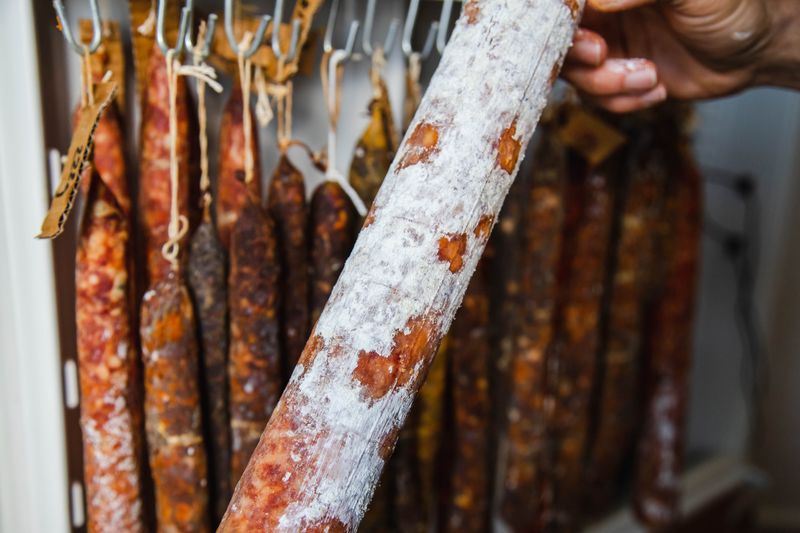
The beneficial white type of penicillin mold you often see on dry-cured salami is not a necessity. However, it can hold some moisture on the casing and is also permeable, allowing the mold to work efficiently.
Ideally, a nice white bloom of goods mold on a natural casing is the ideal situation you’re looking for.
Cold smoke can counter the white mold to some extent as well.
Casing Hardening on Salami
When the outside of dry-cured meat dries faster than other areas inside, it can create case hardening with the lack of moisture.
I’ve learned over the years since fat has less moisture in it, you sometimes find the meat drying out faster than the fat, the fat still having a certain level of softness. This is related more to whole muscle meat curing as opposed to drying cured salami.
Because salamis have a casing, you do tend to not get the case hardening as bad in my experience. But this is also the balancing act of having a high enough humidity, especially for larger diameter salamis that can take 6 to 12 months until the target weight loss that you desire. Which is often at least 30% more like 40 to 45%
White mold can regulate the drying on the surface of the casing as well.
Tips on Making Salami at Home
Here are some tips learned along the way in regards to making salami at home, that are often not included in a salami recipe the you’ll see online!
Tighter the Better (for Salami Stuffing)
In a way, it’s one benefit of using fibrous/synthetic casings rather than natural casings. They are tough, and you can force the meat mixture into them very tightly.
(not beef bungs and some larger diameter natural casings are tough also, I am talking about hog casings for instance)
It’s quite a different type of stuffing compared to when you’re making fresh sausages using natural casings. With fresh sausages, you try to leave a little bit of room so that it’s not too tight and when the meat is cooked it won’t expand and pop the case. It’s also necessary for linking and tying sausage.
There is an advantage in having two people working the stuffer I reckon, I am a big fan of the manual stuffers ideally the horizontal ones because you can have one person on the hand cranking and another on the nozzle, with the other person holding the stuffing and casing making sure the salami is tightly stuffed!
Mold Control on Salami
You can always use white, red, or malt vinegar to knock back the salami on the outside of the casing, especially if you’ve old colors. However, you have to remember that advanced white penicillin mold on the outside of the salami can look green.
I’ve often found, that smelling the mold indicates whether this is a mildew unwanted mold or a positive white type of good mold.
Temperature During Salami Making
This can have big impact on the mold as well as how quickly the salami can dry in your chamber.
You’ll find a lower temperature towards the 50°F or 10°C world creates less mold, but sometimes because the compressor or cooling mechanism is cycling more. Potentially you can have a dryer exterior. It’s a bit hard to come to conclusions about this because many curing chambers operate differently.
Another aspect is that it depends on how much of the newly cured whole meats or salamis you put into a chamber. As you can imagine, they start moist, and then you introduce a lot of moisture into the chamber.
Generally speaking, most meat is 70% water, 20% protein, and 10% other.
But by the time you finish, you have lost 30 or 40% of that 70% water in the salami, which is a significant change!


Tom Mueller
For decades, immersed in studying, working, learning, and teaching the craft of meat curing, sharing the passion and showcasing the world of charcuterie and smoked meat. Read More
Hi Tom,
Very informative read for the person who has at least dabbled in the craft.
I myself have been making salamis for around 20 yrs & have seen some weird things happen as well.
Your point about forming the salami paste would be one of the most important, I also tend to think that initial moisture content of the paste, and being careful not to include air in the packing process, has a fair bit to do with achieving good results. We have also found the addition of 30-50ml of water per kg of product helpful to form a good paste, if the paste seems too dry.
We live in a temperate zone in our part of Australia, so usually cool wet winters of 0-15 deg Celsius average daily temperatures. The salamis are cured outside over earth, covered from above and the sides in a shelter, so fogs ect get on the salamis but rain doesn’t, we use the Mould 600 culture & usually have good results in curing this way.
Cheers for your article.
Bruce.
Thanks Bruce, I’m based on the North Island of New Zealand, East Coast – we have a mildish winter as well with hardly a frost (actually one the sunniest places in NZ, and produces a majority of the fruit for NZ). Thanks for you’re comments, luckily I’ve had most batches work out, but I think taking on a whole pig with 2 of us over 3 days was too much recently! Luckily all the whole muscle salumi are developing nicely! (including a few 12kg prosciuttos). Cheers, Tom (off to Cairns in a week to see family!)
hello, i’ve successfully made lonzino a few times now using your instructions and would like to try making a dry, fermented salami something like soppressata. i have a meat grinder and curing chamber. do you have any suggestions for a beginner-level dry cured salami that i could attempt making? i don’t care about having large fat chunks to make it look nice, all i care about is flavor.
also, is it necessary to buy an expensive sausage-stuffing machine or is there an affordable way to do that?
thanks for your help, this site is great.
Cool name! Getting a salami tight is really key, I’ve always used a stuffer, but a funnel an chunk of plastic has been used. Strong bungs helps. I would start with like a hog casing and make something like 1-2″ max.
Sopresssatta! Took quite a few attempts to get that right! I’ve thrown out prob 100lbs of salami to get a good sopressatta! sad but many learnings over the years.
To add to the whole muscle and bacon course – I want to create a dry cured salami course in the next year or so. There is a lot more to it!
I would recommend something like this, with 1-2″ hog casings
thank you for your advice. i guess i’ll hold off on sopressatta… 100lbs of training meat is too rich for my blood, as is buying an expensive stuffing machine. everything in the hungarian salami recipe you shared looks pretty do-able, it’s just stuffing tightly that might be difficult. it looks like i need to do some research and figure out how stuffing casings is done by hungarian and italian grandmothers; i doubt all of them have stuffing machines.
i hope that you make that salami course, it’d be helpful. do you have any tips on how to tell if your casing is properly (or improperly) stuffed? is it something that you just have to hope for and wait until you cut the sausage open?
thanks for your help.
I’ve had to make alot of mistakes to learn! That’s why it the last meat curing project I’ve developed skills in over the years. A PVC plastic pipe that is tapered or not can work for stuffing too! Hand stuffing is done for large diameter salami, like beef bungs. Cheers T