When I first began experimenting with curing chambers more than fifteen years ago, I quickly learned that getting the temperature and humidity perfect wasn’t the goal — keeping them within the right range was.
Through plenty of trial and error, I discovered that stability mattered more than precision, and those steady conditions were what produced consistent, great-tasting results.
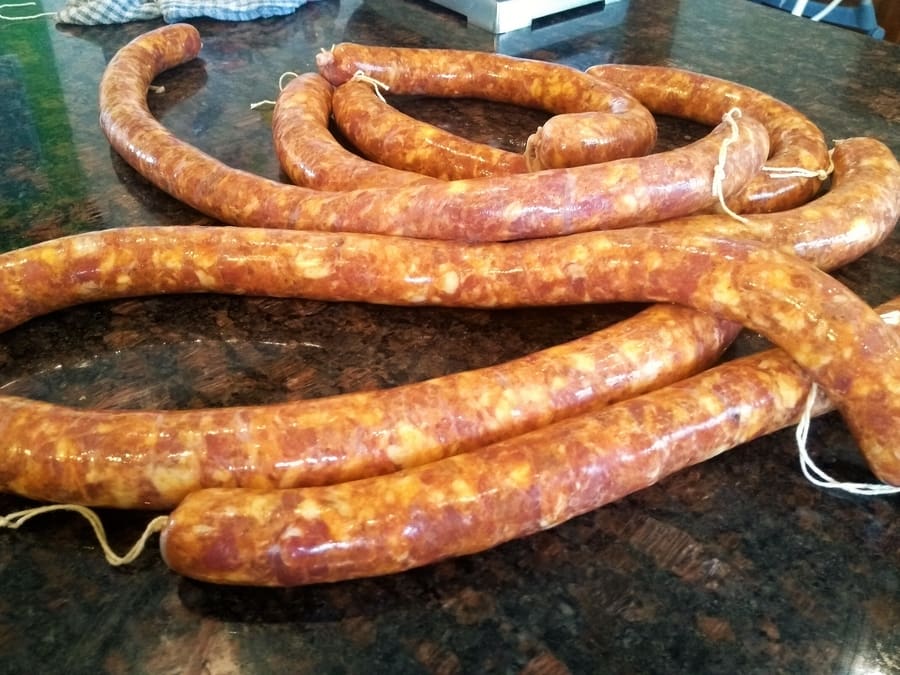
Back then, I read every curing and charcuterie book I could get my hands on to be sure I was heading in the right direction. Today, after many successful batches of pancetta, coppa, and salami, I share what I’ve learned so others can build their own curing setups with confidence and avoid the frustrations I went through early on.
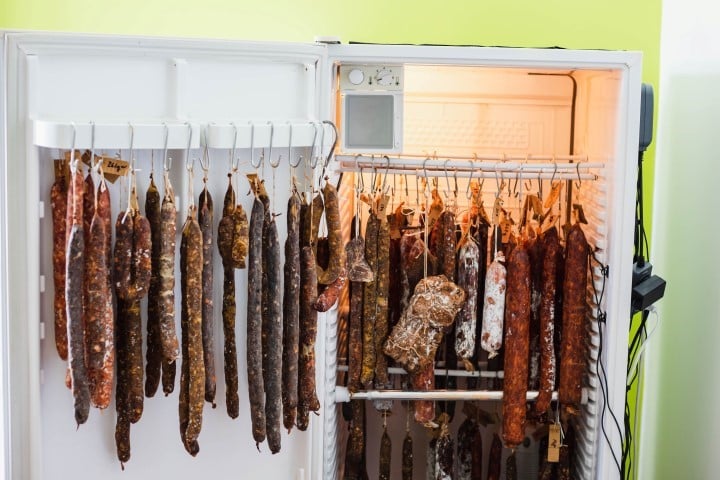
Even when I finally had the temperature and humidity steady, it still took time for the right protective mold to appear. That fine, white coating of Penicillium — the “good mold” that serious dry-curing makers talk about — protects the meat’s surface and adds flavor. Some people seed their chambers by spraying cultures on the meat or chamber walls, but I’ve found that once conditions are stable, the right culture usually develops naturally.
Once that beneficial mold establishes itself and the salt-curing process is underway, the meat gains another layer of protection. The combination of salt, controlled airflow, steady temperature, and humidity balance is what makes reliable dry curing possible — every factor supports the others.
Ideal Temperature & Humidity Ranges by Project
Below is a simple table that outlines the target conditions I’ve refined for different curing projects. These ranges come from years of practice and from conversations with other enthusiasts and professionals who dry-cure meats around the world.
| Temperature | Humidity | |
| Dry-Cured Meat (Whole Muscle) | 50–61°F / 10–16°C | 60–80% |
| Dry-Cured Salami (after fermentation) | 50–61°F / 10–16°C | 60–80% |
| Jerky and Biltong | 61–113°F / 16–45°C | 30–50% |
These are the conditions that consistently give me balanced results. Some makers like to tweak the numbers slightly depending on meat type or regional climate. For example, I prefer biltong that dries slowly over several days, while friends I’ve met overseas — including a South African competition winner — run a faster, hotter process to achieve a similar end texture.
Jerky, by contrast, is a much quicker project. The meat is sliced thin and often dried in a low oven with the door slightly ajar, which drives off moisture rapidly. Biltong uses thicker strips, around an inch thick, so the process takes longer and benefits from steady airflow more than direct heat.
If you don’t yet have a dedicated curing chamber, you can still experiment with small pieces of meat hung in a garage, basement, or shaded outdoor shed that has gentle airflow. As long as the temperature and humidity remain roughly in the ranges above, you can produce surprisingly good results. Many Italian families have used this rustic method for generations.
Why Temperature and Humidity Matter
Knowing the target numbers is only part of the process. The real success comes from keeping the environment steady. Cured meat develops best when fluctuations are minor — sharp swings in temperature or humidity can lead to case-hardening, surface mold problems, or uneven drying.
Over time, a curing chamber settles into its own rhythm. Once the balance of moisture, temperature, and airflow stabilizes, projects finish with fewer problems: even drying, smooth texture, and that signature white bloom of protective mold. That consistency is what separates a dialed-in chamber from a trial-and-error setup.
The big realization for me came when I stopped chasing decimal-point precision. A chamber sitting at 72 percent humidity is not “better” than one at 74 percent — both are fine. It’s the long-term average that matters. Staying within range day after day is what builds an environment the mold, bacteria, and enzymes can thrive in safely.
The Role of Good Mold (White Penicillium)
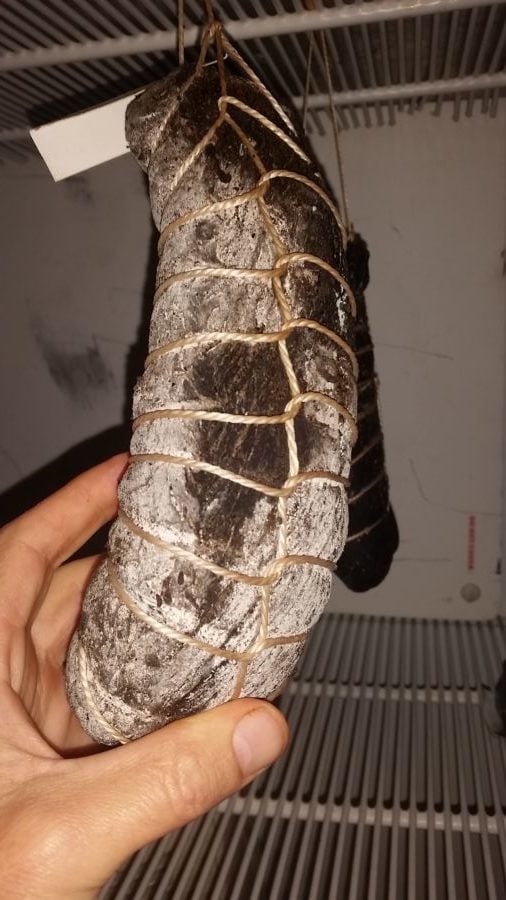
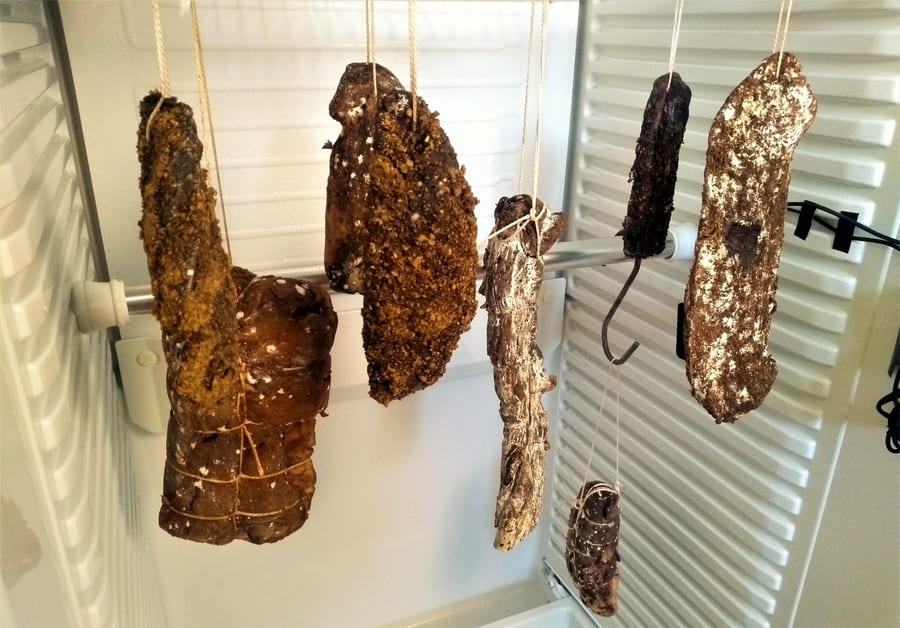
One of the clearest signs that a curing setup is healthy is the development of fine white mold on the meat’s surface. This natural Penicillium acts as a protective skin, slowing the rate of surface drying, discouraging unwanted mold species, and subtly improving aroma and flavor. It’s nature’s quality-control system for dry curing.
When I built my first chamber, that white culture didn’t appear for several months. Now I expect that delay and know patience pays off. Once established, the same environment tends to carry the right mold from batch to batch, giving every project a familiar look and smell — a kind of “house culture” that becomes part of your signature flavor.
Inoculation Options and My Experience
Some makers speed the process by spraying Bactoferm Mold 600 or wiping a starter culture from an existing chamber onto new projects. I’ve tried both but generally let nature take its course. If the meat is properly salted and your temperature and humidity are within range, the desired mold appears without any extra work. In Italy, inoculation is common for salami; in Spain, I’ve visited curing cellars where the same natural culture has lived for decades. Both methods work — it just depends on how hands-on you want to be.
Environments for Different Curing Projects
Not every curing project demands the exact same setup. A chamber built for whole-muscle curing can often handle salami, jerky, or biltong, but each one has slightly different requirements. Understanding how the environment interacts with each type of meat helps you fine-tune humidity, temperature, and airflow for better consistency.
Ideal Temperature & Humidity for Whole-Muscle Curing
Whole-muscle cuts like pancetta, lonza, and bresaola are the best starting point. Less surface area is exposed, which means fewer opportunities for unwanted bacteria to take hold. Even in a less-than-perfect chamber, whole-muscle projects are forgiving as long as you maintain steady airflow and humidity.
Regions such as Parma in Italy have naturally humid conditions that slow surface drying and create smooth maturation. My own curing chamber runs a little drier than Parma’s environment, so I begin projects at around 75–80 % humidity for the first few days, then lower it to roughly 70 %. This gradual adjustment helps avoid case-hardening and keeps weight loss slow and even. For a quick reference on Parma’s climate and curing conditions, you can read about traditional Parma ham aging humidity and temperature.
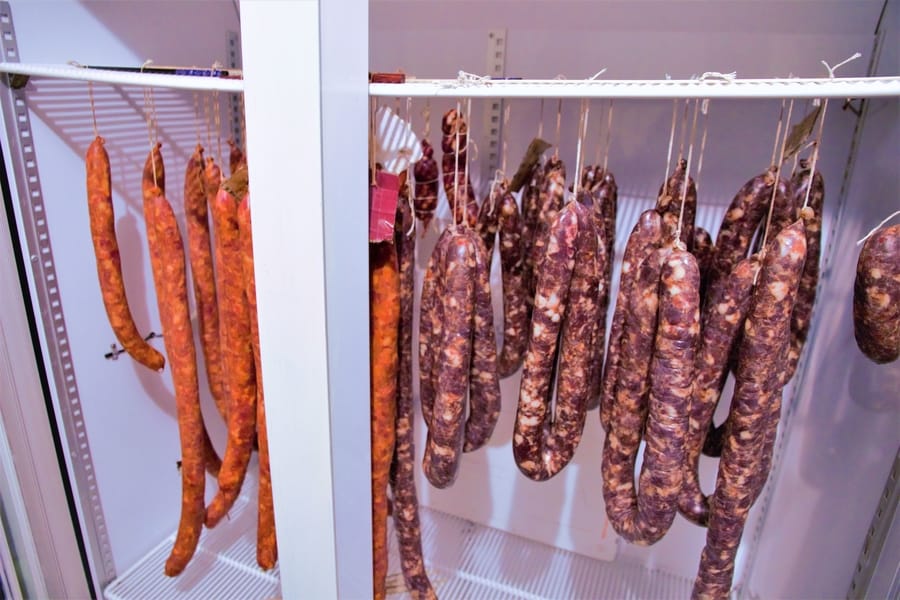
Ideal Temperature & Humidity for Salami
Salami projects are more advanced because of the fermentation stage. During fermentation, humidity and temperature are intentionally higher to allow beneficial bacteria to lower pH and develop that signature tang. Once fermentation is finished, salami is returned to the same environment as whole-muscle curing — roughly 50–61 °F (10–16 °C) and about 70 % humidity.
Some makers run both salami and whole-muscle projects in the same chamber, but I prefer to ferment separately. It gives me freedom to push humidity higher without risking case-hardening on other meats. If you want more detail on fermentation and chamber design, see my guide on how to build a DIY meat curing chamber — it covers airflow, controller setup, and insulation basics.
I’ve even improvised small fermentation spaces, like using a friend’s unused shower room for a batch of salami. It worked surprisingly well for a short run, but once you experience a chamber you can fully control, you’ll never go back to improvising. Building a purpose-built setup not only improves quality but also reuses old fridges or wine coolers — a simple way to keep equipment out of landfill while creating the perfect curing environment.
Different Ways to Control Humidity
Creating the Right Environment
Humidity control depends heavily on where you live. In temperate or coastal climates, the ambient air might already sit within the desired range. In hot or dry regions, you’ll need tools to stabilize conditions. I’ve spoken with people curing meat in climates where it never drops below 77 °F (25 °C); in those cases, a fully enclosed, climate-controlled chamber is the only practical solution.
Some beginners experiment with bowls of salt water or humidity packs, but those only create minor short-term effects. For multi-month projects, you need equipment that can add or remove moisture as required. That’s where humidifiers, dehumidifiers, and humidity controllers come into play. My detailed Inkbird humidity controller review explains how automated dual-stage control can maintain stability with almost no daily adjustment.
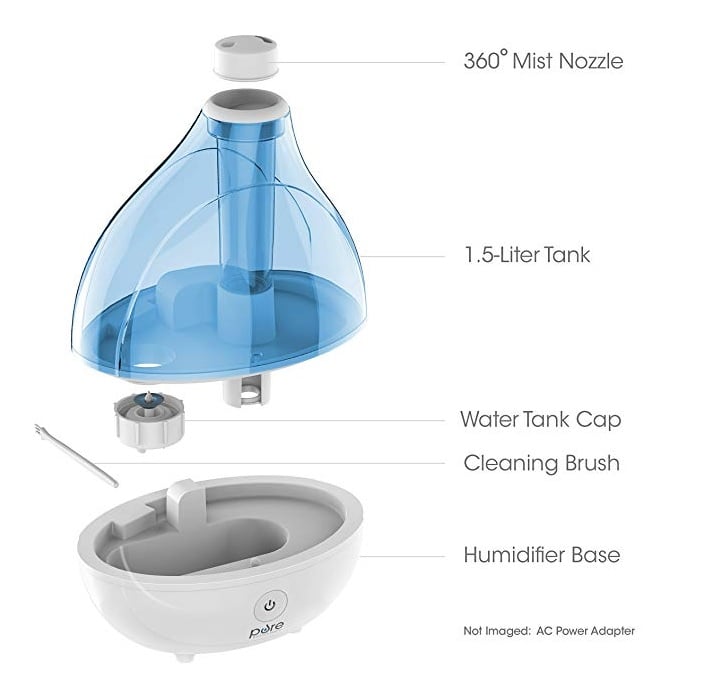
Humidifiers
Ultrasonic humidifiers are my go-to. They produce a fine, cool mist, run quietly, and most include replaceable filters. For long projects, pick a model with a large enough tank that you’re not refilling daily, yet compact enough to fit inside or beside your chamber. I often use this ultrasonic humidifier; it’s been reliable across several converted fridges.
Placement matters — keep the unit low in the chamber so the mist rises and spreads evenly. To go deeper into product options and features, check my comparison of humidifiers useful for meat curing, which breaks down performance and maintenance tips.
Dehumidifiers
Excess humidity can be as troublesome as too little. If moisture sits above 80 %, unwanted molds and sticky surfaces appear quickly. A small, low-noise dehumidifier works wonders here. I’ve had great results with a compact Pro Breeze dehumidifier. It fits neatly in the chamber and has proven reliable for months-long runs.
Place it so airflow moves across the meat rather than in one corner, and empty the reservoir regularly. To understand how to integrate both humidifiers and dehumidifiers for balanced control, my overview on choosing the right temperature controller for a curing fridge shows how to coordinate humidity and temperature management together.
Different Ways to Control Temperature
Temperature is the second pillar of consistent dry curing. Too warm and the meat dries too quickly on the outside; too cold and microbial activity slows to the point where spoilage becomes a risk. The simplest and most reliable solution is a plug-and-play temperature controller paired with an old fridge or wine cooler.
Over the years I’ve tested several controllers, but the one I reach for most is the Inkbird ITC-308 temperature controller. It’s accurate, easy to wire, and can switch your fridge’s power off or on automatically to hold a steady range. For full specifications, see Inkbird ITC-308 temperature controller specs on the manufacturer’s site.
Depending on the fridge you’re converting, you might notice quirks. One of my old drink fridges, for example, kept the fan running even when the compressor was off, which caused condensation and uneven cooling. Re-wiring the fan so it ran only with the compressor solved that instantly. Every chamber behaves a little differently, so don’t be afraid of small experiments — that’s part of the craft.
If you’d like more on wiring, controller choices, and troubleshooting, check the detailed guide on choosing the right temperature controller for a curing fridge. It explains how to coordinate temperature and humidity systems for hands-off stability.
For complete environmental control, pairing a temperature controller with a humidity controller works best. The Inkbird IHC-200 dual-stage humidity controller lets you plug in both a humidifier and dehumidifier so the chamber automatically adjusts up or down as needed — almost no babysitting required.
Fresh Air Flow Needed
Early on, I underestimated how important fresh air really was. I assumed the fridge compressor provided enough circulation, but without intake and exhaust points, the air became stagnant. Eventually, I cut a small intake fitted with a HEPA filter and a 3 × 3 inch exhaust. That single change eliminated off-odors and kept the white mold healthy.
For most small chambers, a quiet computer-style exhaust fan is enough to move air gently. Mount it so airflow passes across the hanging meat, not directly at it. That subtle exchange of fresh air prevents stale buildup and keeps humidity consistent throughout the cabinet.
Important Factors for Dry Curing in a Curing Chamber
Even with perfect humidity and temperature, fundamentals still matter. These few basics make the difference between an average result and something worth slicing thin for months to come.
- Quality of the Meat Matters – Start with the best you can source. Wild game and well-raised livestock with balanced fat produce superior flavor and texture.
- Keep Everything Clean – Sanitize knives, hooks, and chamber surfaces before each project. Clean tools reduce unwanted bacteria and cross-contamination.
- Salt Choice and Optional Curing Salts – Sea salt alone preserves meat, while pink curing salts (Prague Powder #1 or #2) are an optional layer of protection for color and long-term safety. For a deeper breakdown of when and why to use them, see using Himalayan pink salt for meat curing.
I’ve been fortunate to process game from clean, wild environments. When meat is handled carefully and cured fresh — not after weeks in the freezer — the texture and color stay far superior. Salt does the preservation, but good preparation makes the magic possible.
Expert Tip
Fine-tune humidity slowly. Instead of chasing fast changes, adjust your humidifier or dehumidifier in small increments and let the chamber settle for 24 hours. This avoids over-correction and protects your ongoing projects from sudden swings.
Alternatives If You Don’t Have a Chamber
If you’re just getting started, you can still practice the fundamentals without a full setup. Try smaller pieces of pancetta or bresaola inside a standard refrigerator or a naturally cool room. Results may vary, but it’s an excellent way to understand how salt and airflow affect texture and flavor before investing in gear.
My illustrated tutorial on curing meat in a regular fridge without modifying it walks through exactly how to manage airflow and moisture using only basic tools.
What is the best humidity for a curing chamber?
Aim for around 75% relative humidity. Short daily swings are fine as long as the long-term average stays between 60 and 85%.
Do I need both a humidifier and a dehumidifier?
Not always. Dry climates may only require a humidifier, while damp regions benefit from a dehumidifier. A dual-stage controller keeps levels most consistent.
Can I cure meat in a normal refrigerator?
Yes. For small cuts like pancetta or bresaola, a household fridge works — just expect slower drying and check regularly for surface dryness.
How can I tell if the mold on my cured meat is safe?
Healthy mold is white and powdery. Green, black, or fuzzy molds are undesirable; wipe with vinegar and stabilize your chamber before continuing.
If you’ve built your own curing chamber or tried other methods, I’d love to hear what worked for you. Share your experience or questions in the comments below — your insights help others learn this craft too.

Tom Mueller
For decades, immersed in studying, working, learning, and teaching the craft of meat curing, sharing the passion and showcasing the world of charcuterie and smoked meat. Read More
Hi Tom, I recently discovered your website and it’s a real treasure trove of information.
I have a question on a 4.5 lb Pork shoulder that I’m attempting to cure into Spalla.
I salted for roughly 3 days in a ziplock bar in the refrigerator with a pan and 8 lb weight on top (as per Ruhlman and Polcyn’s Salumi).
When I took the shoulder out of the bag to hang, it had a slightly greyish tinge to it. I know this is probably because of oxidation but I wasn’t sure if this would negatively affect the curing process?
Also, I purchased this shoulder a few months ago at the farmers market (sold frozen) and it’s been in the back of the freezer ever since. The packing date was mid February, so I also wasn’t sure if the long time in the freezer would negatively affect the curing process? And perhaps this contributed to the greyish tinge/oxidation?
So is the the greyish tinge/oxidation okay?
And is the long time in the freezer okay?
Should I scrap this shoulder and Star with a fresh one?
Thank you so much for all of the information on your website! Keep up the great work!
Hi John,
Thanks for your kind words, really encouraging for me.
I double checked, but I am presuming you didn’t use any nitrates/nitrites.
Check out this too:
https://asktheexpert.custhelp.com/app/answers/detail/a_id/109/~/what-causes-grayish-color-on-cured-pork%3F
It’s really hard to guess what’s going on without seeing it.
But yes I would say oxidation, smell it and try using your senses, does it have any ‘off’ smell (our evolutionary noses are quite useful)
Fresh frozen meat that is thawed and then cured, I personally have had no problems with – as long as it was fresh (so you have to get your source to acknowledge this)
I know recipes don’t have (pink) curing salt, but I prefer to use it, not just for color but also the other obvious safety reasons.
(freezers can deteriorate smell/flavor so it depends how its frozen too (with air or without like with vacpac (which we do for harvest wild game generally), i friend had a wild young goat in the freezer for 2 years…we roasted it up, it was amazing! just a random story.
All the best,
TOm
Hi Tom, thanks for your very informative blog! Based on your DIY chamber booklet I’ve almost got a complete setup hooked up over the past week, can’t wait to see the results.
I do have a query regarding lower temperatures. As I don’t yet have a dehumidifier I have been controlling the humidity through having the fridge plugged into the humidity controller to try and maintain an average of 75% RH. Now with the current climate and setup I have this has the chamber averaging around 7deg C. My thinking is that this is preferable to when I had the fridge controlled by the temp controller to maintain ~12deg C, but RH was averaging 85%.
Just wondering what the downside would be to having the temp a few degrees cooler, but the humidity in the desired range?
Thanks again!
Chris
Thanks Chris!
Interesting… 7 Deg could mean thinks drying slowly…
Also, beneficial bacteria (penicillin) prefers is a little warmer too
85 is doable, but when you have meat in there (which is 70% water), it’s going to probably be a wetter environment, initially.
Might need that temp controller too…
Cheers
T
Gday Tom,
Thank you for putting in so much effort in your site and sharing your experience. As a babe in the woods when It comes to curing (iv only made hams, bacons, and pancetta) having someone share the lessons they have learnt is much appreciated.
Thanks for your time.
Seth,
Broome, Australia.
Cheers Seth, Much Appreciated!
If there is any topic you want to suggest feel free. Sounds like you are on the right track!
Cheers
Tom
Hello Tom,
I wanted to thank you for all the knowledge I’m getting from your blog. I’m getting into charcuterie. As a 28 yo French woman it was about time !
Everything is easy to understand and clear. I really enjoy the percentages used to calculate almost everything.
Thanks again !
Nice Sophia, thanks for the kind words. Check out the courses link at the top if you want a booklet on DIY curing chamber, my ‘charcuterie’ course will be out later this year too! 🙂
I recently found out you can ‘equilibrium’ percentage calculate your pickling of vegetables!
Hi again !
I have a question this time : I just bought a wine cellar (18 bottles). I programmed it at 11°C/52°F. Unfortunately it’s pretty hot in France and the actual temperature of the cellar is 17-18°C/62,6-64,4°F.
It it too high ? Can it cause spoilage or just a longer time for the meat to cure ?
Thank you so much for your help.
Howdy,
I prefer 11-13C all the time, since bacteria grows exponentially the hotter it gets. Personally, I wouldn’t.Portable cooler? plugged into a temperature controller? Whole muscle meat maybe, salami no thank you! Viva La France! (home of real chhhaaarcuuuterrrie!) Better to try smaller pieces in a fridge, I wrote about this here.
Tom,
I need to buy a portable cooler. Hopefully I’ll be able to find that in some store.
I only have whole muscle meats hanging in there at the moment : lamb pancetta arrotolata, bresaola and beef bacon.
I’ll wait for the cooler months to try salami. Can’t wait !
Oui, vive la France ! Charcuterie is indeed a French word but I have to say the Italians are the masters in that matter.
I know we have amazing charcuterie, I’m Muslim so no pork for me. That’s why I decided to try curing meat at home. and your blog is so amazing to lear about that.
I had another wine cellar that was too small to hang the meat, I had to lay it so the pieces preciously mentioned have been curing in there at 13°C for 2-3 weeks and I just transferred them to the 17°C wine cellar to be hang. Hopefully, they’re dry enough to handle the hotter setting.
Thanks again for your tips !
Nice! Your on track! 🙂
Tom, gem of a site and already great help as I begin my own dry-cured meat hobby.
I have just set up a small curing chamber, 8 ft cu, from a refrigerator but am seeing some instability in my humidity control…..confirmed by a recording temp/hum monitor. Temp stays right in range. What I see is my humidity collapses in conjunction with the temp dropping….appears the humidity collapse might precede temp drop but not certain, they follow very closely. I assume the compressor is on during the drop. Humidity comes back with temp but sometimes overshoots and crawls back down as dehumidifier comes on. I ended up unplugging the humidifier as it appears I don’t need it in such a small space. Controller is working correctly and switching when it should. Total cycle during the swing it about the same time as when its stable in-range.
Whats going on and is it anything to worry about?
Thanks mate! Oh the joy of the craft and balancing the gear! If it swings like 10%, no problem. I’ve had similar things with chambers, but when the compressor is ‘drying’ things out too much – it does tend to get the dreaded case hardening (which can be remedied by vapacing for 2-3 weeks in fridge). I had this probably with a large commercial fridge, too much power!
I had a friend diffuse the airflow with a metal plate and another commercial fridge, which actually also had an impact on stabilising humidity. Trial and error is the way! Cheers T
Hi Tom,
Lots of great info here!
I’ve been wanting to find out if my crawlspace (no actual crawling required) is suitable for hanging and curing meats. Ultimately, I feel like what I need to do is get daily readings of min/max temp and humidity over the course of a year or so to determine whether it stays in the curing temp and humidity ranges. I live in the PNW, so we’re rarely very hot or cold, and the basement of course mitigates that further.
Do you have any recommendations on gear that would collect those readings (ideally, digitally) and record them so that I can do a trend analysis?
Hey mate, thanks!
I’ll be getting something like this soon, temp & humidity sensor/logger
prob get most consistent in basement? If your approx. in the right zone of 10-20°C, that’s fine/ humidity not ‘dry’ over 60%. If your thinking longer term dry curing.
Remember Parma Ham is in controlled environment for 3 months, then often its just hanging around in a building with the windows open, when it rains they close the windows!
Morning Tom
i have a biltong box of about 300mm square and 420mm high with a fan, can i put salt water at the bottom of the box hang the salami and then let the fan run. Will that work. I am in South Africa
for drying or fermentation? For fermentation, if it matches the starter culture, sure. For drying, unless you can keep that temperature down under 15-17C probably not. All the best,
Tom