The goal here is to give people the confidence to take an interest in an ancient craft that can be done at home as long as a solid process is followed and common sense is used.
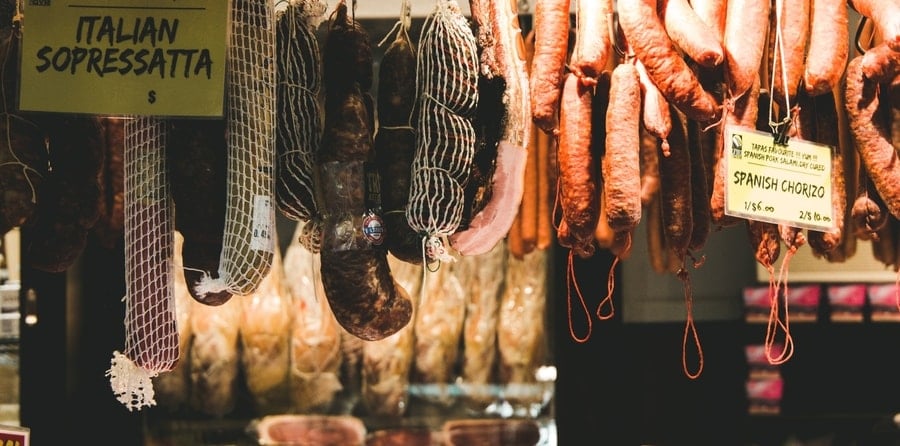
Dry-Cured Salami – There are two main types of salami – cooked/hot smoked or dry-cured.
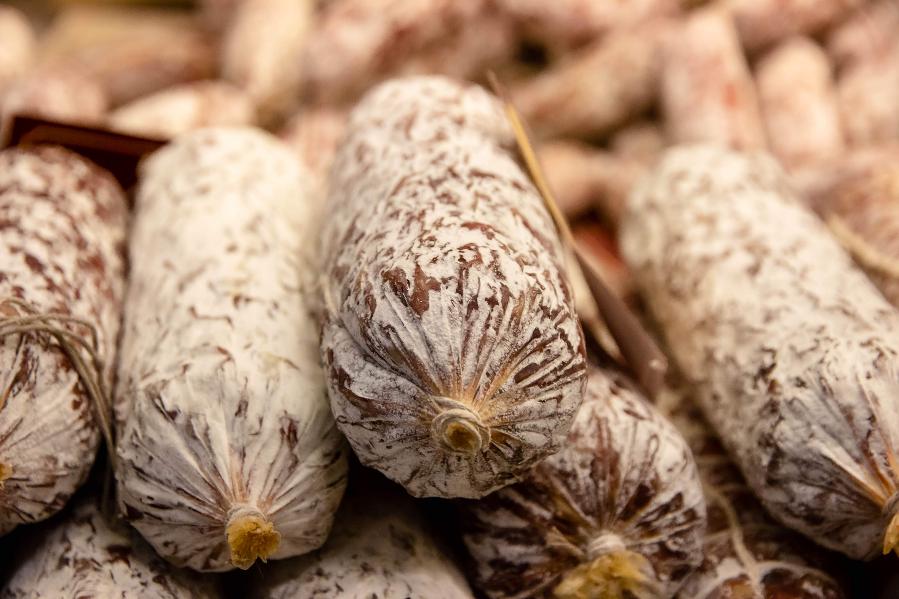
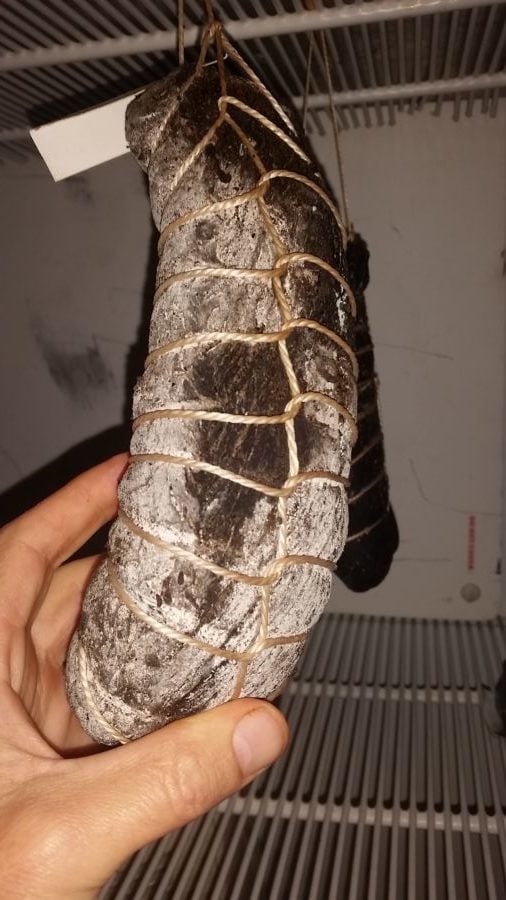
Dry Cured is a traditional kind; it looks like this. The focus is on this dry-cured style.
After making and savoring dry-cured meats including all the variations of salami for a few decades, and making my own over the last 15 years. I hope to demystify some of the craft and hopefully share my passion. You will find some of the traditional methodology sprinkled with some modern techniques.
I will mention this quite often—dry-cured salami, especially making it at home. I would look at it after you have tried dry-cured whole-muscle meat and have had an introduction to how it works.
Dry-cured salami making involves good bacteria and its relationship with meat. I’ll also cover this a bit more later.

I’ll explain the modern perspective of using equilibrium curing to get an adequate amount of salt while also choosing the level of saltiness to suit your taste preference.
The goal here is to give people the confidence to take an interest in an ancient craft that can be done at home, as long as a solid process is followed and a good sprinkling of common sense is always useful.
Cooked Salami
Now, where I was brought up in New Zealand, many of the butchers immigrated from the United Kingdom. They would sell a type of cooked salami, which is also often smoked, and some still do.
This is a kind of cooked sausage that some Eastern European countries (Poland, Slovakia, Czech Republic, etc.) call dry-cured salami—”sausage.”
I have had a delicious hot-smoked salami cooked in this style, but it is relatively simple compared to the dry-cured and fermented salami below.
I just wanted to clarify the difference so I can hopefully not confuse you before we move on!
Firstly, I would like to list all the steps to give you an idea, and then I’ll go over the basics of making dry-cured salami.
Then, I will elaborate on these steps to better understand why and how.
Process of Dry-Cured Salami
How To Make Dry Cured Salami
- Understanding the Dry Curing Process
- Use proven recipes
- Mince / Grind Meat
- Add Salt, Spices, Starter Culture, and Nitrites/Nitrates
- Soak Casings if Using Natural Types
- Stuff into Casings
- Prick to Release Air Pockets
- Tie off into the Desired Length of Salami
- Ferment (Recipe Dependent)
- Innoculate with Mold Culture (Optional)
- Hang to dry
This process is based on achieving ‘consistent’ results. There are many old-school recipes out there, which may work. But using starter cultures and controlled environments (fermentation chamber and dry chambers) are all part of getting some ‘consistency’ for me anyway- I don’t like to waste meat whether I have harvested it from the wild myself or purchased it.
Cooked is reaching an internal cooked temperature for the meat. Cooked Salami (often hot smoked – here is a link to the hot smoking category list on this site)) has a ‘cooked flavor, but can still be wonderful. It’s just that it won’t have the stronger more complex flavors that dry curing can create, losing moisture and the ‘funk’ of dry curing – give that complexity and mystery to salami I think.
So I’m going to go into some ‘ detail’ about each of these steps, so you guys can understand the basics. But I don’t want to create a ‘how-to’, I would prefer you to do the research (and also do one of my courses when it’s out – link at top of the page).
Advanced Meat Curing Charcuterie – Salami
*Disclosure*
This is an overview and breakdown to demystify the subject of dry-cured salami.
I have seen YouTube videos of Italians making dry-cured salami without mincer, sausage stuffers, nitrates, and hanging the salamis in the basement.
As opposed to a consistent white mold on the outside, the many colors of the rainbow of the various molds on the outside can still mean is ‘ok”.
I’m after consistency and not wasting time and effort, so this ‘meat science’- based approach is my preference (even though I am a cowboy of spice blend flavors!).
I’ll put a bunch of references to some good books at the bottom.
But my accumulation of knowledge is based on reading books about making salami, my experiences of making salami (10 years), and knowing butchers that sell salami commercially (though my memory sucks as well).
The Internet can be a fickle place and even Google gets those Google answers wrong sometimes. Here is hopefully a resource that has a bit of “quality meat” in it.
1. Understanding the Dry Curing Process
I feel that the basics of dry curing are really important to grasp before making dry-cured salami. First, you need to understand the salt and the drying of whole pieces of meat.
If you effectively salt cure something, such as a chunky piece of meat, the worst scenario is that the outside will dry out before the inside, leading to spoilage and complete waste.
This is another reason why so many people create their own DIY curing chamber (here are some DIY humidifiers I wrote about) to control temperature and humidity allowing for even drying of dry-cured meat projects over the long term.
Here is another post on the basics of meat curing at home.
Then, I have another one based on how to make a DIY curing chamber at home.
2. Use Proven Recipes
I’m hesitant to put just about any recipes, but there are a few that I feel are probably based on similar literature.
Hank at Honest Food covers some salami charcuterie. Check out this basic recipe. It’s a bit oversimplified but worth a read.
3. Mince / Grind Meat
It doesn’t take a very high temperature for fat to start melting, and this is something that really you want to avoid when you’re making salami. So to start off your want the meat as close to frozen as possible, but not frozen.
In addition to minimizing bacteria, it is also about having that separation, which you kind of expect from many traditional dry-cured salami recipes.
4. Salt, Spices, Starter Culture and Nitrites/Nitrates
From a failed commercial catering type business, I’m lucky to have giant roasting baking commercial aluminum trays, which are perfect for mixing together spices and meat and all you need to create salami.
Sometimes, I make salami with a friend. Pete has a giant marble kitchen benchtop, which is cleaned properly. We sometimes just mix everything up before stuffing it on the marble.
Getting an even dispersion of all the spices, salt, and nitrates means you have to work the meat for a fair bit of time, folding and flipping it like sourdough bread.
Slow Fermentation & Fast Fermentation Salami
The more scientific approach used these days, especially to get consistent commercial results, involves introducing mold cultures to lower the pH level inside the meat. This increases the acidity level, making it challenging for bacteria to thrive.
Now, there are good bacteria and bad bacteria.
This is penicillin; it can naturally occur on and around the meat, and once it’s established, it can be stored inside a home curing chamber (more on this later).
Then you can find it will magically appear when you put the next meat curing project nearby (for me this is an old second fridge with some controllers – popular for the home meat curer – see course for a booklet on this).
You can also buy this mold culture pro
5. Soak Casings if Using Natural Casing
30 minutes soaking I think is about right and then rinsing them through, there is also the addition of vinegar that some people use a very small amount, however.
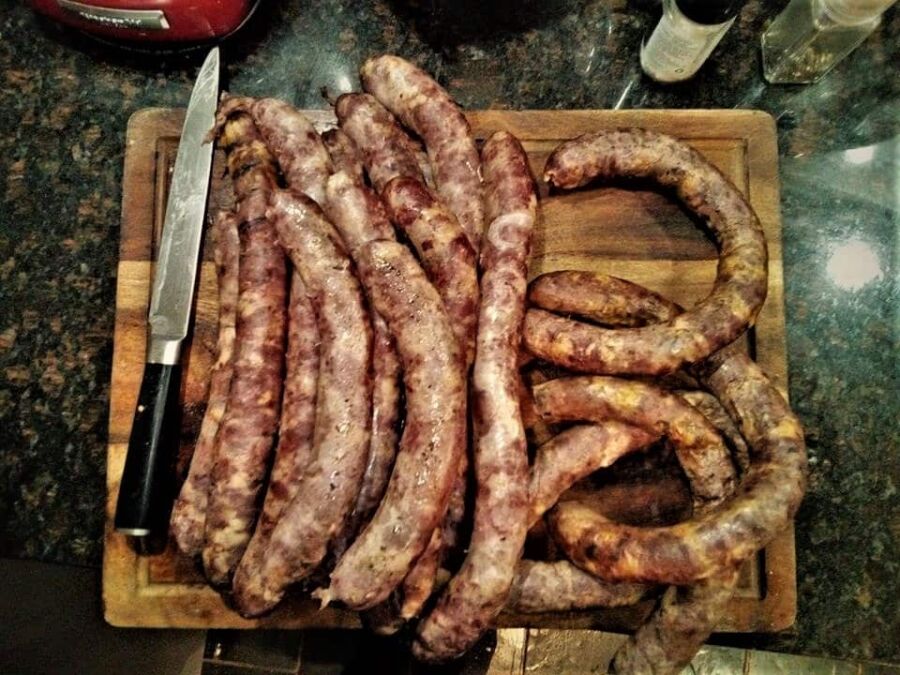
6. Stuff into Casings
I find this probably one of the most fun aspects of making salami, you are always trying to keep things tight and I think it’s one of those skills that just takes practice like most things!
It’s not a big deal if there is a split you can also always tied off and try again its reasonably forgiving.
Some people do find the non-natural casings easier to work with. I kind of like edible natural casings, but each one to their own.
7. Prick to Release Air Pockets
Pretty straightforward part of this but very important that any of your air pockets are released from under the casing whether natural/synthetic.
8. Tie off into Desired lengths of Salami
Sometimes a really long salami can be difficult especially when you’re hanging these up. Actually had a learning experience making Hungarian salami and trying to have them 2 ft each. Sometimes the knots just might not hold especially since casings are slippery to work with.
Having a loop at the end helps to hang the salami for fermentation and drying. The whole point of hanging is to avoid contact with either the meats or the environment which could lead to unwanted bacterial growth.
9. Ferment (Depending on Recipe)
It depends on the recipe, but if starter cultures are used, there are many DIY ways you can do this. Having a heat source inside a DIY curing chamber (old secondhand fridge setup with some plugin controllers to turn things on and off) as well as the humidifier, and dehumidifier is quite common with the home salami making these days.
(I used a wet warm bathroom once, not recommended)
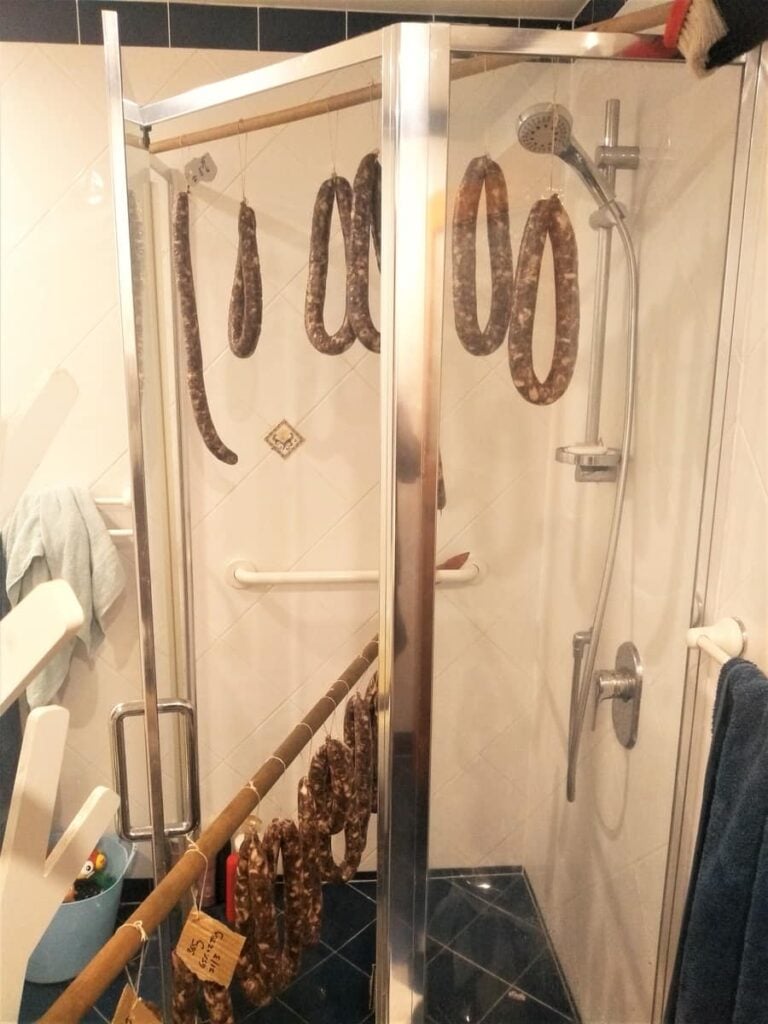
Ice boxes are used but since they are ideally hung up this might need to be a big ice box!
10. Inoculate with Mold Culture (Optional)
This can really boost up the beneficial white mold on the outside, it does have a certain flavor but of course, casings can be removed when the product is finished or during with vinegar.
You generally only have to do this once because the mold flora will be present in the chamber/area, however having a separate fermentation and drying chamber is a kind of ideal to separate the mold cultures but they can live kind of happily together.
11. Hang Salami to Dry
I think I’ve mentioned above that some guys just hang the salami around the house, and this can work; however, my preference is to have a controlled environmental area, which is why I use secondhand fridges.
Weight Loss
The minimum is 30% most guys prefer 35% weight loss to deem salami rated to go. The drier it is the more intense the flavor for some recipes I prefer 40% or above as well. Like many things, it just comes down to personal preference!
Important Concepted and Aspects
Challenges with Dry Cured Salami
Why is it a little more complex:
- Avoiding air pockets – which can grow nasty bacteria ie. trap oxygen for bacteria to thrive
- A fine balance of controlling ‘beneficial’ mold, inside and out
- Ideally, increasing acidity by dropping pH -the acidic environment also makes it very hard for bad bacteria to establish itself
- Nearly ice-cold, keeps the separation of fat/meat cleaner-looking
Some guys may nail it, some may not – and that’s half the fun of the craft.
So it’s a balance of curing, process, molds, and environment mainly.
I get quite a few comments from people who have just found a recipe and decided to quote-unquote ‘have a go’ at making the salami. Because of all the variables, it’s really hard to give advice based on a few sentences to start with.
Bacteria – Good, Bad and the Wicked
As mentioned above there is the good and the bad, I am the wicked one.
Once the salami has been introduced to salt, spices, pink curing salt, and mold culture, the fermentation stage begins at 8 hours to 72 hours or longer (depending on the start culture preference).
Here are some ‘descriptions’ of different mold cultures.
The key here is that the humidity or moisture levels are quite high whilst also the temperature is above the dry curing temperature (50°F or around 11°C) – depending on the culture being used.
This is one of the many variables when it comes to salami making. You can buy various mold cultures; they prefer different conditions during this fermentation inoculation stage.
One of the ‘old-school’ methods was to use wine as a fermentation tool to lower pH and therefore increase acidity, the goal behind all this is to create an acidic environment so the unwanted bacteria doesn’t like it.
Bacteria you don’t want don’t like salty or acidic environments.
Pink Curing Salt & Nitrites/Nitrates
I have had to read a lot of literature, both opinionated and scientific, when it comes to using pink curing salt, either number 1 or number 2.
Basically, pink curing salt number 1 is often used for meat curing that is cured, cooked, and consumed within 30 days such as pastrami.
Pink curing salt number 2 is used for long-term dry-curing meats that are over 30 days, such as dry-cured whole muscle and also dry-cured salami.
When you compare the two pink curing salt, 2, one only has nitrites, whilst pink curing salt number two has nitrites and nitrates. With long-term curing is the nitrates break down into nitrites, and that is basically what is happening with pink curing salt number two.
It is a product dyed pink so that it is not confused/consumed by itself or to be confused with normal salt. You usually use 0.25% pink curing salt to the weight of the meat for dry curing salami at home. And because often you’re using such a small minuscule amount, it is nearly imperative that you have accurate scales, not your basic baking scales.
Generally, to 1 to 2 decimal places (0.XX); if you want some info on equilibrium curing and using scales, here is a link to a post I wrote.
There is a lot of information out there on nitrates and nitrites and whether they affect health. I do not want to tell people what is right or wrong or better or worse; I can only highlight what I do and why I do it.
I do not use pink curing salt for whole-muscle dry-curing meats such as braesola, pancetta, and lonzo (all classic whole-muscle dry-cured salumi).
There is less risk with whole muscle meat because you’re not going to have pockets of air like you would have with salami for instance. Mincing meat also of course exposes it to the environment more.
This is based on what I’ve seen across many parts of Italy (for home curers), as well as from books like Salumi by Michael Ruhlman and Brian Polcyn.
However, when it comes to salami, for dry-cured salami I do use pink curing salt number 2 (same as Ruhlman/Polcyn).
From what I have read and learned pink curing salt and nitrates become an issue when they convert to carcinogens, but only when they are exposed to hot temperatures of something like 300-350°F. So me personally, I avoid any store-bought bacon because I know it’s got nitrates in it, I will make my own bacon dry cured at home without any pink curing salt.
Uncured bacon is a legislative mishandling since the bacon is still cured with nitrites/salt – they use things like beetroot powder instead of sodium nitrite – but beetroot powder has sodium nitrite in it anyway.
Acidity (pH) & Salami
Acidity and salami are quite a significant subject matter and what differentiates dry-cured salami from many other foods. Fermentation and lactic acid are now quite a popular subject across many various fermented foods in the non-meat categories (ie. yogurt / fermented grains).
Basically lactic acid is a product of the fermentation process -the increase of acidity means the lowering of the pH. The more sugar that is able to be fermented will make the meats more ‘tangy’ or ‘sour’ (I wrote in detail about the unique taste of salami here) in flavor.
In terms of commercially made salami, a lot of fast fermentation is used to quickly lower pH and provide a highly acidic environment. This is in a way a shortcut to do salami fast (like in a few days), compared to traditional dry-cured salami which depending on the thickness and size could take 1 to 6 months to make.
As you can imagine commercially made salami makers just don’t have the ability to carry the expenses over that amount of time basically quality shortcuts for profit.
So when you make salami (here are an article on pH meter salami testing) at home – time and patience are very important. But also the results speak for themselves and you have a product with often, low acidic flavor and intensified umami from the drying process.
There are literally whole meat science books just acidity, fermentation and the fact is that creates various outcomes – the joy of complexity of flavor!
Fat and Meat
Glorious fat, was surprised when I came across this write up on Parma Ham the King of dry-cured classic Italian meats.
Here is the link to a Parma Ham site. There is a download pdf on some science behind this claim.
It basically talks about how the meats amino acids inside meat break down and become more digestible when meat is dry-cured. This was quite a revelation when I came across it, but I can probably imagine most of the scientific studies had done here are in Italian and not really publicized around English speaking dominant scientific journals or it’s bias propaganda (who knows, but I love Parma Ham)
The salami for me really needs a minimum of 20% good-quality neutral fat, often pork fat. 30% is quite often what I use.
I have found in certain parts of Europe 40 to 50% fat quite often the separation between meat and fat has been melded together.
We can definitely taste the grease though, I have found that longer maturation drying leads to a more pleasant mouth feel.
Some of these products are more commercially based may be the amino acids were not given time to break down and they are highly acidic – who knows this is just a food/salami for thought.
Since dry curing salami is quite often about intensifying the flavor of the meat, Using good-quality meat is the way to go if you have more subtle herbs.
Especially I like to use meats that can be traced back, about how the animal was treated, and what it ate.
I’m lucky and often harbest wild meat which I like to coin the phrase is “beyond organic“. Or else, sometimes I’m lucky enough to have mythically farmed meat where I know the story behind it.
Sugar
Fermentation – Adding certain sugars will produce more ‘tangy’ ‘ sournesss’ – higher acidity = lower pH
Most of the time I am making dry-cured salami, I really minimize the use of sugar quite often dextrose (more easily digestible for start mold cultures). The whole idea here, as mentioned above is, lactic acid feeds on the sugar, therefore, creating that acidic environment that bacteria isn’t very fond of.
At the end of the day, it’s a taste thing, and kind of sad (most) people are rather hooked on sweetness and sugar (due to confused biological signals, effective marketing, and mouthfeel – in my opinion).
Whether it’s in their barbecue low & slow smoked meat (most rubs are packed full of sugar) or glazed over (maple) bacon.
(I’m more of the savory guy personally)
Salt
Salt comes in many forms but is the cornerstone of meat curing and dry-cured salami making – it takes care of most of the bad bacteria if done at the right ratio (equilibrium curing) or using the saturation method (saturation is for whole muscle curing not salami though).
Here is a link to the basics on salt I wrote in another post.
Equilibrium curing is a way of choosing the level of saltiness but still using the minimum amount of salt to ensure the meat is cured to the point of preserving (after drying effectively).
Salt does all the hard lifting, followed by nitrates and nitrite in salami making. The finishing blow to preserve is the mold cultures, which create that acidic environment, and the penicillin-type mold cultures, which protect the outside of the meat.
Spices & Flavors
I’ve only recently come across salami with nuts but it is a complete classic product for instance. It was dry-cured salami with walnuts or dry-cured salami with hazelnuts – definitely on my list of things to create in the near future.
Herbs, spices and fruit can be where salami gets exciting.
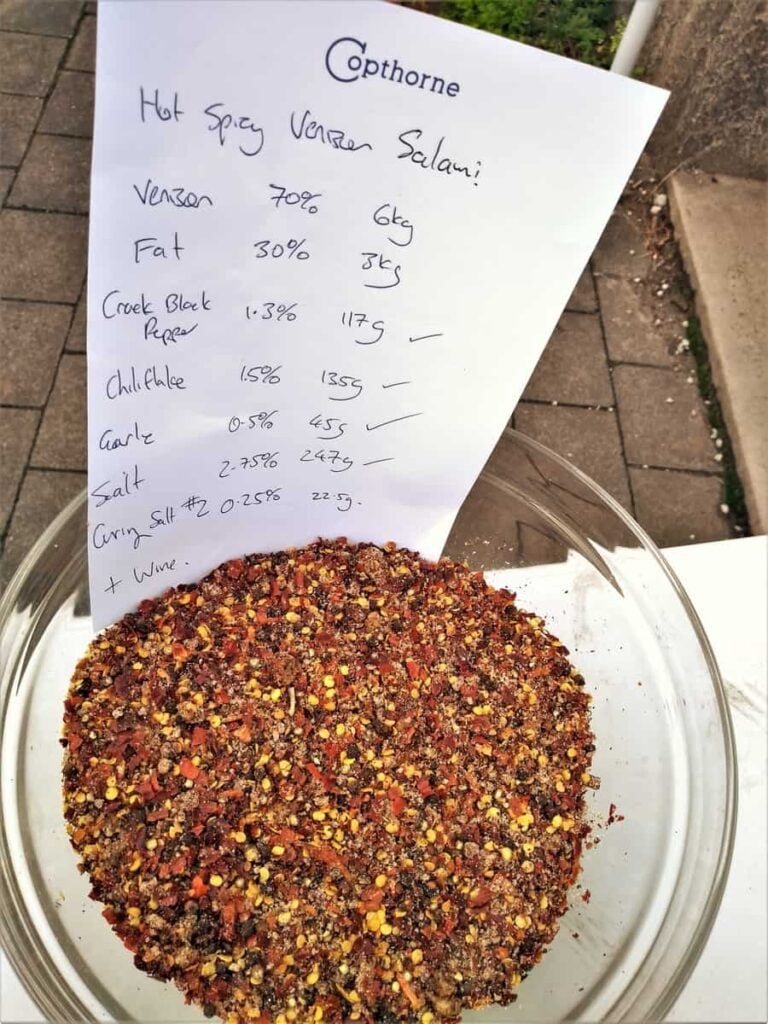
The Marianski brothers produced a formidable meat science salami book, they actually have produced quite a lot of meat curing books about the ratios of spices and a lot of idea salami from across the world.
Often in their general guide to recipes, being Polish they call the salami sausages but the ratios are.
Meat – 1,000gram/1kg
Spice – 1.5grams (1.5%)
Herbs – 1 gram (1%)
Salt – 28 grams (plus pink curing salt to reach 3%)
Pink Curing Salt 2# = 2.5 grams (0.25% of the weight)
Mold Culture / 0.12 grams
Penicillin/Inncolution (if desired after stuffing) = Bactoferm M-EK-4 / Now known as Mold 600 generally.
Another spice that you’ll see it often in salami recipes is of course peppercorns or pepper, not just for taste, it has antioxidants, anti-fungal, and antibacterial properties.
In many traditional Italian prosciutto whole leg dry-cured 12 months products, fat/lard is mixed with pepper to the to protect exposed areas of the leg (in Spain I think also chili pepper is used).
And something that I need to really do a lot more research, many other spices and herbs hold other beneficial properties that help with the making of salami.
Equipment
As mentioned before this is all about what I use and what is considered the equipment you need to produce something consistently using the backbone of meat science knowledge.
This also takes that into account a more modern perspective on using equilibrium curing to get an adequate amount of salt whilst also choosing the level of salinity for taste.
By using equilibrium curing and also choosing the precise amount of either spice & herbs , you also calculate the minimum acceptable amount of acceptable of pink curing salt to inhabit any unwanted bacteria.
Accurate Digital Scales
I have to put digital scales, especially accurate digital scales as the number 1 tool. Because every time I am doing a meat curing project I’m using my accurate digital scales (even for salt pork, you can use over 10-15%. Eq Curing for full preservation).
Once you are measuring precisely the amount of salt, nitrates, herbs, and spices, you are also creating the ability to replicate the recipe and hopefully have a very similar result.
Having a journal or a google sheet tracking your recipes (I am creating something to share soon) I find incredibly useful when it comes to customizing my salami meat projects.
One decimal place is good, but really 2 decimal places are the best way to go – especially for strong spices like cloves and star anise.
Here is a link to a page on digital scales that are put together.
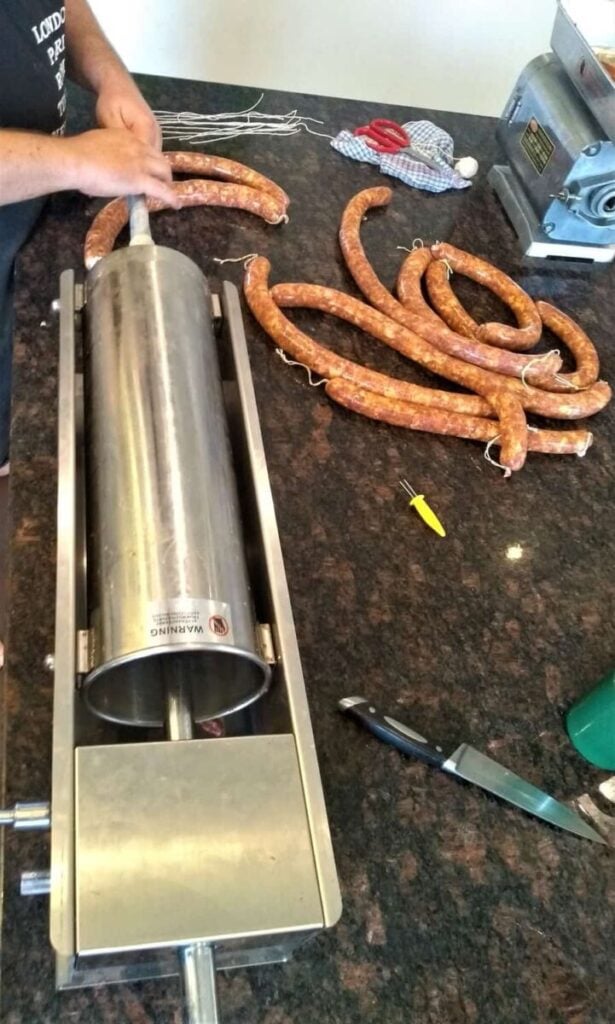
Sausage Stuffer
Have seen guys using funnels and another contraptions to achieve the same result, but a good sausage stuffer is the right tool for the job – though they do come in various designs.
I have found crank handle types whether they are horizontal or vertical to be the best.
It’s for one reason the control you have as a pushes meat mixtures into the casing, note often a two-man/woman job works well, as long as communication is clear! But it can be done with one person to.
Things like the KitchenAid accessory electric powered units can do the job, however once they start generating a bit of heat – the blending and emulsifying starts to happen with the salami you don’t get the separation of meat and fat which can be more visually appealing I find.
There is a link to some decent sausage stuffers with your making for sausages of salami that I can recommend.
Meat Mincer
It’s again getting the right tool for the job, you can get away with some smaller units or something that does “o.k”.
In saying that if you really want to be a minimalist you can use to sharp knives drawing them away from each other after slicing meat to create your own midst meat. But really you only can use this in very small quantities.
Here is a link to a page I wrote about meat mincers.
Casings
Casings come in many forms, there are natural casings based on intestines of animals mainly like hog or sheep casings.
Collagen, cellulose, and synthetic casings all have their own attributes and aspects.
Personally I like to use natural good-quality animal casings, it’s not something which you want to go cheap on. The most annoying thing is stuffing a salami and having a casing that’s continually ripping or breaking on you.
The good thing is that you buy 30 or 100 ft of casings, as long as they are kept in the salt and refrigerated then you can get quite a few months out of them for various salami stuffing projects.
Mold Cultures
I would open up a can of worms getting into a lot of detail about mold cultures, probably be best to link to an official supplier here.
Pricking Device
You always want to release air pockets between the meat and the casing after stuffing. There are specific pricking devices that are used for this but you can just use a needle. As long as the salt, and the nitrates used in the right way with the right amount – the meat should be protected in the casing. Casings have permeability and ‘breath’ when the drying process is happening.
Dry Curing Environment – Chamber / Natural
Another topic that would start a whole new topic – check out the courses page for a ‘booklet’ on DIY and natural curing chambers

Tom Mueller
For decades, immersed in studying, working, learning, and teaching the craft of meat curing, sharing the passion and showcasing the world of charcuterie and smoked meat. Read More