Most folks don’t realise Original Mortadella has 800 years of History in Bologna, Italy. I had the pleasure of meeting Davide, the President at the time of this classic at his salumeria, Simoni (often considered the best Mortadella in the world).
Mortadella is a light cured cooked emulsified meat icon — silky smooth, delicately spiced, and studded with those signature cubes of fat or pistachio.
You cannot compared this to American baloney! Baloney is the mass produced commercialized product (so is Mortadella across Italy though)
While it’s a not as technical as salami, making mortadella at home can be incredibly rewarding.
With the right approach and some careful emulsifying, you can craft a version that can mimic what you find in Bologna.
Why I Love Making Mortadella
After years of making salami and dry-cured whole muscles, I was drawn to mortadella because it represented something completely different — smooth, emulsified, and cooked instead of dried. Emulsification is another style that is like a craft on it own with certain nuances, I try to elaborate on.
I was a bit intimidated at first, but once I understood the steps, I realized it’s very doable at home with the right setup.
What makes mortadella so satisfying is the balance: light aromatic spices, visible fat cubes, and a creamy meat paste all carefully squeezed into a neat casing.
It’s a showpiece meat that slices perfectly thin and makes a sandwich or antipasti board feel elevated.
We’ve made this a few times now, tweaking small details each round. There’s definitely a learning curve with temperature control and emulsifying, but once you get it, the results are amazing.
And nothing beats that first slice after cooling — tender, savory, and rich without being heavy.
Key Ingredients
This recipe uses a traditional ratio of pork shoulder, back fat, and classic Italian spices.
The formulation below is based on 1000g (1 kg / 2.2 lbs) of total meat (including showcase backfat) — you can scale it up or down depending on your batch size. The recipe card below with have a auto adjustment for your total meat weight.
| Ingredient | Amount | Approx. |
| Salt | 17.5 g | 3 tsp |
| Cure #1 | 2.5 g | ½ tsp |
| White pepper | 2.0 g | 1 tsp |
| Whole peppercorns (showcase) | 4.0 g | 1 tsp |
| Coriander | 0.5 g | ¼ tsp |
| Garlic powder | 1.5 g | ½ tsp |
| Anise | 1.0 g | ½ tsp |
| Mace | 1.0 g | ½ tsp |
| Caraway, ground | 0.5 g | ¼ tsp |
| Pistachios, whole (showcase) | 35 g | ¼ cup |
| Red wine | 60 ml | ¼ cup |
| Cold water | 60 ml | 2 oz fl |
I use pork shoulder (aka pork butt), which generally contains around 25–30% fat — ideal for this recipe.
The salt percentage for this is in-between what i use for fresh sausage and dry cured meats, I’ve found this suited to our tastebuds.
You’ll also need back fat for the showcase cubes, which are cut into small pieces and blanched before mixing into the paste. This keeps them firm and intact during cooking.
The spice blend is subtle but important — mortadella should have a gentle aroma without being overly spiced.
You’ll notice no sugar, binders, or milk powder here — just meat, fat, spice, and care. Often with emulsified commercial products, they use the process of emulsification to ‘hide’ ingredients or add water retaining additives to make more profit.
Substitutes
Mortadella is traditionally pork-based, but you could substitute part of the meat with lean beef or veal if desired.
Just be sure to maintain at least 20% fat content for proper emulsification and flavor.
If you don’t want to use pistachios, you can try toasted hazelnuts or green olives — both offer visual appeal and some nice contrast.
Just avoid anything with too much moisture that could break the mix (unbind the myosin).
Key Equipment
Mortadella requires precision — you can’t wing this one. These are the pieces of equipment I consider essential for a successful result:
- Meat Grinder – At least two grinding plates (6mm and 3mm). You’ll grind twice to get the right base texture.
- Food Processor – A bowl cutter is ideal, but a sharp-blade food processor in small batches works if you keep the meat ice cold (expect an involved process).
- Casings – Fibrous casings in the 80–300 mm range. Bigger is traditional, but use what you can find.
- Probe Thermometer – Accurate cooking to internal temp is critical — don’t guess here.
- Stuffing Setup – Either a sausage stuffer or funnel setup. Mortadella paste is sticky and firm — it takes effort to stuff well.
I learned early on that heat is the enemy. Chill between each step, freeze mixing bowls, and do everything you can to keep temperatures down.
How to Make Mortadella
This process takes a few rounds of chilling, mixing, stuffing, and cooking. It’s best done in stages with a cold workspace and a clear plan.
Below is how I break it down — starting with prepping the meat and fat, then moving on to the emulsification, stuffing, and gentle cooking.
Preparations
Step 1: Prep the Fat
Cut high-quality back fat into small cubes (¼” or 6 mm). These will become the visible white specks inside the mortadella.
Briefly blanch the cubes in simmering water for 5–10 minutes. This helps them stay intact during cooking and avoids greasy bleeding into the paste.
Step 2: First Grind
Tip – I also like to freeze the grinder attachments, only do this if they are durable enough for the freezer. Freeze it with the plate you want on it!
Grind the chilled pork shoulder using a 6 mm plate. If you’re using beef or veal in the mix, include it here as well.
Once ground, spread the meat on a tray or bowl and place it in the freezer for 20–30 minutes. You want it very cold, but not frozen solid.
Step 3: Second Grind
Run the chilled meat through a 3 mm plate for a finer grind. This gives you the smooth, almost pâté-like texture mortadella is known for.
A powerful grinder is helpful here — you’ll be pushing dense meat through a tight plate, and a weak motor will slow things down or heat the meat.
We use a 1 HP grinder, which is powerful.
Step 4: Mix & Bind
Combine the ground meat with all ingredients except pistachios, back fat cubes, and whole peppercorns. Use a stand mixer or by hand — the goal is to develop a sticky bind.
This process extracts myosin from the meat — it’s what helps hold the sausage together. Add the cold wine and water slowly, in 2–4 stages, to hydrate and enhance binding.
This is also when you’ll add pink curing salt (Cure #1), which preserves color and protects during the cooking phase.
Step 5: Emulsify
Working in small batches, emulsify the mixture in a food processor. Chill the bowl beforehand and keep everything cold throughout to avoid overheating the fat.
Process until smooth but not whipped — overmixing can add air, which changes the texture. You can see holes in the meat once the product is cooked, like in these pictures below. The result should be dense, sticky, and uniform.
I chilled the mixture between batches, working in 3 or 4 rounds total. If it starts to warm up, pause and return it to the fridge or freezer briefly. Instant meat thermoeter probe is useful here.
Step 6: Add Fat, Pistachios & Peppercorns
Gently fold in the cooled back fat cubes, whole pistachios, and peppercorns. Use your hands or a spatula — you want to distribute evenly without breaking the emulsion.
Once everything is combined, you should see a smooth, pale pink paste studded with white and green bits. It’s ready to stuff.
If you need gear for this step, here’s a breakdown of essential meat curing equipment I’ve used over the years.
Step 7: Stuff into Casings
Use fibrous casings around 80–100 mm diameter. Wet the casing first, then fill firmly with the paste, avoiding air pockets.
Prick the casing all over with a sausage pricker or sterile pin to release trapped air. Tie off securely at both ends with twine.
Cooking
Step 8: Sous Vide, Steam, Poach or Bake
Place the mortadella in a pot of water heated to 176°F (80°C), or bake in a covered dish at the same temperature. You’re aiming for an internal meat temp of 154°F (68°C).
I tried using a smoker with low heat at first, but found the casing darkened unevenly. Finishing in a covered oven produced better color and a more even texture.
The original recipe I followed from Mortadella di Bologna suggested two hours, but mine took closer to five depending on thickness and starting temp, it started in a hot smoker without smoke hanging outside, but we had a multifunction on the thermostat, we finished the cook in the oven with temperature probes into the meat to know when 68°C was reached.
Use a reliable probe thermometer to track progress. In my case, the multi-probe thermometer showed major temp differences between surface and core. Worth double checking!
Step 9: Ice Bath Cool Immediately and Rest After
Before target temperature has been reached, prepare an ice bath to stop the cooking as quickly as possible. Leave in the ice bath for atleast 30-60 minutes.
Then place in fridge, ideally overnight but if you can’t wait 4 hours minimum.
Slice and Enjoy!
Expert Tips
- Chill all equipment and ingredients — especially the food processor bowl — between steps to prevent fat smear.
- Sharpen your food processor blades before starting. Dull blades create heat and whip air into the mix.
- For perfect slicing later, let the cooked mortadella rest at least 8 hours (ideally overnight) in the fridge before cutting.
- If you use nuts or olives instead of pistachios, make sure they’re dry and not oily or wet — excess moisture can cause pockets or spoilage.
- Stick to natural ingredients. Many commercial mortadellas use powdered milk or stabilizers, but traditional ones don’t need them.
Recipe Variations
This mortadella recipe is flexible once you understand the core method. Here are a few ideas to customize it to your taste or what ingredients you have on hand.
- Different Meats: Try combining lean beef (20–30%) with pork shoulder for a deeper flavor. Veal is also used in some classic versions.
- Flavor Adjustments: Swap out anise for fennel seed or add a hint of smoked paprika if you prefer a stronger spice note.
- No Pistachios? Use green olives, toasted hazelnuts, or skip the inclusions altogether — the texture will still shine.
- Casings: Larger diameter casings (120–150 mm) are more traditional but take longer to cook. Stick with 80–100 mm for easier handling.
What to Serve With
Mortadella is versatile. It can be served cold, thinly sliced on a charcuterie board, or used in creative sandwiches. Here are a few favorite serving ideas:
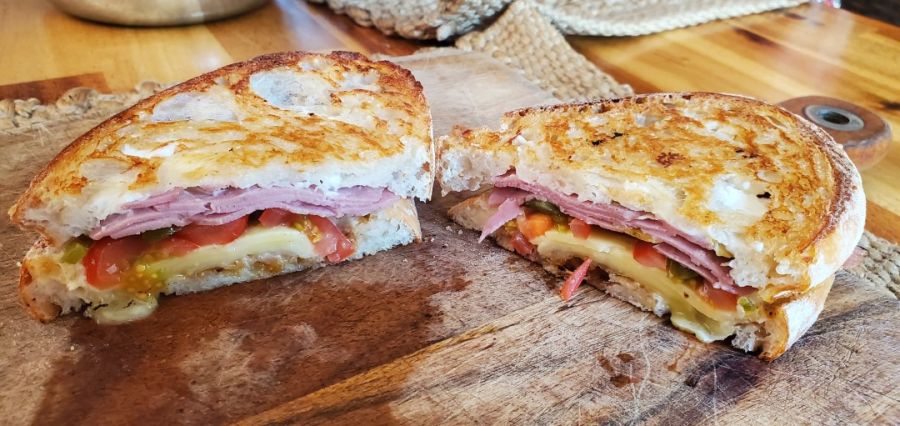
- Classic Samwich: Fresh ciabatta or focaccia, a few slices of mortadella, provolone, and pickled vegetables.
- Antipasti Board: Pair with mild cheeses, marinated artichokes, olives, and crusty bread.
- Mortadella & Eggs: Thin strips gently warmed and added to a soft scramble — rich and delicate.
- Mortadella Cubes: Pan-seared into crispy cubes and tossed into pasta or on a warm salad.
Frequently Asked Questions
Can I freeze mortadella after cooking?
Yes, once fully cooked and cooled, mortadella can be vacuum-packed and frozen for several months. Thaw slowly in the fridge before slicing.
What casing should I use for homemade mortadella?
I recommend fibrous casings between 80–100 mm for beginners. They’re easier to stuff and handle. Traditional mortadella can use 120 mm+ casings, but they take longer to cook.
Why does my mortadella have air holes?
Air pockets usually come from poor stuffing technique or warm meat. Always prick the casing and chill your mixture thoroughly before stuffing.
Storing and Reheating
Once cooked and cooled, mortadella can be stored in the fridge for up to 2 weeks if vacuum-sealed or tightly wrapped.
It slices best when cold, straight from the fridge. For best flavor, let slices rest for 5–10 minutes at room temperature before serving.
If you’d like to freeze mortadella, do so after chilling. Wrap well or vacuum seal, and freeze for up to 6 months.
More Craft Recipes You’ll Enjoy
If you’re into more cured meat projects like this, you’ll want to check out my full breakdown of what pink curing salt does — it’s essential for making shelf-stable cured meats safely.
You might also enjoy exploring other salumi and sausage-making projects — stay tuned as I expand more into emulsified sausages and charcuterie-style cooked meats.
Serving Size & What to Expect
Mortadella is rich and flavorful — not something you’d serve in large portions. Think of it like prosciutto or pâté: a little goes a long way.
Plan for 30–50g per person on a charcuterie board, or 75–100g per sandwich. For a 1 kg batch, you’ll have enough for 10–12 generous servings.
Scaling the Recipe
Because this recipe is based on a 1000g meat ratio, you can easily scale it up or down. I recommend making at least 2 kg batches to make the effort worthwhile.
Don’t forget that cooking time will increase with thicker casings or larger diameters — always check internal temperature, not just time.

How to Make Mortadella at Home
How to make the emulsified classic Italian Mortadella Cooked Sausage, it take time due to the steps of emulsify and binding, but its worth the effort. A very well balanced aromatic meat.
Ingredients
- 1000 g Pork – Fat should be 20%-30%. (include the cubed pork back fat in this total)
- 17.5 g Salt (1.75% of meat weight)
- 2.5 g Pink Curing Salt No. 1, many other names – To be used for under 30 days meat curing projects. (0.25% of meat weight) Optional See Notes
- 2 g White Pepper Powder (0.2% of meat weight)
- 0.5 g Dry Coriander (0.05% of meat weight)
- 1.5 g Garlic Powder (0.15% of meat weight)
- 1.0 g Anise (0.1% of meat weight)
- 1 g Mace (0.1% of meat weight)
- 0.5 g Caraway (0.05% of meat weight)
- 60 ml Ice Cold Water (Emulsify stage)
- 2 g Whole Black Peppercorns (showcase) (0.2% of meat weight)
- 35 g Pistachios, whole (showcase) (3.5% of meat weight)
Instructions
Preparations
-
Prepare the Showcase Fat – Blanch and Cool
-
First Grind – 6mm plate and Chill
-
Second Grind – 3mm plate and Chill
-
Mix & Bind – (exclude pistachios, fat cubes, whole peppercorns)
-
Emulsify
-
Add Fat, Pistachios & Peppercorns
-
Remove From Bag
-
Optionally, apply additional spices or aromatics before hanging – ie. chili, peppercorns
Cooking
-
Sous Vide, Steam, Poach or Bake
-
Ice Bath Cool Immediately and Rest After
Recipe Video
Recipe Notes
- Pink Curing salt is an optional ingredient – please carefully read this other article I’ve written about this.
- If you want to build a DIY dry chamber, I’ve written extensively on the topic here.
- Expect this project to take longer then you anticipate, it’s worth the effort.
Please feel free to leave a comment or ask any questions below — happy to help you dial in your own homemade mortadella!

Tom Mueller
For decades, immersed in studying, working, learning, and teaching the craft of meat curing, sharing the passion and showcasing the world of charcuterie and smoked meat. Read More