Discovering how to equilibrium cure or brine bacon was a bit of a revelation. It means I had control over the level of saltiness that you taste (rather than guessing with the old covering the bacon with salt method). I’ve been making my own bacon for about twenty-odd years.
I’ve tried dry curing and wet brining with a whole different array of smoking woods and techniques – so to settle in on one’s technique now really is a blessing.
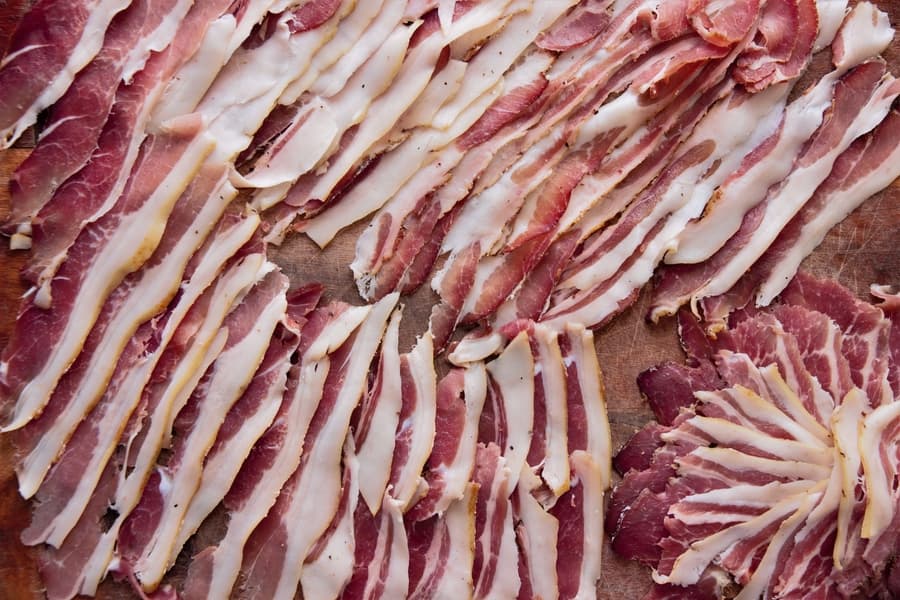
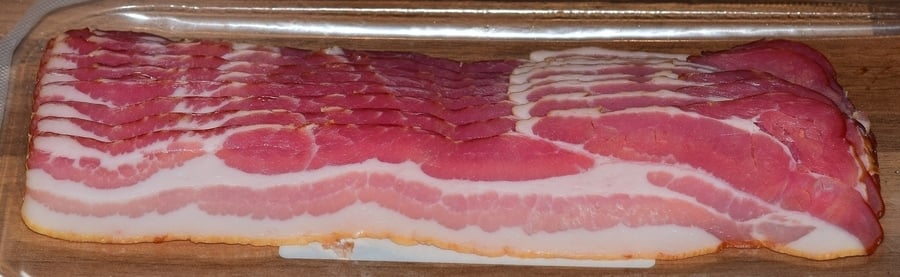
Equilibrium Curing Bacon
I created an equilibrium curing calculator to make it simple for anyone
Here is my curing calculator page.
Here is another page (with the same tool but other info) on the amount of equilibrium curing here as well.
If you’re new to bacon making or equilibrium curing, please read the rest of this post.
I’ve been using equilibrium curing for dry-curing meats, like more classic Italian Salumi. It took over the way that I cured bacon or pancetta-style bacon.
Considering that this is just a little bit of a calculation to work out the ratios. Once it’s done and recorded it’s pretty straightforward.

The most important thing you can remember is that the total amount of saltiness will include the pink curing salt (@ the recommended 0.25% pink curing salt quantity to the total weight).
So, for example, you are aiming for 2% total salt to the weight of the meat. Then, I would use 1.75% sea salt +0.25% pink curing salt.
Basics of Equilibrium Curing
Equilibrium curing is just about getting the correct amount of salt for fully curing the meat and balancing the salt level’s taste.
You get to a level where it restricts most of the unwanted bacteria, and when you add the pink curing salt, it speeds up curing, and provide another layer of protection from botulism.
I’ve found that over 4-5% is incredibly salty and too much to handle.
But I have read that 5% to 10%, is the appropriate level to use for long-term storage of meat. Just like the explorers of the old world, on their voyages across the globe with salt fish or salt pork, for instance.
Basics of Equilibrium Brining
It’s basically the same as equilibrium curing, but you add water to the mixture so that you can do it in a wet solution. As a guide, I use 40% water to the total weight of the meat, but it depends on the size of the meat and also the container you use!
The metric system makes this nice and easy to calculate.
1 g (gram) = 1 mL (millilitre)
Therefore,
1000g / 1 kilogram = 1,000 mL / 1 Liter
This works if the container is a tight fit for the meat weight.
Sometimes, it’s worth doing a bit of a test run with the meat and the container to see how much water is necessary to submerge the meat in the brining solution.
Advantages of Equilibrium Curing or Brining
Control of Saltiness
Okay, the obvious ones first: If you use an equilibrium curing or brining method, you end up controlling the level of saltiness and, therefore, taste.
For me personally, my bacon is generally dry salt cured at 2.25% total salt (which includes the 0.25% pink curing salt). It depends on your perception of saltiness. I know a lot of people who love to go a lot higher and a bit less.
For every packet of bacon in the shop, I tend to read the nutritional information on the back, they are normally around 1.0-1.5g per 100g (or 1%-1.5%). This seems low to me, but I’m not doing commercial bacon (often brined, though).
But this is a level that I’m happy with when I make bacon. Quite often, I use no sugar, but if I have a sweet tooth ( or am making bacon for others who like a bit of sweetness), I can use up to 1% sugar.
Can Leave in the Cure or Brine for a Bit Longer
The good old-fashioned saltbox or saturation method is based on leaving the meat in the cure for a day per 2 pounds or 1 kg.
The big problem is that salt penetrates at a different pace, depending on the brand and the shape of the salt. With the size of the salt comes wonderful equilibrium curing or brining.
Going by weight, not volume, is the key.
I have left equilibrium-cured bacon in the fridge for an extra five days, with no problems, up to 7 to 9 days even. It developed a slightly slimy exterior.
I think this had to do with all the spices and herbs that were used in this bacon mix. So I guess what I’m saying is you can leave equilibrium curing for longer, but be aware that it’s not a free license to forget about it for a month.
Disadvantages of Equilibrium Curing & Brining
Precise Equipment is Needed
The key aspects of equilibrium curing are precision and percentages.
Sometimes, when doing home curing, you may use only 0.5-1.0 pounds of pork belly for the bacon. When you’re doing this, you work in minimal quantities. Using the metric system is the easiest for equilibrium curing or brining.
Investing in accurate digital scales that go down to 0.X decimal places or even 0.XX 2 decimal places is the only way.
This is a must, and since the price of technology has decreased so much. I suggest a couple of options that will do the trick nicely.
Another tip is to use a reasonably fine salt and spices cure.
To achieve this you can use a manual grinding method or automatic grinding methods like a coffee spice grinder.
What I like to do is place the spice grinder onto the scales, and then I can zero TARE the ingredients as I add them in.
Challenges of Equilibrium Curing
Applying all Equilibrium Cure to Meat
This is probably one of the most crucial steps when your equilibrium curing (for brining it’s easy).
I find using a large bowl is a really good method because it keeps the cure in one area.
You can use the meat to wipe the surface of the bowl with the meat at the end, to really get all the cure onto the meat, before placing it in the bag.
You can, of course, rub the equilibrium cure into the meat on a wooden board, but I have found through experience that you always end up having some level of cure left on the board rather than adhering it to your meat.
Maintaining Contact of Cure Tightly to Meat With Oxygen
Now, I guess in a perfect world, I would have my own Vacpac for this, but I always ended up borrowing friends’ gear instead.
I’ve read on some forums that guys only use Vacpac for equilibrium dry curing. I don’t think it’s necessary as long as you pay attention to removing as much oxygen as possible in a Ziplock bag.
Currently, I’m trying to develop a reusable bag. I dislike the idea of using single-use plastic for my equilibrium bacon curing.
I have heard about using sous vide bags made of silicon, which are reusable and washable. I use one large bag and also a small bag with the meat in it. But I can’t report a proper procedure for this yet, so watch this space.
So here are my methods are broken down, first equilibrium curing bacon, then brining.
If you want to ideas about pork skin for bacon, I wrote a post about how to approach this here.
Process of Equilibrium Curing Bacon
- Calculate Equilibrium Cure (Calculator Tool)
- Accurately Use Scales to Measure Out All Ingredients
- Grind the Salt/Spice Cure to a Fine Powder
- Apply cure inside a Bowel
- Place Inside Bag and Remove Excess Air
- Place in Fridge for Curing
1. Calculate Equilibrium Cure or Brine
It always became quite a hassle to go through the calculations, especially if I wanted to do 3 or 4 spice mixture variations for bacon projects simultaneously. Quite often
(I have a large amount of meat and animals after harvesting, and I have to do the calculations for the various meat curing projects.)
So I created this calculator and tool for easily doing the equilibrium curing and brining, you can find a link here to the calculator.
2. Accurately Use Precise Scales to Measure Out Ingredients
I really slow down when I do this part of it, since it’s really important, accuracy at this stage leads to good outcomes when it comes to your tasty bacon.
Because the measurements are sometimes like 0.5g for certain types of herbs and spices you might want to use. You really want to be precise about all these measurements.
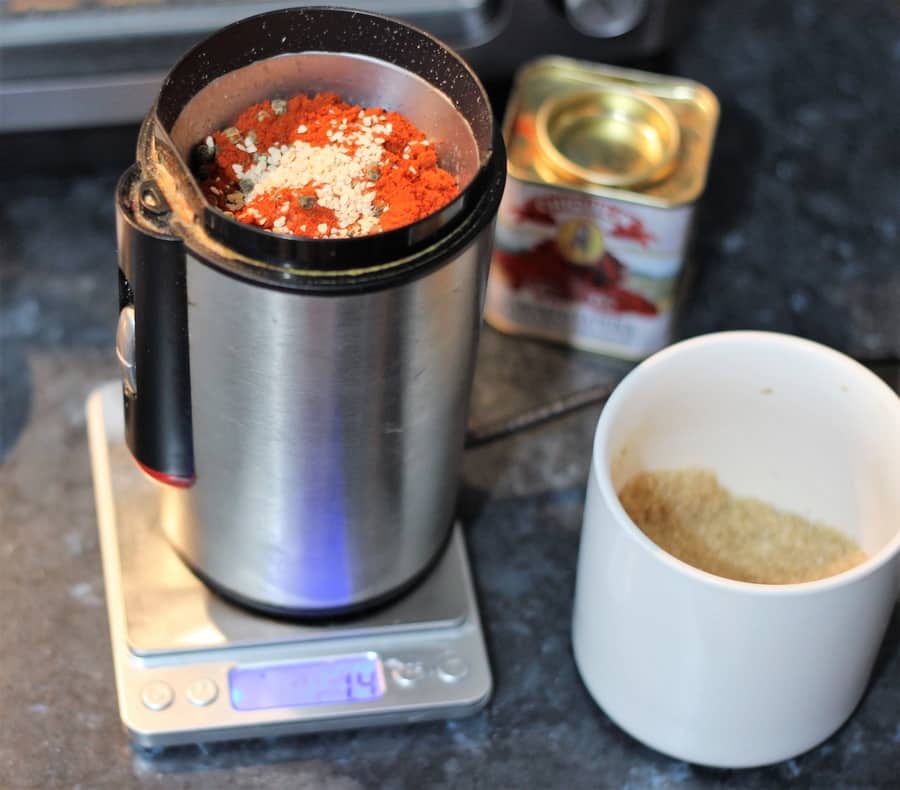
3.Grind the Salt/Spice Cure to a Fine Powder
When I started out doing curing mixes, I used a good old-fashioned mortar & pestle to create a spice salt curing mix.
As I got older maybe lazier (or smarter) I wanted a more fine curing mix (without the arm work), I switched over to an automatic spice grinder.
These are not expensive items but make a big difference in your curing mix.
Another tip I have is to grind your salt separately: first the salt, then the herbs, spices, and pink curing salt.
And then combining the 2 for a final quick blitz in the spice grinder.
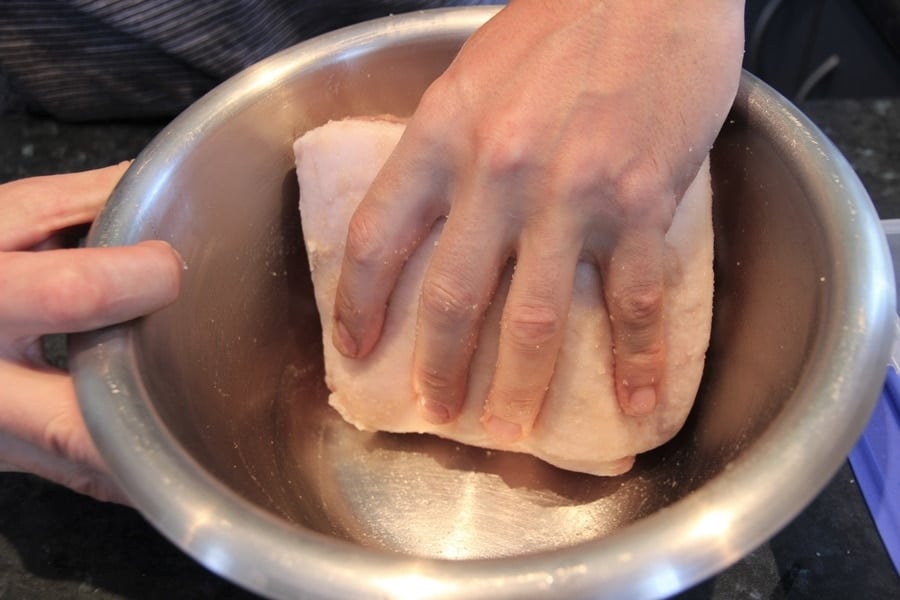
4. Apply Cure Inside a Bowel
Again it’s just about taking your time I reckon, having a good-sized mixing bowl is the way I like to do it.
And wiping up the cure with the meat inside the bowl, so the bowl is practically clean of curing mix at the end of it.
Another tip: It’s a good idea to do this reasonably quickly. It doesn’t take long before salt starts drawing a little bit of moisture out of the meat.
Then, you end up leaving a small amount of dry curing converted into a kind of salt brine in your bowl. But as I said, if you move fast, the moisture brine mixture isn’t left hanging around the bowl.
4. Place Inside bag and Remove Excess Air
Need some air-sealed bag, ‘Ziploc’ work very well for this.
I like to roll the meat up in the Ziploc bag, with the seal slightly open on one end. This squeezes as much air out of the bag as possible.
Then you have to ziploc close the last bit up.
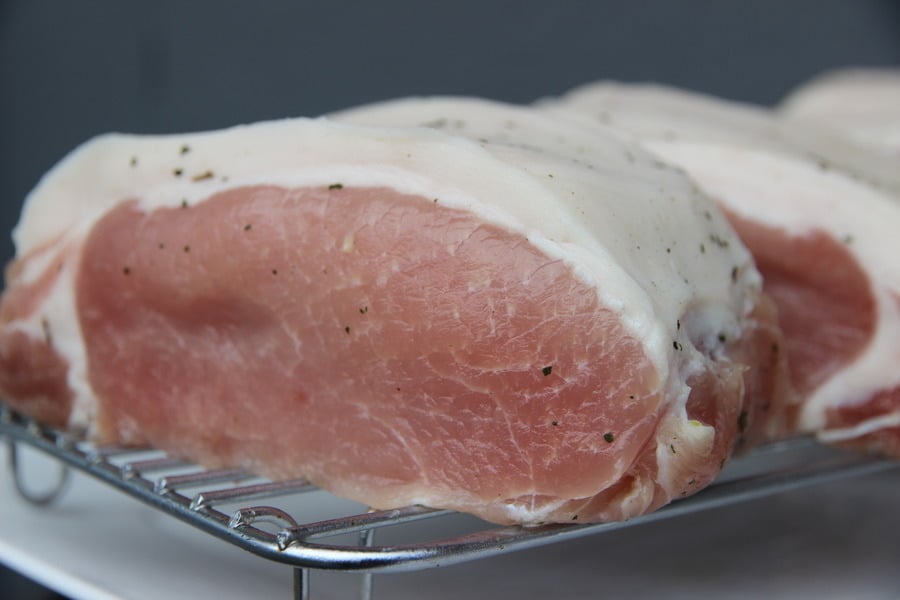
5. Place in Fridge for Curing
When you place your pork belly cured bacon (or whatever cut of meat you are using for bacon) in the fridge, it gets a bit of a uniform shape and forces the cure into the meat a bit more. I utilize the space underneath the fruit and vegetable containers in my fridge.
Quite often, some cans are given a little bit of extra weight. Pressing down on the cured meat, I presume, just speeds up the process a little bit.
Some people like to wash the cure after, some people don’t. I think a very basic little wash is a good idea, but I also like to leave some of the herb or garlic ingredients on the cured meat.
Example of the Calculations
1,000 grams of pork belly with 2.25% Total Salt
| Percentage of Meat Weight | Amount (Grams) | |
| Sea Salt | 2.0% | 20.00 grams |
| Pink Curing Salt | 0.25% | 2.50 grams |
| Black Pepper | 0.50% | 5.00 grams |
| Dry Thyme | 0.50% | 5.00 grams |
| Juniper Berries | 0.20% | 2.00 grams |
Process of Equilibrium Brining Bacon
- Calculate Equilibrium Brine
- Accurately Use Scales to Measure Out All Ingredients
- Grind the Salt/Spice Cure to a Fine Powder
- Dilute Cure Mix Completely in Water
- Place Meat into the Brine Cure Container
- Remove and pat dry (if you want)
1. Calculate Equilibrium Brine (Calculator Tool)
If you skip straight to this part, I mentioned that I got my mathematical brother to create an equilibrium curing and brining calculator tool, so you can have a look.
If I have a computer nearby, I use a Google sheet to record all the recipes and percentages, but I’ve been known to have a few too many pieces of paper floating around with “secret” bacon recipes.
2. Accurately Use Scales to Measure Out All Ingredients
Same as with equilibrium curing, having an accurate digital scale for this is a must. You really need a minimum of 1 decimal place, ideally 2 decimal places.
I have a few recommendations for decent digital scales; check them out here (near the bottom of the page).
3. Grind the Salt/Spice Cure to a Fine Powder
This makes diluting the cure in the water much easier if you have finally ground cure mix.
As I said, I like to grind the salt separately, get it to a fine powder, and then grind the rest of the ingredients to a fine grind. After combining the two, I give it a quick blitz in the grinder.
4. Dilute Cure Mix Completely in Water
I find lukewarm to cool water temperatures work well. With a fine powder, it dilutes pretty quickly. You just want to make sure you can’t see any particles of the cure once you’ve stirred and mixed it into the brine container.
5. Place Meat into a Brine Cure Container
There isn’t much to say here, to submerge the meat, make sure that the meat is totally underwater, at 40% water to the weight of the meat should be submerged (some weight might need to be placed on the meat to keep it submerged).
6. Remove Pat Dry
I pat dry the pork belly or whatever meat your making into bacon. Some people like to wash the brine off, I guess it’s completely up to you and what salt level you decide to go for as well.
Examples of the Calculations
You add the water to the meat weight to give a total that you work out the percentages for:
1,000 grams of pork belly
2.25% target total salt level
| Percentage of Meat + Water | Amount (Grams) | |
| Water | 40.00% | 0.4 Litres |
| Sea Salt | 2.0% (0.02 x 1400) | 28.00 grams |
| Pink Curing Salt | 0.25% (0.0025 x 1400) | 3.50 grams |
| Black Pepper | 0.50% (0.005 x 1400) | 7.00 grams |
| Dry Thyme | 0.50% (0.005 x 1400) | 7.00 grams |
| Juniper Berries | 0.20% (0.002 x 1400) | 2.80 grams |
Equilibrium Curing or Brining Smoking
- Green Bacon (Drying – No Smoking)
- Hot Smoke @ Low Temperature
- Cold Smoke for 8-50 hours
I often go after pancetta-style bacon. I end up drying out the meat in the DIY curing chamber or even putting it on a non-reactive rack in the fridge. Even though a normal kitchen fridge is running at 20 to 30% humidity, the pork belly that I am drying out is normally less than 1 inch thick. It seems to dry out nicely in the kitchen fridge in between some light cold smoking sessions.
I’ve done a little bit of hot-smoking bacon, but to be honest for me it’s not really bacon, as you’re just really curing and then low & slow smoking a piece of pork belly. So you end up cooking for the first time during the smoking session and then end up cooking it again when you decide to grill or pan-fried.
I cold smoke most of my dry-cured bacon. I think the dry curing brings out the herbs and spices used in the mixture. I like to cold smoke generally over 15-20 hours, which gives it that subtle smoke angle that makes bacon awesome (pretty light smoke, high humidity, and airflow, of course).
Adding Sugar to Your Cure Mix or Not
I never exceed about 1% sugar, but I realize some people like to make bacon candy or a sweeter type of bacon. I can understand why sweetness goes very well with pork.

Tom Mueller
For decades, immersed in studying, working, learning, and teaching the craft of meat curing, sharing the passion and showcasing the world of charcuterie and smoked meat. Read More