Over the years, I’ve made many different cured meats, but biltong is one I keep coming back to. It’s simple, full of flavor, and very different from jerky.
I’ve used wild venison I harvested myself and store-bought beef, both with excellent results. After decades of experimenting, I’ve tried traditional quick cures and precise equilibrium curing. Each produces that savory, slightly tangy flavor that makes biltong so moreish.
What makes biltong so appealing is how easily it can be started. You don’t need special gear or ultra-thin slices. With a knife, a few simple ingredients, and airflow to dry, you can make a protein-rich snack that lasts without refrigeration.
This guide shows you both a classic biltong recipe—just salt, malt vinegar, and toasted coriander—and an advanced EQ curing recipe with measured spices for more control.
What Makes Biltong Unique
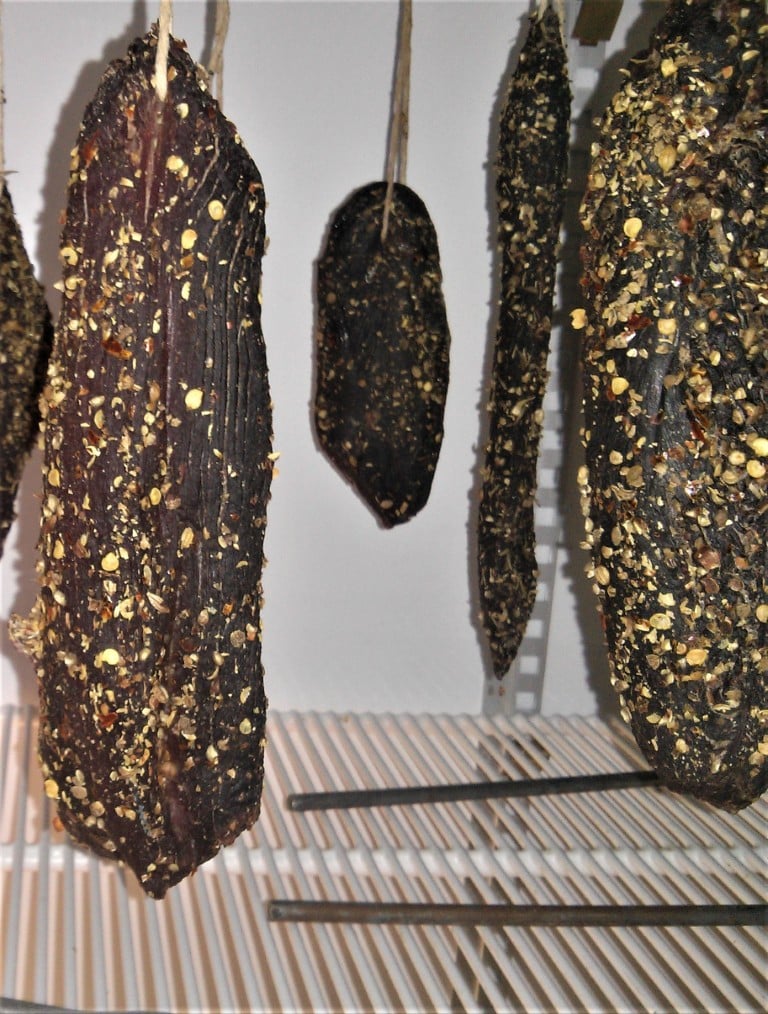
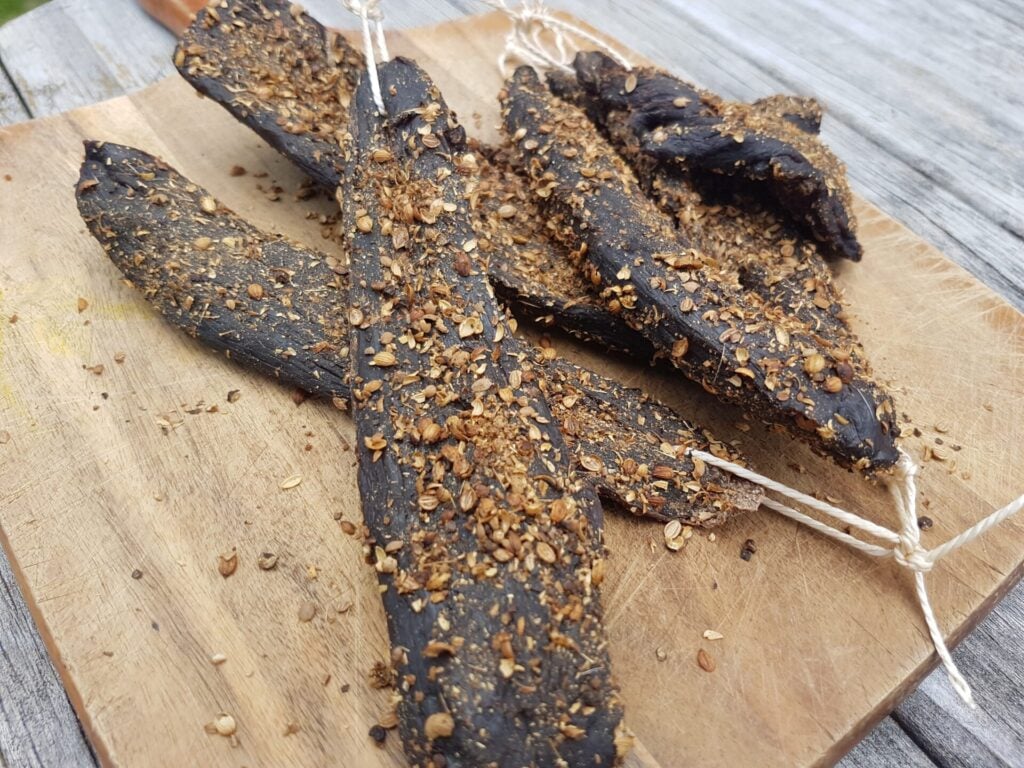
Biltong is cut much thicker than jerky, often ½ to 1 inch slabs. As it dries, it shrinks to about half the size, leaving chewy, flavorful strips.
Lean cuts like rump, topside, or venison leg work best. Cutting with the grain gives that fibrous, authentic texture when you bite into it.
Salt and Vinegar Preservation
Biltong isn’t cooked with heat. Instead, the meat is cured with salt and vinegar, which denature the proteins. This changes the texture, adds tang, and helps preserve the meat before drying.
It’s similar to how ceviche is made with fish and citrus. The process both seasons and protects the meat, making it safe to dry without cooking.
Flavor Profile
The signature flavor of biltong comes from toasted coriander. Combined with salt and vinegar, it creates the classic South African taste.
For the advanced EQ method, I add black pepper, chili, and a touch of ground cloves. This keeps the meat savory, slightly spicy, and never overly sweet.
Ingredients for Biltong
You can make biltong in two ways. The classic recipe is very simple, while the advanced EQ method uses precise spice percentages for more consistent results.
Classic Biltong Recipe
- Lean beef, venison, or other red meat (topside, rump, or leg cuts)
- Salt – about 1 tablespoon per 500 g of meat
- Malt vinegar – about 2 tablespoons per 500 g of meat
- Toasted coriander seeds, cracked
Advanced EQ Curing Recipe (per 1000 g of meat)
- Salt – 20 g (2%)
- Coriander – 15 g (1.5%)
- Black pepper – 15 g (1.5%)
- Chili flakes – 10 g (1%)
- Ground cloves – 2.5 g (0.25%)
- Malt vinegar – adjusted to your curing style
Equipment You’ll Need
Knives and Slicers
A sharp knife is all you need for chunky biltong slabs. If you prefer thinner strips, a slicer makes it easier to keep the slices even.
Containers and Bowls
Use a non-reactive container for the curing stage. Glass, stainless steel, or food-safe plastic all work fine for salting and marinating the meat.
Drying Options
After curing, the meat needs airflow to dry. A fan in a ventilated space is the simplest method. A dehydrator gives more control, while a curing chamber provides the most consistent results.
Step-by-Step Biltong Recipe
Step 1 – Cut the Meat
Start by cutting the meat into slabs about ½ to 1 inch thick. This is much thicker than jerky and gives biltong its dense, chewy texture once dried.
Always cut with the grain of the meat. It makes the final product easier to chew and keeps that authentic biltong feel.
Step 2 – Choose a Curing Method
Classic Saturation Cure
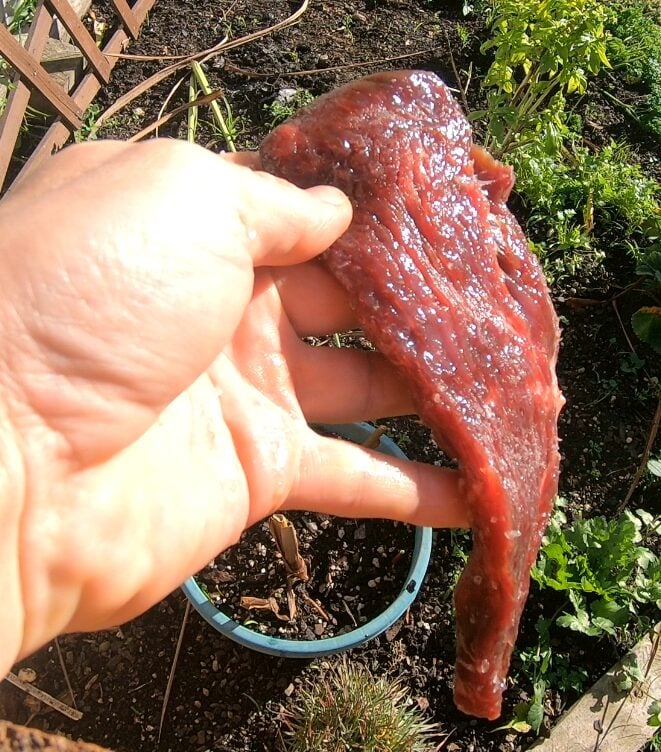
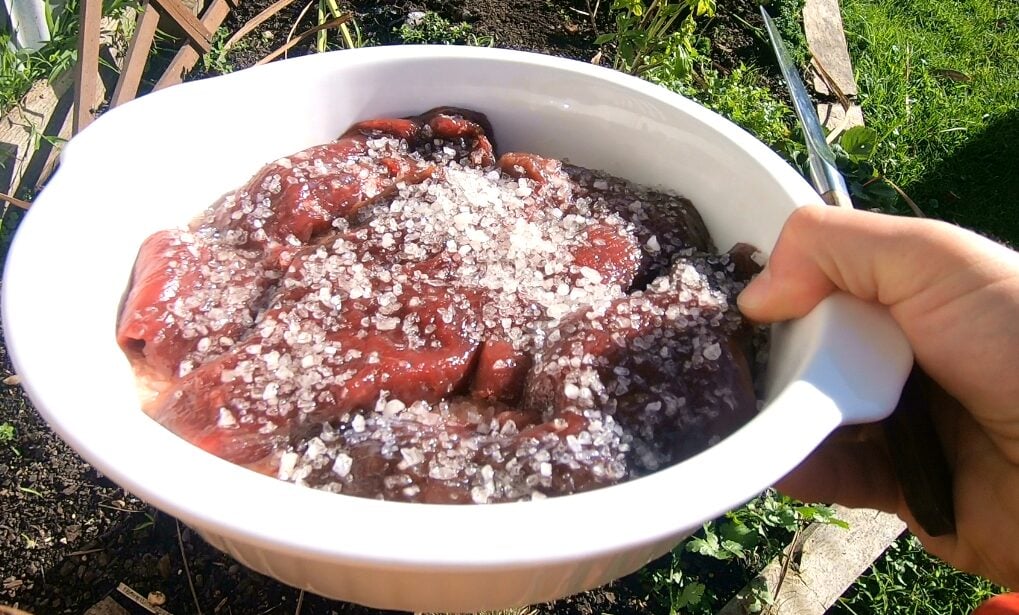
Cover the meat in salt for about one hour. This draws out moisture and seasons the surface.
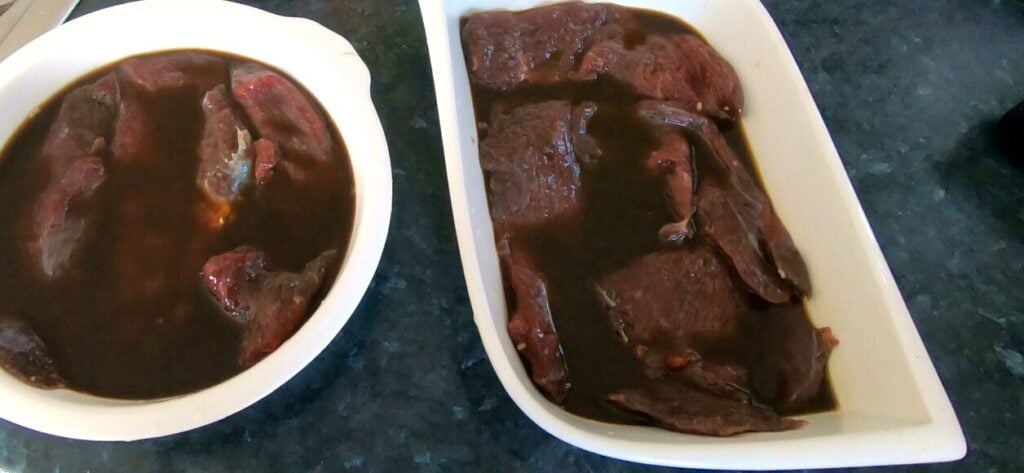
Afterward, wipe or rinse off the salt and soak the meat in malt vinegar for another hour. This step gives the meat its tang and begins the denaturing process.
Advanced EQ Cure
For more control, weigh your meat and use the EQ recipe percentages. Mix the salt, coriander, pepper, chili, and cloves, then rub evenly over the slabs.
Add the vinegar and seal the meat in a container. Leave it to cure in the fridge for 12–24 hours. This method balances flavor and preserves without over-salting.
Step 3 – Add Vinegar & Spices
Once the curing stage is done, the meat should still be slightly damp. This is the best time to coat it with spices so they stick well to the surface.
For the classic version, use cracked toasted coriander. For the advanced recipe, coat with your spice mix for deeper flavor.
Step 4 – Coat with Toasted Coriander
Toasting coriander seeds before cracking them brings out their fragrance and adds that iconic biltong aroma. Roll the damp meat in the seeds until well coated.
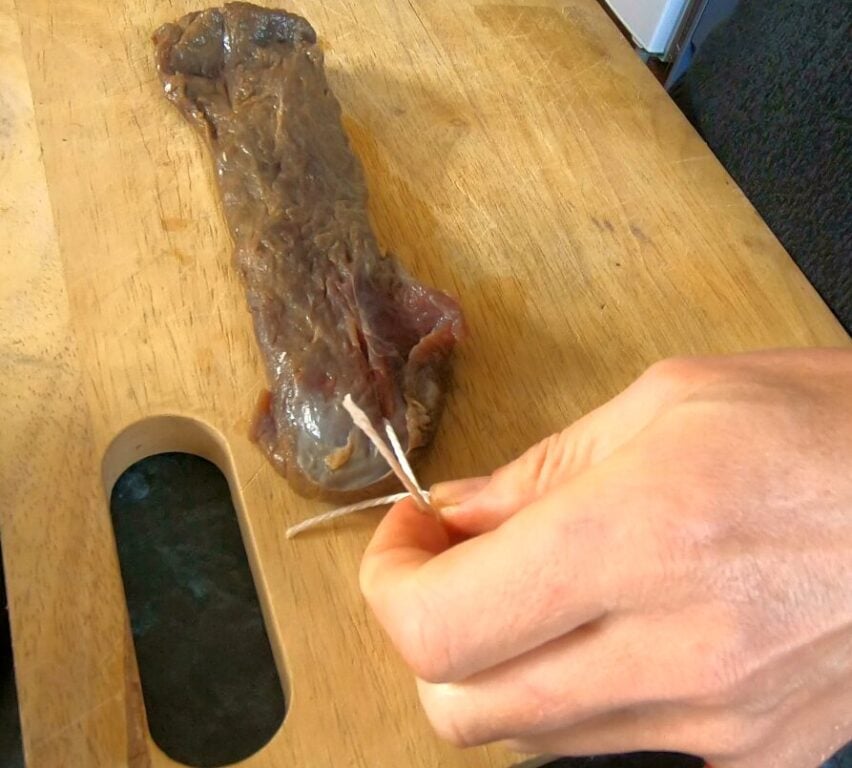
You can also thread a string through the slabs at this stage if you plan to hang them for drying.
Step 5 – Dry the Biltong
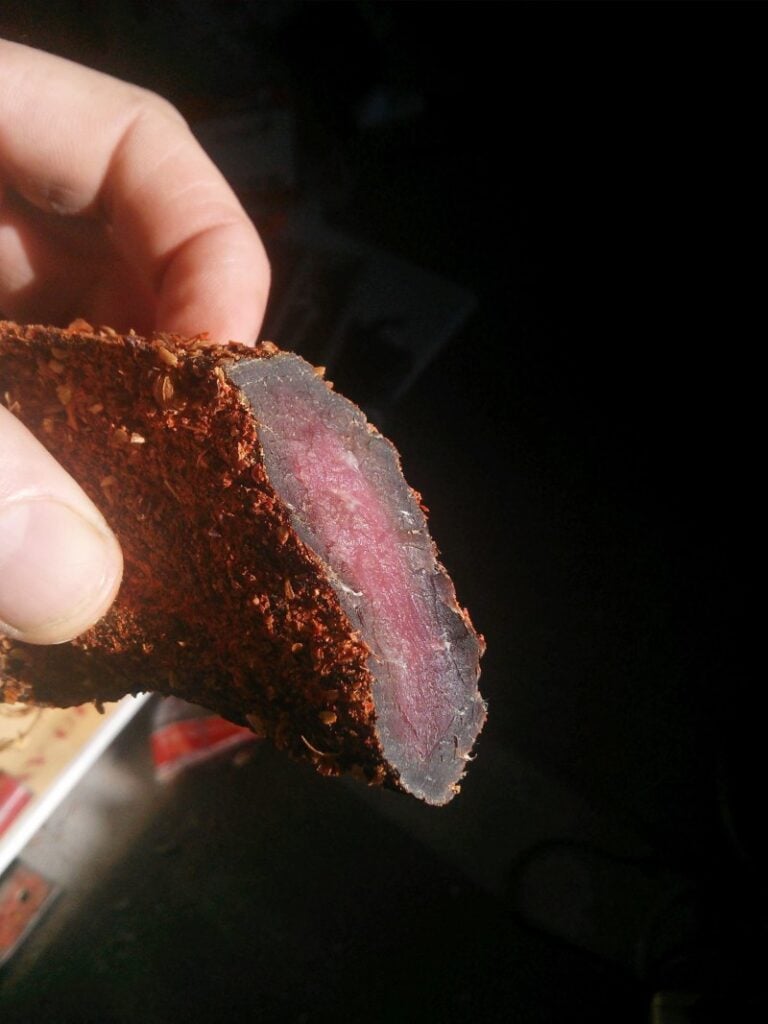
Once cured and spiced, the meat is ready to dry. Good airflow is the key. As the moisture leaves the slabs, they firm up and shrink to about half their starting size.
The goal is to lose at least 35% of the original weight. This gives a safe, flavorful product that keeps well at room temperature.
Fan Drying
The simplest option is to hang the meat in a well-ventilated area with a fan blowing gently across it. Keep the room cool and dry for best results.
Dehydrator
A dehydrator gives more control over temperature and airflow. Set it to a low setting and let the meat dry slowly. This produces consistent results without much effort.
Some people prefer a slightly “wet” biltong, which means leaving more moisture in the center. Just shorten the drying time for this style.
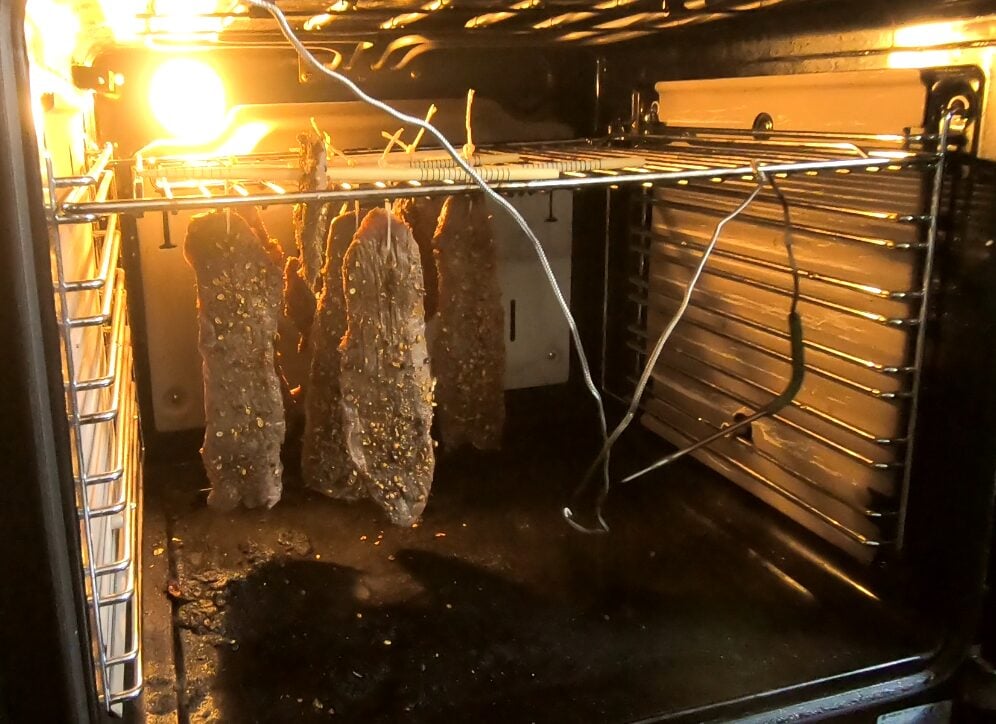
Oven
Using a domestic oven, just with the light on and fan works also. This is how i’ve introduced many friends to curing meat and making biltong. I like to keep the oven door slightly open for more airflow.
Curing Chamber
If you already have a curing chamber, it’s a perfect place to dry biltong. Set the humidity around 50–70% and the temperature close to 20-40°C / 70-°100°F (Drying usually takes 2–4 days depending on thickness.
This is the most consistent method I’ve found. The chamber maintains stable conditions, preventing the meat from drying too quickly on the outside.
Step 6 – Store & Enjoy
Once your biltong has dried to the level you like, it’s ready to eat. The pieces should be firm, flavorful, and packed with that classic savory tang.
I usually store mine in a brown paper bag. This keeps airflow around the meat and prevents excess moisture from building up. In a cool space, biltong can last 2–3 weeks or even longer if dried well.
Refrigeration isn’t necessary, but if you do keep it in the fridge, the meat may continue drying until it’s very firm. Some people prefer it this way; others find it too tough.
Optional Cold Smoking
For another layer of flavor, you can cold smoke the biltong after curing and before drying. A light smoke adds a subtle depth without cooking the meat.
If you’re interested in trying this, I’ve written a detailed cold smoking guide that covers everything you need to know.
Expert Tips for Better Biltong
Keep your meat cuts even in thickness. This helps them dry at the same pace and avoids some pieces finishing too early.
Toast coriander seeds just before using them. The aroma is far stronger and gives that unmistakable biltong fragrance.
If you like a softer texture, shorten the drying time and leave more moisture in the middle. For longer storage, aim for a firmer finish with at least 40% weight loss.
I prefer to skip adding sugar. It’s common in some recipes, but I like to keep the flavor savory, slightly spicy, and clean.
Alternatives You Can Try
If you cut your meat thinner and dry it faster with heat, you’ll end up with jerky instead of biltong. It’s a different process but still a tasty snack.
Other cured meats like coppa, lonza, or breasola use similar ideas but are aged longer and often hung in a curing chamber. They’re worth exploring once you’re confident with biltong.
Traditional Biltong Recipe (Classic & EQ Methods)
Ingredients
- 1000 g Meat Lean Red Meat, Beef Topside, Venison, Rump, Silverside
- 2.5 g Salt approx 1 cup course salt per 1kg/2pds of meat
- Malt vinegar 2 tbsp per 500 g meat
- Toasted coriander seeds cracked/crushed to coat after vinegar
Instructions
- Cut the meat into ½–1 inch thick slabs, cutting with the grain.

- Classic Method: Salt for 1 hour, wipe/rinse/scrap

- Soak in malt vinegar for 1 hour.

- Poke hole through thinnest end of slab of meat, tie twine or use S hook

- Coat the damp meat with toasted, cracked coriander (or the EQ spice mix) so it sticks well.

- Dry the meat: hang with a fan, use a dehydrator on low, or use a curing chamber at ~25°C / 80°F and 50–60% RH for 2–4 days (aim for ≥35% weight loss).

- Store in a brown paper bag in a cool place. Lasts 2–3 weeks or longer depending on dryness.


Notes
- Biltong is cured, not cooked — salt and vinegar denature the proteins, changing the texture and helping preserve the meat before drying.
- Airflow and humidity are key. Aim for 50–70% RH and around (20-40°C) or 70-100°F for drying
- Always cut with the grain for that classic chewy texture.
- Lean cuts like rump, topside, or venison leg dry evenly and safely. Avoid fatty or marbled cuts.
- Toasting coriander just before using it releases its aroma and gives that distinct biltong flavor.
- Classic method (1 hr salt + 1 hr vinegar) gives a fast, traditional result with a more rustic flavor.
- EQ method gives precision — you can control salt levels and consistency batch to batch.
- For a softer “wet” style biltong, dry for less time and keep a little moisture in the center.
- For longer shelf life, dry more thoroughly until at least 40-50% weight loss.
- Store in a brown paper bag in a cool area. Avoid plastic or airtight containers, which trap moisture.
- Optional: add a light cold smoke before drying for extra depth and complexity.
- Keep everything clean — utensils, hands, and workspace — to avoid contamination during curing and drying.
How long should biltong dry?
Drying usually takes 2–4 days, depending on thickness, airflow, and humidity. Many makers aim for at least 35% weight loss for a firm, shelf-stable result.
Can I use beef instead of venison?
Yes. Beef rump, topside, or silverside are classic for biltong. Venison works beautifully too, giving a leaner, slightly gamey profile.
Do I need curing salt (nitrites) for biltong?
Traditional biltong uses salt, vinegar, and spices—no nitrite curing salt. The salt and acidity help protect the meat before drying. Always follow good hygiene and proper drying to reduce risk.
What’s the difference between biltong and jerky?
Biltong is cut into thicker slabs, cured with vinegar and coriander, and air-dried. Jerky is usually thin-sliced, marinated, and dried quickly with gentle heat.
Have you tried making biltong at home? Share your experience or questions in the comments below — I’d love to hear how it turned out for you.

Tom Mueller
For decades, immersed in studying, working, learning, and teaching the craft of meat curing, sharing the passion and showcasing the world of charcuterie and smoked meat. Read More
1.Cas I use a plastic box instead ?
2.Then connect a light bulb and a fan to it ? Then hang the meat on the racts .
3. What temperature does it have to be in my garage ?
4. Will the meat get a weird taste from all of my things stored in the garage ?
5. About how long do I leave the meat in the plastic box ? John
1. yes!
2.Yes!
3. moderate, not cold or hot 15-30C
4.as long as you don’t have weird things in the garage! Toxic? etc.
5.depends on temp 3-6 days?! (box should have holes for circulation too)
Hello Tom I am new to smoking and thought i would try jerky first I bought a cheep smoker from Amazon and modified it making a bigger fire box because the original one was super tiny. and sealing up the smoking chamber to prevent too much smoke leaking out and I fitted a small 80cm 23cfm fan to an aluminum box that i made that attaches to the fire box air inlet to blow air into it and I have a temperature controler to turn thr fan of if ther temp gets too high and control the temp. I decided to put a single burner hot plate in the bottom of the fire box also controlled by the temp controller and put a stainless steel smoker box on top of it loaded with apple pellets. and an aluminum loaf pan beside it with water to humidify the smoke then put my marinated beef slices on the grills in the smoker charmer. O only did about 1 lb I used a spice rub and Worcestershire sauce and soy sauce and a bit of v8 and marinated for a few hrs then onto the smoker the smoke box put out smoke for about 2 hrs before there was no more smoke coming out of it i expected the temperature to be higher with the hotplate 1000w at high it only got to about 120F. after the smoke stopped i removed the water pan and smoke box but left the burner going and the fan running all night and pulled the jerky off in the morning and after about 14hrs it was a little more dried out than I wanted but it tasted really good. i did not add anything sweet to it so it came off a little bit bitter but still tasted great. I then made another batch same recipe but added about a tablespoon of maple syrup to it and cut my beef a little thicker the first time i cut 1/8 strips and some of them almost disappeared after drying so I cut about 1/4 strips this time and I had some room left in the smoker so I decided to try some extra old white cheddar since my temp was only 120F I thought the cheese should not melt, I froze the cheese before I put it on the smoker and used the same method as before and took the cheese off after 2 hrs of smoke and let it cool and dried the sweat off and wrapped it in plastic wrap and put it in the fridge to rest I was told to rest it for a week to let the smoke soak into the cheese.
now I have read some of your stuff and I was not cold smoking or hot smoking I was smoking somewhere in between I think it is called the danger zone?? also I did not use any Prog salt#1 curing salt I don’t know if soy and Worcestershire and spice rub have enough salt to do the job of a cure. and since my jerky did not get up to 160F is it safe does drying it make it safe. The 2nd batch turned out better than the first i took it off at about 11 or 12 hrs. I believe that after I remove the smoker box and water pan from my smoker the electric element and the fan turn it into a dehydrator. The cheese turned out great as well I will have to see how it is in a few more days but it tasted smokey when I first pulled it from the smoker. If it is too strong I may need to pull it sooner.
I have a couple questions
1 Do I need to use the Prog salt cure to make jerky safe?? even if I am smoking it?
2 Can the prog salt cure just be added to my marinate and then let it cure overnight before smoking and dehydrating.
3 Should I try just lighting a corner of the smoker box without running the burner under it and see how much smoke I get and how long it will burn this would be a more cold smoke especially when winter comes here in Canada.
4 You did not mention curing salt when you were talking about Jerky and Biltong
Alton Brown dries his jerky in air filters strapped to a box fan and does not use curing salt and says it is fine because there is no moisture for the bacteria to live on?
I just want my jerky to be safe I don’t want anyone to get sick from it.
Please let me know what you think
Thank you it has been interesting reading your stuff. very informative.
Hey Wayne, wooah big write up!
1) I make biltong mainly and use vinegar, salt and spices, jerky can be cooked or dried – you are somewhere in between! For in-between, the Europeans call this ‘warm smoking” they always use No. 1
2) yes, please be very accurate using pink curing salt/Prague powder -generally 0.25% of the weight of meat 1kg = 2.5grams
3) hard to comment on your smoker, under 20C is what I like for cold smoking, or I cook things ie hot smoking until internal temperatures are reached – too different thing! Here is a cold smoking post I did
4) I don’t comment on other recipes generally, pink curing salt/prague powder is a personal choice. If you remove most moisture from jerky then bad bacteria cant take hold of the environment generally. I am making more biltong where vinegar helps also (Worcestershire and some other condiments can help in this way). Acidity has a denaturing effect which is similar to cooking.
Cheers
Tom
Do you need curing salt Prague powder#1 for jerky that is cold smoked and or dehydrated?
Depends on the recipes, so many variations with meat and method too
Hi Tom, Great info you were the closest I’ve seen to perfection.
Moved from South Africa 25 years ago and after experimenting on replicating perfect biltong for the last 20 years I think I have finally dialed it in.
Meat: whole center round prime (Costco sells it in bulk)(silverside in SA) with fat cap, cut in 3/4 in pieces with fat on one side.
Cover in course salt on countertop for 1 hr. then scrape off salt
rinse in Malt vinegar and 2tbs of worchtershire, 4tbs brown sugar. wait another hour and let meat sit in juices.
toast Coriander in pan then grind lightly in coffee grinder with pepper, then coat meat and I use zipties at the top.
Hang in desired location for about 5 days. Dehydrators ruin the texture and flavor.
Hope any purists looking to achieve perfect South African Biltong find this… BTW my whole family eats this, the only issue we have had is not wanting to share and stashing pieces away. Happy to send some pictures.
P.S a touch of curing salt can be used, but I have only done so a few times.
Thanks! I’ve always listened closely to the African guys I’ve met, and their recipes! I’ll give this a crack too! Not so keen on sugar, and I prefer to use an equilibrium curing to get precise saltiness of my choosing.
Appreciate authenticity, but I guess Worcestershire sauce is a more recent addition in modern times.
I met another South African here in New Zealand the other day, his biltong was delicious- he didn’t divulge exact amounts, but his ingredients were kinda similar:
Worcestershire /malt vinegar/salt
garlic/coriander/smoked paprika/pepper
24 hrs
15g salt per 1000g meat
Hi Tom
Although I’m from South Africa I’ve never made my own biltong (do I have to give my membership back?). I was given a homemade dryer once in a plastic tub but I’ve never liked the idea of food exposed to plastic even when only slightly heated. I toyed with the idea of building a wooden one with the same components but was recently wondering if an electric smoker would do the trick, albeit without the smoke.
The dryer is basically just the incandescent bulb and a computer fan…
Hey there! Your memberships is revoked! 🙂 Definitely any area will do, cardboard box and fan. Plastic box and fan. So say just oven with fan and no heat.
Since vinegar and salt are used, the meat is ‘cooked’ (denatured) with vinegar . Whilst the salt cures it. Top tip from a few South African’s with 20+ years each of making biltong. Use 50/50 Worcestershire Sauce / Malt Vinegar…
How much is the allowable level of use of a vinegar needed in curing meat?
vinegar is ‘cooking’ the biltong or denaturing. It more of a marinade I think than an equalized ingredient at a measured amount.
Hi Tom,
I made biltong for the first time out of wild boar. It is currently air drying…. Then I became concerned if it was safe to eat …. Made from pork?
hey, guess depends on how pork was handled, cooled etc. I do it with wild venison all the time. Unless you let the meat go off. I would be fine with it. you are curing and denaturing/cooking with the salt/vinegar. Biltong is made from all sorts of birds like ostrich in South Africa and many other white or red meats!