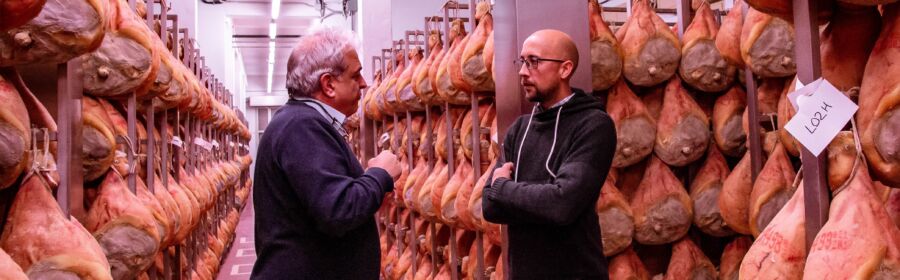
Over the years I’ve experimented with many different ways to create a reliable drying fridge for meat curing. From touring commercial Prosciutto Parma Ham facilities in Italy to converting five different fridges myself at home, I’ve seen the range of approaches people use to maintain the right balance of temperature, humidity, and airflow. Some setups were minimal, while others were highly engineered, but all ultimately came back to the same principles.
Designing a chamber is about encouraging the growth of beneficial bacteria while preventing spoilage. At the same time, you need to slow down the drying process just enough so the outside doesn’t harden before the inside has finished curing. Achieving that balance requires more than luck — it’s about creating the right environment.
Whether you’re working with a converted second-hand fridge or considering a commercial option, the same three factors always come first: temperature, humidity, and airflow. Everything else builds on these fundamentals. Once you understand them, you can choose the design option that matches your space, budget, and goals.
Key Factors for Designing a Meat Curing Chamber
Before exploring all the possible designs, it’s essential to understand the parameters you’re trying to maintain. Every chamber I’ve used, from basic DIY builds to commercial-grade units, came back to these three essentials.
Temperature Control (Ideal Ranges & Stability)
The target range for dry curing is typically between 50°F and 60°F (10 °C and 15°C). At the lower end of this range, you’ll see slower mold growth, while at the higher end the process accelerates. I’ve successfully cured meat at a temperature slightly above 60°F, but it requires closer attention to airflow and humidity. Consistency is more important than precision — swings of 5–10% have never ruined a project in my experience.
Controllers make this possible. Plug-and-play units or hardwired setups can cycle the fridge’s compressor on and off to maintain the correct environment. Without this control, a standard fridge runs far too cold for meat curing.
Humidity (Humidification & Dehumidification)
Humidity keeps the meat drying at the right pace. Too low and you risk case hardening — the outside sealing before the inside has finished curing. Too high and you encourage unwanted mold or even spoilage. For most projects, the sweet spot is 70–80%. During certain stages, like equalization in prosciutto, commercial producers even run the humidity up near 90%.
In my own builds, I’ve almost always needed both a humidifier and a dehumidifier. Frost-free fridges naturally dehumidify as part of their cycle, so sometimes you can get away with only adding moisture. Older non-frost-free fridges, however, often need active equipment on both ends. The key is having sensors and a controller that switch each device on and off as needed.
Airflow & Air Exchange
Airflow is often overlooked, but it’s essential for consistent drying and mold control. The goal isn’t constant wind — too much airflow can dry the surface too quickly. Instead, you want gentle, intermittent circulation. Fixed or timed fans, or controllers with airflow programming, can provide this balance.
Exchanging stale air for fresh air also helps. Some DIY setups rely on simply opening the fridge door daily, while more advanced builds use fans with filters to bring in outside air. I’ve found that even 10–15 minutes of airflow per day can be enough, but it depends on how full the chamber is and the size of the cuts inside.
With these three factors understood, the next step is to choose a chamber design that suits your space and needs. Some options are simple and budget-friendly, others far more advanced. In the following sections, I’ll walk through DIY conversions, natural environments, and commercial solutions I’ve tested or seen in action.
Designs & Options for a Meat Curing Chamber
Once you understand the three key factors — temperature, humidity, and airflow — you can determine which chamber design will best suit your setup. I’ve worked with several different fridge conversions and explored dedicated units that are ready to use out of the box. Each option has its advantages and drawbacks depending on your space, budget, and how much meat you plan to cure at once.
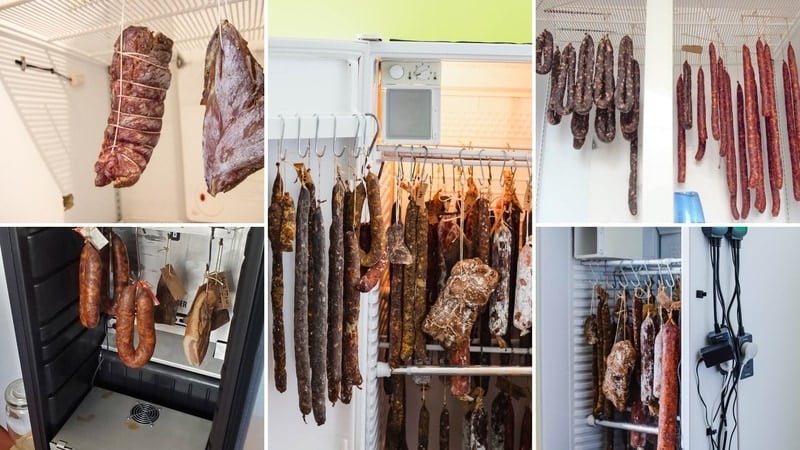
DIY Fridge Conversions
For most people, the easiest entry point is converting a regular fridge into a curing chamber. I’ve tried this with old kitchen fridges, mini fridges, and even wine coolers. Each comes with its own quirks, but the principle is the same: add external controls for temperature and humidity, then fine-tune airflow.
Kitchen Compressor Fridge
A standard compressor fridge runs too cold on its own, usually 32–40°F (2–5°C). With a controller attached, you can cycle the compressor to hold the higher 50–60°F (10–15°C) range that meat curing needs. Humidity inside these fridges is often relatively low, around 20–40%, which means adding a humidifier is essential. In most of my builds, I needed both a humidifier and a dehumidifier to maintain balanced conditions.
One of the challenges with a compressor fridge is airflow. Some fridges have an inbuilt fan, others don’t. You may need to install a small filtered fan for air exchange, but be cautious if you decide to drill — coolant lines are often hidden in the insulated walls.
If you want more details on dialing in these ranges, I wrote about Temperature & Humidity for Meat Curing Chambers, where I share how I’ve handled swings and controller setups.
Mini Fridge
Smaller fridges can work, but the limited space makes the choice of equipment more critical. Compact humidifiers and sometimes even USB-powered fans fit better here. I’ve had success with mini fridges, though they fill up quickly if you want to cure multiple cuts. They’re a good test project before committing to a larger build.
Wine Cooler Fridge
Wine coolers are an interesting option. Thermoelectric models can be less reliable for long-term curing, but compressor wine fridges often have built-in humidity recycling features. These systems evaporate water and pump it back into the chamber, which, on paper, sounds perfect for curing. I haven’t converted one myself yet, so I can’t fully recommend them, but they may offer a shortcut compared to modifying a kitchen fridge.
Frost-Free vs Non-Frost-Free
From my experience, frost-free fridges are easier to work with. Because of their natural dehumidifying cycle, they tend to run drier, which means you usually just need to add humidity back in. Non-frost-free fridges often need more active management on both ends — adding and removing moisture with equipment.
If you’re planning a DIY build and want a step-by-step walkthrough, I’ve detailed my process in How to Build a DIY Meat Curing Chamber. It covers gear setup, sensor placement, and common pitfalls I’ve run into along the way.
Natural Environments (Shed or Cellar)
Sometimes you don’t need a fridge at all. If you have a cellar or outbuilding that naturally sits within the right range of temperature and humidity, you can use that environment for drying. I’ve seen small cuts dry successfully in just a couple of months this way. Whole muscle projects are much simpler in these spaces than salami, which tends to be more sensitive. The downside is you’re at the mercy of the weather, so results vary more than with a controlled chamber.
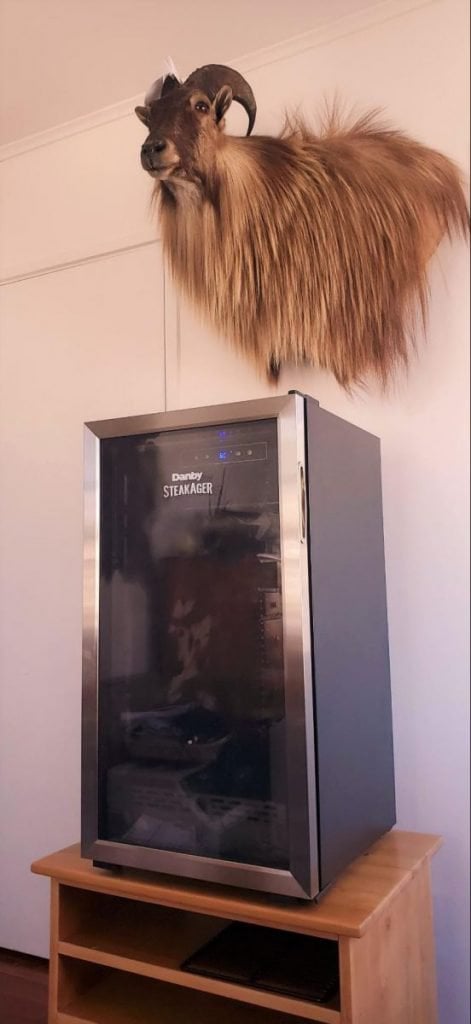
Out-of-the-Box Solutions
If DIY isn’t your thing, there are small-format units built for dry aging and curing. I’ve tested a SteakAger Pro 40, which works well as a set-and-forget system when paired with a humidifier accessory. It’s significantly less expensive than a full commercial cabinet, but it has a narrower humidity range. At times it has left meats a little drier than I’d like, but it’s a solid plug-and-play choice.
For anyone wondering what it can handle, I broke it down in Can the SteakAger Pro 40 be Used for Charcuterie?, where I show its strengths and the adjustments I needed to make to get consistent results.
Commercial Drying Fridge
On the high end, I’ve had hands-on experience helping a friend with a Stagionella Double Door professional curing chamber. This Italian-made unit has just about every parameter adjustable — airflow, ventilation speed, air exchange cycles, and even a self-cleaning mode that sterilizes the interior with heat. It’s a potent tool, but also complex. Support and documentation were limited, which meant a lot of trial and error to dial in the right settings. After four years, we’re still learning new tweaks to get the best results out of it.
These professional fridges are impressive, but they’re also expensive and require a learning curve. For most home curers, a DIY fridge or smaller out-of-box solution will provide more than enough capability. Still, it’s inspiring to see what’s possible at the commercial level.
Lessons from Dry Chambers
After experimenting with five different fridge conversions and helping friends with commercial units, I’ve built up a fair list of lessons learned. Some designs worked better than others, and every chamber taught me something new about balancing temperature, humidity, and airflow. Here are the most valuable takeaways I can share.
Best Setups That Worked
The most reliable design I’ve used was a frost-free compressor fridge paired with a humidifier and dehumidifier controlled by plug-and-play units. This setup provided steady conditions with minimal maintenance. A small fan on a timer helped exchange air without drying the meat too quickly. With this combination, I was able to cure larger cuts like coppa and bresaola with consistent results.
Another solid approach was a mid-sized mini fridge conversion. Even though space was limited, I found that by carefully positioning a compact humidifier and using USB fans for circulation, I could get nearly the same outcomes as with a full-size chamber. The only drawback was capacity — perfect for hobby batches, but not enough for larger projects.
For readers just starting out, I’ve also covered a shortcut method for small projects using a kitchen fridge. You can see exactly how I’ve approached this in How to Cure Meat in a Regular Fridge (Unmodified), which is useful if you want to try curing without committing to a full build.
Common Problems & Fixes
One of the most significant issues I ran into was case hardening — when the outside of the meat dries too quickly, leaving the inside raw. The fix usually involved raising humidity slightly or reducing airflow. A frost-free fridge on its own often created this issue because it pulled too much moisture out during its cycle. Adding back humidity with a controlled humidifier solved the problem.
Mold was another common challenge. White mold is usually beneficial, but green or black mold needed to be wiped away with vinegar or brine. Consistent airflow helped reduce these outbreaks, as did regular cleaning of the chamber. Over time, I realized that a small swing in humidity or temperature wasn’t a disaster — stability mattered more than perfection.
If you want to avoid these kinds of problems, I’d recommend reading through my guide on Common Mistakes to Avoid When Curing Meat. It’s a collection of errors I’ve made and how I learned to correct them.
Extra Uses Beyond Meat
Over time, I discovered that a good curing chamber can serve more than one purpose. I used one large converted fridge for projects like fermenting beer and wine, growing oyster mushrooms, and drying vegetables and herbs. Each project required a thorough cleaning before and after, but the chamber’s ability to hold steady conditions made it versatile. It taught me that these chambers are not only tools for meat curing but can also support other fermentation or drying experiments if you enjoy exploring food craft more broadly.
These lessons shaped how I design chambers today. I keep my builds simple, focus on the three main factors, and accept that minor fluctuations won’t ruin a project. With this mindset, a curing chamber becomes less intimidating and more enjoyable to experiment with.
Troubleshooting & Optimization
Even with the best planning, things don’t always go perfectly inside a curing chamber. Over the years I’ve had to deal with humidity swings, odd mold growth, and meat drying faster than I wanted. Here are some of the most useful troubleshooting tips that have helped me get consistent results and keep projects on track.
Too Dry or Too Humid
Low humidity can cause case hardening. The surface of the meat dries out, forming a barrier that prevents moisture from escaping from the inside. If this happens, I usually raise humidity by 5–10% and reduce airflow. Adding a humidifier on a controller quickly brings things back into range. If the chamber feels overly dry, lightly misting the walls with water can also help stabilize conditions.
Excess humidity, on the other hand, can encourage unwanted mold or even spoilage. If my chamber holds above 80% for too long, I turn on a dehumidifier or add an extra fan cycle to exchange air. It’s a balancing act, but with sensors and controllers keeping a close eye on conditions, it becomes much easier to adjust quickly.
Mold Management
Some mold is a natural part of the process, but not all of it is beneficial. The desirable white mold (Penicillium nalgiovense) protects the meat and gives it a traditional look. Green or black mold, however, needs to be dealt with immediately. I wipe down the affected areas with vinegar or a strong brine solution, ensuring the rest of the chamber remains clean and dry. Regular cleaning of fans and humidifiers also prevents mold from spreading.
Consistency in airflow makes a big difference here. Without it, humid pockets form inside the chamber where unwanted molds thrive. Gentle, steady circulation helps avoid these hotspots while still allowing the good mold to flourish.
Equalization Trick
Once cured meats reach the target weight loss of around 30–45%, I often vacuum-pack them and store them in a normal fridge for one to two months. This stage is called equalization. It allows moisture to balance throughout the meat and softens any drier edges. It’s a simple step, but it makes a big difference in the final texture and flavor.
This trick is handy if you’re using a smaller chamber or an out-of-the-box solution like the SteakAger Pro 40. In those setups, the humidity range can be slightly lower than ideal, so equalization helps bring everything back into balance before slicing and serving.
If you’re building or fine-tuning a chamber and want gear recommendations, I’ve pulled together a list of Humidifiers Useful for Meat Curing Chambers. They’ve saved me countless hours of trial and error when trying to stabilize a project that wasn’t behaving the way I wanted.
With some patience and these adjustments, a curing chamber becomes far less intimidating. The key is not chasing perfection but keeping all three factors — temperature, humidity, and airflow — within reasonable ranges. Small fluctuations won’t ruin your project, and often the experience you gain troubleshooting teaches you more than when everything goes smoothly.
How do I deal with unwanted mold in my curing chamber?
Not all mold is beneficial for meat curing. White mold (Penicillium nalgiovense) is generally desirable, but most other colors of mold should be removed. You can wipe down affected areas with vinegar or a saltwater solution. Consistent airflow and humidity control help reduce unwanted growth.
What should I consider when scaling up from a home setup to a commercial curing chamber?
Scaling up requires more space and reliable equipment, such as commercial-grade humidifiers and temperature controllers. Air circulation becomes increasingly critical in larger chambers, and conditions must remain uniform throughout the space. Food safety regulations and local health codes must also be followed, and the chamber should be designed for regular cleaning.
How can I cure different types of meat in the same chamber?
It’s possible to cure different meats together, but be mindful of each type’s specific needs. Salami often requires slightly higher humidity than whole muscle cures like prosciutto. Monitor closely and adjust airflow or humidity settings to ensure both styles progress correctly.
What are some tips for long-term maintenance of a DIY curing chamber?
Over time, condensation and mold can affect fans, controllers, and chamber surfaces. Regularly cleaning and disinfecting equipment is important for consistent performance. Check seals and insulation to keep conditions stable without wasting energy.
Can I use a curing chamber for other fermentation projects?
Yes, many people use curing chambers for aging cheese, fermenting beer, or drying vegetables. Just keep in mind that each project has specific temperature and humidity needs. Be prepared to adjust your settings and clean thoroughly between uses.
What have been your biggest challenges when setting up or running a curing chamber? Drop a comment below — I’d love to hear your experiences and compare notes.

Tom Mueller
For decades, immersed in studying, working, learning, and teaching the craft of meat curing, sharing the passion and showcasing the world of charcuterie and smoked meat. Read More