I have been house-sitting for about a year, which has meant curing meat without my usual curing chamber setup. That forced me to go back to simpler methods: the fridge, the oven, airflow, salt, acidity, and careful drying.
I know how, and a focus on simpler projects was needed.
After making cured meats for over 20 years, I have learned that not every project needs a dedicated curing chamber. A chamber is excellent for long-term dry curing, larger whole muscles, salami, and controlled humidity, but it is not the only way to make interesting cured meat at home.
This article is about the cured meats I would make when I do not have a chamber available. These are practical, smaller, shorter projects that use basic equipment most people already have: a fridge, an oven, a rack, a tray, some airflow, and accurate scales.
Cured Meats You Can Make Without a Curing Chamber
Without a curing chamber, I focus on cured meats that do not need months of controlled drying. The easiest options are thinly sliced dried meats, fridge-cured bacon, and smaller whole-muscle pieces that can be managed with salt, airflow, and patience.
The oven and fridge are the two most useful tools. A frost-free fridge can help dry the surface of cured meat quite quickly, while an oven with the light or fan running can create a gentle drying environment for biltong-style meat.
The key is choosing the right project. I would not start with a whole prosciutto, large coppa, or traditional fermented salami without a more controlled setup. But for biltong, bacon, and smaller fridge-friendly cures, there are good options.
The Easiest Cured Meats to Start With
The easiest cured meats without a curing chamber are the ones that dry relatively quickly, use manageable-sized pieces, and do not rely on months of aging. These are the kinds of projects I have used while moving around, house sitting, and working without my usual chamber.
Biltong at Home
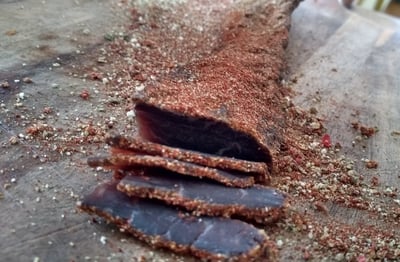
Biltong is one of the most useful cured meat (link to full guide) projects when you do not have a chamber. It uses salt, acidity, spices, and drying rather than a long controlled aging environment.
I usually start with topside or another lean whole-muscle beef cut. Slice it into slabs about half an inch to one inch thick. Think of them a bit like steaks: fairly even, not too thin, and not too thick.
Whether you leave some fat on the meat is up to you. Leaner pieces dry more predictably, while a little fat can give more flavor. For a beginner batch, I would keep the pieces fairly even so they dry at a similar rate.
Cover the meat with coarse salt for about one hour. After that, rinse the salt off under tap water.
Then place the meat in a shallow roasting dish or glass baking dish with a half-and-half mix of Worcestershire sauce and malt vinegar. Let it sit for about one hour.
While the meat is soaking, I like to toast whole coriander seeds in a dry pan until they become aromatic. Then I smash them in a mortar and pestle or pulse them briefly in a spice grinder or coffee grinder.
After the meat comes out of the Worcestershire-vinegar mix, let it drip off for a while. I have even used metal clothes pegs for this, clipping the pieces up so the excess liquid can drain away.
Sprinkle the biltong slabs with the crushed coriander seed and a little cracked pepper on each side. Then hang them in the oven with a tray underneath.
A simple way is to thread metal clothes pegs over chopsticks, spoons, skewers, or anything long enough to span the oven rack. The meat can hang from the pegs while the tray catches any drips.
If your oven can run very low, around 50°C / 122°F, you can use that with the door slightly open. I usually wedge the door open slightly with something heat-safe so moisture can escape.
If your oven does not go that low, you can often use just the oven light and fan. The goal is not to cook the meat. The goal is gentle airflow and gradual drying.
After three to five days, the biltong should start to feel firm. I check it by feel rather than just by time, because thickness, airflow, humidity, and the fridge or oven setup all change the drying speed.
Biltong (link here to what I wrote in detail) works because several preserving hurdles come together: salting, acidity from the vinegar and Worcestershire mix, spice, airflow, and drying. I still treat it sensibly, store it properly, and check smell, texture, and appearance before eating.
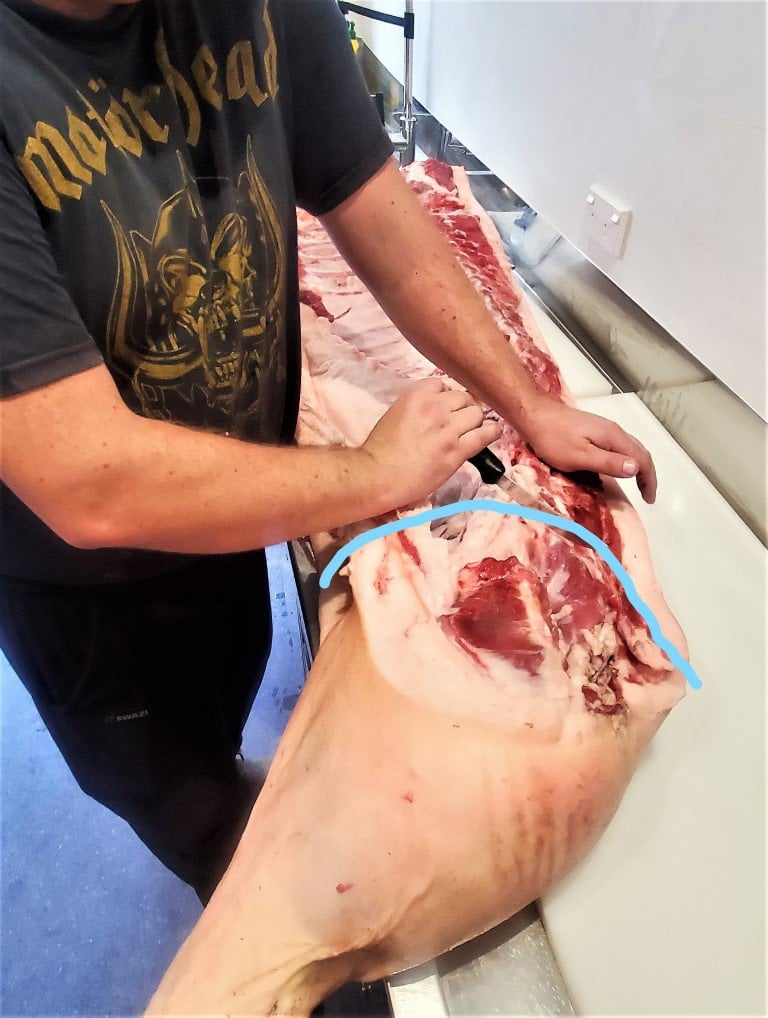
Fridge Dry-Cured Cold Smoked Bacon
Bacon is another excellent project that doesn’t require a curing chamber because the curing stage happens in the fridge. You are not trying to age it for months. You are curing the pork belly, drying the surface, and then cold smoking it if conditions are suitable.
I start with a good piece of pork belly, ideally with a reasonable balance of meat and fat. I remove the skin before curing because I find it easier to work with, slice, and smoke evenly.
For a simple dry-cure equilibrium, use 20 grams of sea salt per 1 kilogram of pork belly. That gives a 2% salt level.
I also like to add 10 grams of sugar per 1 kilogram of meat. Juniper and garlic work well too. I usually smash the garlic and juniper into the cure mix so the flavor spreads more evenly over the pork.
Rub the cure mix over the pork belly, then place it in a plastic bag. Try to remove as much air from the bag as possible, tie it up, and place it in the fridge.
For pork belly that’s about 2 inches thick or less, I usually cure it for about 1 week. The equilibrium method maintains a controlled salt level because the salt is calculated based on the meat weight.
After curing, take the pork belly out of the bag and place it uncovered on a rack in the fridge for about a day. A frost-free fridge will usually dry the surface quite quickly.
This drying stage helps form the pellicle, which gives the smoke something to cling to. I do not rush this part because a damp surface does not take smoke as evenly.
For cold smoking, I use a smoke generator or pellet tube smoker. A hooded gas grill-style barbecue can work as a simple smoking chamber, as long as there is no heat running inside it.
I usually give bacon two or three cold smoke sessions of around five hours each. The important part is keeping the temperature low. I aim to keep it under about 15°C / 59°F.
This is why I prefer cold-smoking bacon in cool weather. If the day is too warm, I wait. Cold smoking is much easier when the outdoor temperature is already on your side.
Cured Meats I Would Not Start With
Some cured meats are better left until you have more control, more experience, and ideally a dedicated curing chamber. I do not say this to put anyone off, but because I have made enough mistakes over the years to know which projects are beginner-friendly and which ones can become frustrating quickly.
Without a curing chamber, I would avoid large, long-term, high-risk projects. These need steady temperature, controlled humidity, good airflow, regular checking, and a good understanding of what normal drying, mould, smell, and texture should look like.
Whole Prosciutto
Whole prosciutto is not where I would start if you do not have a curing chamber. For me, it is a long-term project that takes over a year, and ideally closer to two years if you want proper depth, texture, and flavor development.
There are a lot of nuances with a whole pork leg. The size alone makes it a serious curing project. You are dealing with thick muscle groups, bone, skin, fat, long drying time, and a lot of opportunity for things to go wrong before the meat is ready.
I have thrown away whole pork legs that were meant to become prosciutto because things did not go right. That is very depressing after months of checking, waiting, and hoping the project is going in the right direction.
Whole prosciutto is a serious project for someone who wants to get deeply into traditional dry curing. It is not the first thing I would attempt while house sitting, moving around, or working only with a fridge and basic drying setup.
Large Coppa or Whole Muscle Cuts
Large coppa and other big whole-muscle dry-cured cuts follow the same basic problem. You can do them, but without a chamber you may be biting off more than you can chew.
The bigger the piece of meat, the more important steady drying becomes. If the outside dries too quickly, the inside may not dry evenly. If the humidity is too high, the surface can stay tacky for too long. If airflow is poor, you can create problems before the cure has a chance to settle properly.
That is why I prefer smaller whole-muscle pieces when working without a chamber. Smaller cuts are easier to manage, easier to monitor, and more forgiving if your setup is not perfect.
If you want to try this style of curing in a simpler way, I would start with smaller fridge-friendly pieces first. I cover that approach in more detail here: how to cure meat in a regular fridge.
Traditional Salami
Traditional salami is an advanced dry-curing project in my experience. It is not just minced meat in a casing. There are several technical steps that need to come together properly.
You need to think about meat and fat texture, grinding temperature, salt percentage, mixing, binding, and extracting myosin so the salami holds together properly. Then you have the acidity side of things, whether through fermentation culture, process control, or the specific style of salami being made.
The casing adds another layer. Stuffing too loosely, too tightly, or unevenly can all create issues. Air pockets, poor binding, and uneven drying are things I have learned about mostly through mistakes.
Salami can be very rewarding, but I would not treat it as a casual, no-chamber beginner project. It belongs in the advanced category because it combines curing, fermentation, drying, airflow, casing management, and extensive observation.
Basic Equipment You Actually Need
You do not need a full curing chamber for every cured meat project, but a few basic tools make the process much more predictable. I like simple equipment that helps with accuracy, cleanliness, and repeatability.
Some of this gear is not essential, but it does make life easier. If you are working with salt percentages, fridge curing, and drying times, small improvements in accuracy can make a noticeable difference.
Digital Scales
Digital scales are one of the most useful pieces of equipment for curing meat. They are not exciting, but they help you accurately measure salt, sugar, spices, and curing salt.
I harp on about this a lot on the website because curing by weight is far more predictable than guessing with spoons or handfuls. Once you know the meat’s weight, you can calculate the salt percentage accurately.
For small batches, I like having scales that can measure grams accurately. This is especially useful if you are working with equilibrium curing, where the salt amount is calculated against the weight of the meat.
Sea Salt
Sea salt is my preferred general salt for curing. The main thing is to use salt without unnecessary additives, especially iodine or anti-caking agents.
Those additives can affect how the salt behaves and may interfere with the clean flavor and curing process. For simple cured meat projects, plain sea salt keeps things straightforward.
There is also the option of using curing salts, which means pink curing salt containing nitrite, nitrate, or both, depending on the type. These are different from pink Himalayan salt, and they have specific uses in meat curing.
I go into that distinction in detail here: what pink curing salt is and how it is used.
Ziplock or Vacuum Bags
Ziplock bags or vacuum bags are not essential, but they are very useful for the curing stage. They help keep the cure in contact with the meat and make the process tidier in the fridge.
With equilibrium curing, the salt, sugar, and spices stay in the bag with the meat. If you forget about it for a few extra days during the curing stage, it is generally more forgiving than an excess-salt method because the salt has been calculated by weight.
I still turn the bag occasionally if I remember, just to keep the cure moving around the meat. But for simple fridge curing, bags make the process much easier to manage.
Best First Project If You Are New
If I had to pick one first-cured meat project without a curing chamber, I would start with biltong.
It has been covered a lot online, but there is a good reason for that. Biltong is simple, practical, and does not need a complicated setup. You are working with sliced whole-muscle beef, salt, vinegar, Worcestershire sauce, spices, airflow, and drying.
That makes it a good first project because you can see and feel the change happening over a few days. The meat firms up, darkens, loses moisture, and develops that dried cured texture without needing months of controlled aging.
Compared with bacon, biltong is also more direct. Bacon is a great project, but once you add cold smoking, outdoor temperature, smoke control, and several smoke sessions, there are more variables to manage.
Biltong teaches useful curing instincts quickly. You learn how salt changes the meat, how acidity affects the surface, how airflow matters, and how thickness changes drying time.
I would still keep the first batch small. Use evenly sliced pieces, keep the process clean, and check the meat by smell, texture, and appearance as it dries.
Once you have made biltong a few times, fridge-cured bacon is the next project I would move into. It teaches accurate salt percentages, fridge curing, pellicle formation, and cold smoking without jumping straight into long-term dry curing.
From there, smaller fridge-cured whole-muscle pieces make more sense. By then, you have already learned the core habits: weighing accurately, keeping notes, managing airflow, drying slowly, and not rushing the process.
Frequently Asked Questions
Can you cure meat without a curing chamber?
Yes, some cured meats can be made without a curing chamber if you choose smaller, simpler projects. Biltong, fridge-cured bacon, and some smaller fridge-friendly whole-muscle cures are more suitable than large long-term projects like whole prosciutto or traditional salami.
What is the easiest cured meat to make without a chamber?
Biltong is one of the easiest first projects because it uses sliced whole-muscle beef, salt, acidity, spices, airflow, and drying. It does not need months of controlled humidity like larger dry-cured meats.
Can I make bacon without a curing chamber?
Yes, bacon can be cured in the fridge using an equilibrium cure. After curing, the pork belly can be dried uncovered in the fridge and then cold smoked when outdoor temperatures are low enough for cold smoking.
Should beginners make prosciutto without a curing chamber?
I would not start with whole prosciutto without a curing chamber. It is a long-term project that can take over a year, often closer to two years, and it needs much more control, patience, and observation than smaller beginner-friendly cured meats.
Have you tried curing meat without a curing chamber, or are you planning your first batch? Leave a comment below with what you are making or what setup you are working with.

Tom Mueller
For decades, immersed in studying, working, learning, and teaching the craft of meat curing, sharing the passion and showcasing the world of charcuterie and smoked meat. Read More