Over the years, I’ve experimented with many ways to cure meat for long-term preservation and storage. Some I learned by doing, while others came from studying traditional practices across the world.
What fascinates me most is how simple ingredients like salt, smoke, and time can transform fresh meat into something that lasts months or even years.
This site focuses mainly on dry curing and smoking meat. But I’ve also explored older preservation techniques that were used long before refrigeration.
These methods were essential in times and places where keeping food cool wasn’t possible. Even today, I like having the skills to preserve meat without a fridge or freezer.
When I first read about how salted fish and beef kept sailors alive on voyages of discovery, or how armies marched with barrels of salt pork, it made me realize how central curing was to survival.
I’ve written elsewhere about the history of cured meats, but here I want to share how I still apply those lessons today.
Across Europe, Asia, and beyond, countless regional specialties are built around salting and drying meat. Cold smoking often plays a role too.
From smoked herring in Scandinavia to speck in the Alps, these foods show that preservation and taste go hand in hand.
Cold smoking can seem intimidating at first. But once you learn the basics of airflow, temperature, and smoke management, it becomes another useful layer of protection and flavor.
Plenty of hobbyists now cold smoke at home. The key is doing your homework first — prepare well and it’s not nearly as complicated as it looks.
So how do you cure meat for long-term storage? The foundation is salt. Using either a saturation or equilibrium curing method lowers the available moisture in the meat, making it difficult for spoilage organisms to grow.
Careful drying — and sometimes cold smoke — then completes the process. When done properly, the meat can be stored for long periods in a cool environment or fridge.
Every culture has its own approach. Whether it’s salt cod in Portugal, beef bresaola in Italy, or salt pork once carried by soldiers, the principle is the same.
Surround the meat with salt, draw out the moisture, and dry it until stable. The meat changes in texture, flavor, and density — becoming something altogether different from the fresh cut you started with.
I rely on two main approaches. The traditional saturation method, where meat is packed in salt and left to absorb what it needs. And the more precise equilibrium curing method, where salt is weighed against the meat itself.
Both work. One is rustic and heavily salted. The other is more balanced and controlled. Your choice depends on the results you want.
In the next section, I’ll break down these two methods in detail and explain the salt percentages I’ve found most reliable for meat that lasts the long haul.
Three Core Methods for Salt Preservation
Over time I’ve worked with three main methods of salt curing for long-term storage. Each has its own character, and all can produce meat that lasts well beyond refrigeration.
Saturation / Saltbox Method
This is the classic approach. The meat is completely surrounded with salt and left until it has absorbed enough to resist spoilage. It’s simple, rustic, and often results in a stronger, saltier flavor.
Traditionally, the meat is placed in a wooden box, layered with salt, and left to cure. The rule of thumb I’ve always followed is:
Per 1 kilogram of meat = about 1 day in salt.
A smaller 500 g piece might be ready in less than a week, while a larger 5 kg cut can take 20–30 days. Dense meats like beef or pork need more time compared to lighter fish or poultry.
Equilibrium Curing
Equilibrium curing is more modern and precise. Instead of packing in excess salt, you weigh the meat and measure out exactly the percentage you want to use.
For long-term preservation, I use about 10% salt relative to the meat’s weight. At this level, the meat dries firm and holds well in storage.
Example: 1 kg of meat needs 100 g of salt. For 1 lb of meat, it works out to about 1.6 ounces. Sealed tightly in a bag or vacpac, the salt is fully absorbed without draining away.
This method avoids the “too salty” results of saturation. It also gives flexibility if you want to lower the salt percentage for flavor rather than maximum preservation. For shelf-stable results, though, I stick to 10% or higher.
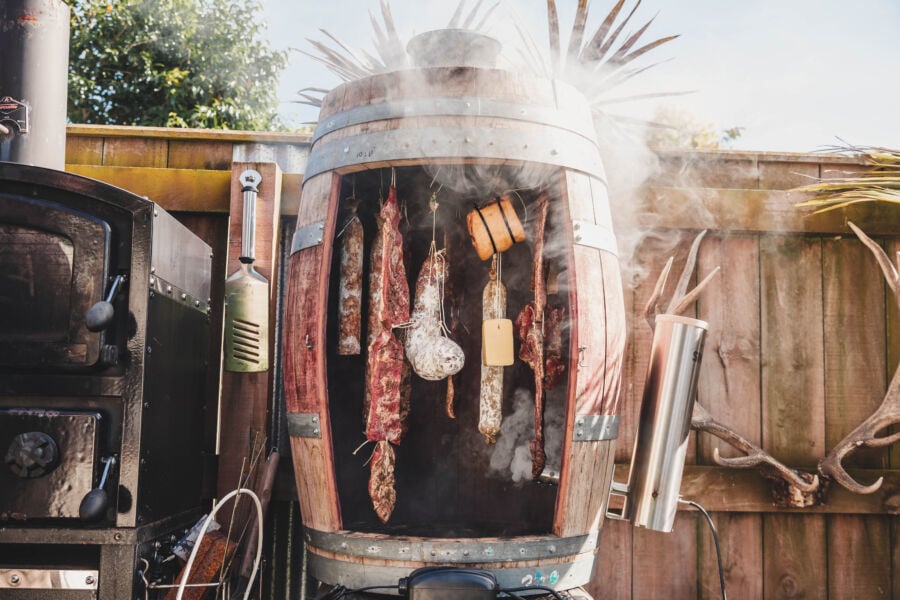
Woodfire and Sun Drying
This third approach blends salt preservation with traditional drying over fire and in the sun. I’ve seen it used in Mediterranean and Asian regions, and I’ve tried it myself with strips of meat and fish.
Some cultures just use the airflow to dry (cold smoke can help with protecting the meat duruing this process).
The meat is salted first, often with coarse crystals. It’s then hung outdoors in a sunny, breezy spot, protected with cloth (or smoke) from insects. During the day, it dries in the warmth of the sun; at night, it is either brought inside or smoked lightly over a low woodfire.
The smoke adds phenols and other compounds that help guard against mold, while the heat of the sun steadily reduces moisture. The combination of salt, airflow, smoke, and repeated cycles of drying builds a product that’s firm, tangy, and extremely resilient.
I’ve found this method works best for thinner cuts — fish fillets, small game, or narrow strips of red meat.
Why the Method Matters
Each method reaches the same end goal: meat that can be stored long-term. The difference lies in the level of control, the flavor outcome, and the traditions they connect back to.
For a rustic, heavily salted style I’ll use saturation. When I want precision, I go with equilibrium curing. And when I want to lean into old-world, fire-and-sun techniques, I turn to woodfire and sun drying. Each has its place in my curing toolkit.
Whichever you choose, once the salt has done its work, the critical final step is drying the meat properly. That’s where the preservation is truly locked in.
Step-By-Step: How to Cure Meat for Long-Term Storage
Once you’ve chosen between saturation or equilibrium curing, the process follows a predictable pattern. These are the steps I use when I want a piece of meat to last for months or more.
1) Start With Fresh Meat
I prefer to begin with fresh cuts. Whether it’s wild game or farmed meat, using fresh meat means fewer bacteria to start with. If I freeze meat for later curing, I make sure it was frozen fresh and then fully thawed before salting.
2) Apply Salt Evenly
With the saturation method, I layer the meat in salt. For equilibrium curing, I seal the meat with its measured 10% salt in a bag. Thinner cuts need less time, while dense meats like beef or pork need longer contact.
Bones or No Bones?
I often remove bones from red meat before curing, but I’ll leave them in fish or small cuts. It depends how I plan to use the finished product.
Thickness Matters
Fish cures quickly, while pork loins or beef slabs need more time. As a rule of thumb, thicker and denser cuts require extra curing days.
3) Refrigerate During the Cure
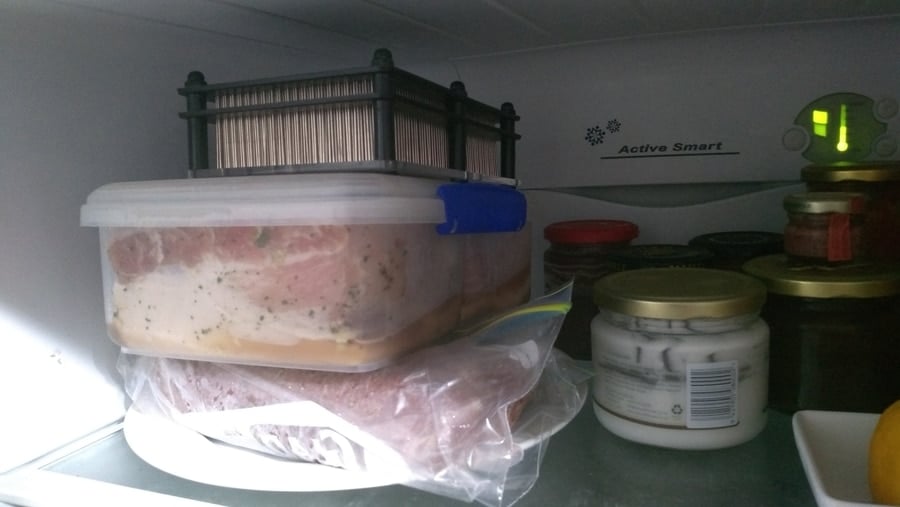
Keep the meat below 5°C / 41°F while curing. I use metal trays to catch any liquid. A rough guide for saturation curing is 1 day per kilo of meat. With equilibrium curing, the timing is more flexible, since the salt amount is set from the start. For more on this technique, here’s my equilibrium dry-curing guide.
4) Rinse the Meat
After curing, I rinse the surface with fresh water. This removes excess salt and gets the meat ready for drying.
5) Dry Thoroughly
This is where the preservation is locked in. Drying removes enough water to keep spoilage organisms at bay. I usually hang the meat in the fridge or in a cool spot with airflow.
Case hardening — when the outside dries too fast and traps moisture inside — is the main risk. To avoid this, I use thinner cuts when I want reliable long-term results.

6) Monitor Weight Loss
I keep a small scale handy and track weight loss. Around 50–65% is a good target for meat I want to store long-term. Squeezing the meat can also tell you if any hidden moisture remains inside.
7) Store in a Cool Place
Once fully dried, the meat is stable. In the past, sailors stored it in barrels. These days I’ll keep mine in the fridge, a cellar, or a larder. I’ve also tested pantry storage in cooler months. For more detail, I’ve written about when cured meat does or doesn’t need refrigeration.
At this point, the meat is preserved. Next comes preparation before eating — desalting or soaking to bring the salt levels back into balance.
Desalting Before Use
Meat preserved with heavy salt isn’t ready to eat straight away. It needs to be soaked or simmered to reduce the salt level.
Soak or Simmer
I normally soak salted meat in fresh water for 12–24 hours, changing the water once or twice. This draws out enough salt to make it pleasant to eat.
Some traditional recipes call for boiling instead of soaking. I’ve bought salt-preserved herrings in Italy that were boiled for ten minutes before being used in a dish. Both methods work to rebalance flavor.
Fixing the “Too Salty” Problem
If the meat still tastes too salty after soaking, I extend the soak time or change the water more often. Another trick is to cook the meat in liquid, which naturally pulls out excess salt into the broth.
The Role of Smoke in Preservation
Cold smoke adds another layer of surface protection. It contains compounds that slow bacterial and fungal growth while also giving a distinctive flavor.
The key is restraint. Too much smoke leads to bitterness. I always keep the old saying in mind: less is more.
For small projects, I often use a simple pellet tube or wood chip setup. It’s an easy way to add controlled smoke during the drying stage.
Examples and Variations
Salt Pork
Salt pork is one of the best examples of preservation through heavy salting and drying. It was once a staple for sailors and soldiers because it lasted so long. I’ve shared my full salt pork recipe here if you want to see how I make it step by step.
Salted and Dried Fish
Fish is lighter and cures faster than red meat. Salt cod, anchovies, and herring are all classics. These traditions show how flexible salt curing can be across different meats.
Meat Strips
Thin strips of meat also preserve well. I often make biltong or jerky-style strips with wild game. These dry quickly, are easy to store, and require less salt than larger cuts.
Each of these variations proves the same point: when the salt levels are right and the meat is dried properly, you can create food that holds for the long term without refrigeration.
What salt works best for curing meat long-term?
I always use pure sea salt without additives. Anti-caking agents can cause problems with flavor and texture. A fine grain salt makes for better surface coverage.
How much salt should I use for equilibrium curing?
For long-term storage, 10% of the meat’s weight in salt is a reliable benchmark. That’s 100 g per 1 kg (about 1.6 oz per lb).
Can cold smoking replace salt curing?
No. Cold smoke is an adjunct for surface protection and flavor. Salt and drying are the foundation of preservation.
How do I know when the meat is dry enough?
Track weight loss. For shelf-stable results I aim for roughly 50–65% weight loss, adjusted for cut and density.
Have you tried curing meat for long-term storage? Drop a comment below — I’d love to hear about your experiments and what worked best for you.

Tom Mueller
For decades, immersed in studying, working, learning, and teaching the craft of meat curing, sharing the passion and showcasing the world of charcuterie and smoked meat. Read More
Once cured and dried what is the best way to store.
I remove good mold with vinegar, let it dry, and vacpac then store in the drying chamber or kitchen fridge – I’ve got some stashed dry cured meats that are 1.5-2 years old.
If it’s a fatter cut, it doesn’t shrink as fast, but will dry and shrink. Meatier cuts continue to dry if left to hang.
Interestingly, look at Iberian Jamon whole hind legs (Spanish prosciutto basically), they hang for 3-5 years sometimes! I presume the skin regulates and stops excessive drying.
I have dry cured some fresh pork bellies in a food safe plastic tray for about 2 weeks or when i saw no moisture in the bottom tray where the top tray was draining. I washed off and then patted dry and let sit in fridge for 24 hours until it was tacky. I have built and old time smokehouse and i smoked in indirect heat at 100 degrees or less for 10 hours. Is this bacon safe to hang completely covered in black pepper in my basement that is dry and dark and if so for how long before it must be consumed?
so you hot or cold smoking?, if 100 degrees F = too high for cold smoking generally. 86F max for cold smoking
if it was 100 C then you cooked/ hot smoked it = so its like a baked pork belly, not for long term aging.
Not sure of your method, get my course if you want to do things more accurately.