I’ve been curing bacon at home for over 20 years, experimenting with every wood, spice, and technique imaginable. Along the way I discovered that using equilibrium curing — whether dry or wet — gives me total control over salt levels and flavor. But here’s the real question:
Which method is right for you? If you want bold, rich flavor and a firmer texture — ideal for cold smoking — a dry cure is hard to beat. On the other hand, if you’re hot smoking bacon (and want extra juiciness), a wet brine can help your meat stay succulent and cook evenly.
Dry Equilibrium Cure vs Wet Equilibrium Brine
| Criteria | Dry Cure | Wet Brine |
|---|---|---|
| Flavor Intensity | Concentrated and robust | Milder, more even spice infusion |
| Spice Profile | Bold—spices cling to surface | Subtle—spices dilute through brine |
| Texture | Possible, but harder to dry | softer texture |
| Cold Smoking | Ideal | Possible but harder to dry |
| Hot Smoking | Better | |
| Time | Faster — no dilution step | Slower —time to dissolve & submerge |
Both techniques have their place — I regularly use each depending on how I plan to finish the bacon. For cold smoking, dry curing gives me a firm, dry surface that absorbs smoke beautifully. For hot smoking, wet brining delivers juicier slices that hold up to a warm cook.
Let’s take a closer look at how equilibrium dry curing works, including how I measure, apply, and adjust each recipe to suit different cuts and spice blends.
Equilibrium Curing Bacon
Equilibrium dry curing uses precise salt and spice ratios based on the weight of your meat—no covering it in salt and hoping for the best. You’ll need a reliable digital scale (0.01–0.1 g precision) and a spice grinder for even mixing.
1. Calculate Your Cure
Decide your target salt level (usually 2–2.5% total, including 0.25% pink curing salt). Weigh your meat, then use my equilibrium curing calculator to work out exact gram amounts for salt and spices (it also calculates wet brine curing).
2. Weigh & Grind Ingredients
- Weigh each ingredient separately on your scale.
- Grind salt first, then spices, to a fine powder.
- Combine & blitz briefly in grinder for uniform texture.
3. Mix & Apply Cure
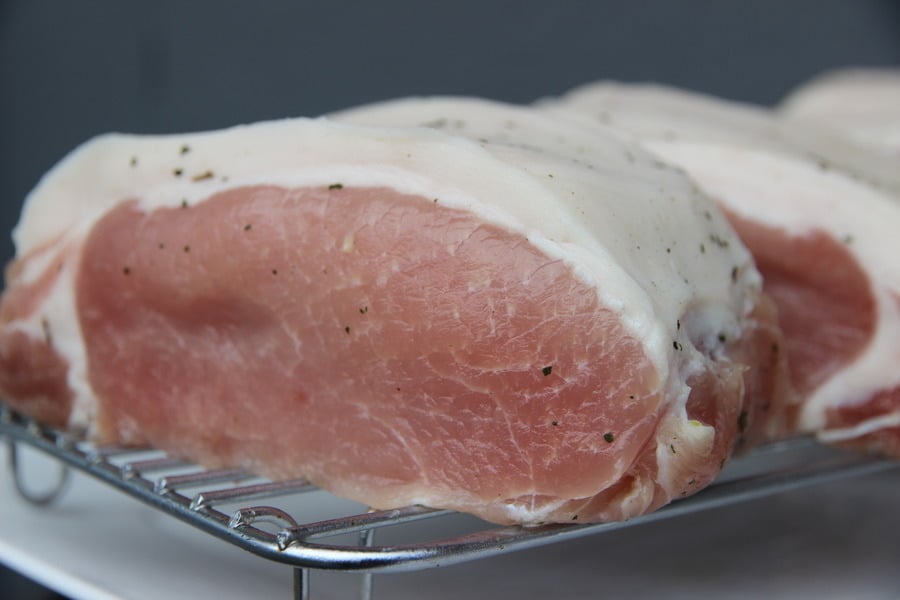
Place the pork belly in a large bowl. Sprinkle the cure evenly, then use the meat itself to sweep the bowl clean—this ensures no cure is wasted.
4. Package & Refrigerate
Roll the meat in a Zip‑Lok bag, squeeze out as much air as possible (vacuum seal optional), then refrigerate. I press the bag under fridge shelf cans for even contact.
5. Cure Time
Cure for 5–9 days per kilogram of meat (longer if spices are coarse). Once complete, rinse lightly or gently brush off excess herbs if desired.
6. Cold-Smoke & Store
Pat the meat dry (pellicle should form), then cold‑smoke for 8–20 hours. Store in the fridge for up to 2 weeks or freeze for longer keeping.
Pro Tips:
- Use a scale with at least two decimal places when measuring small amounts of salt or spice.
- Grind pink curing salt and spices separately, then blend for consistent curing.
- Remove air from packaging to improve cure penetration—Vac‑Pac or Zip‑Lok both work well.
Equilibrium Brining Bacon
Equilibrium brining is similar to dry curing, but the salt and spices are dissolved in water to form a liquid cure. This is especially helpful if you’re hot-smoking your bacon, because it helps the meat retain moisture through the cooking process.
I’ve used this method when I want softer, juicier bacon or when I’m working with larger slabs that benefit from a soaking cure. It’s not quite as intense in flavor as dry curing, but still produces a beautifully balanced and seasoned result.
1. Calculate Your Brine
Weigh your meat and multiply by 40% to determine the amount of water to use. Then calculate your cure ingredients based on the combined weight of the meat and water.
Use my meat curing calculator to make this quick and precise.
For example, if you’re curing 1,000 g of pork belly:
| Ingredient | Amount (Grams) |
|---|---|
| Meat | 1,000 g |
| Water (40%) | 400 g (or 400 mL) |
| Sea Salt (2.0%) | 28 g |
| Pink Curing Salt (0.25%) | 3.5 g |
| Spices (optional) | to taste |
2. Mix the Brine Solution
Grind your salt and spice mix into a fine powder before adding to lukewarm water. Stir until everything is fully dissolved. You should see no particles floating—just a clear, seasoned brine.
3. Submerge the Meat
Place your pork belly in a container just big enough to fit the meat and brine. If needed, use a weight to keep the meat fully submerged.
Make sure the container is food-safe and fits in your fridge. You can also use a large reusable vacuum bag or silicone sous vide bag if you’re trying to cut down on plastic use (I’ve been experimenting with both).
Tip – I’ve had success injecting the cure consistently into the meat with a injection basting type syringe needle, this has halved the curing time.
4. Cure Time
I usually brine for 6–10 days, depending on meat thickness and salt level. Thinner belly slabs may be ready in 5–7 days. Stir or agitate the container halfway through to ensure even salt distribution.
5. Remove & Pat Dry
Take the meat out of the brine and pat it dry. You can rinse it lightly, but I often leave on some of the aromatic flavors. Let it air-dry in the fridge overnight to form a pellicle before smoking.
For more tips on prepping pork belly before smoking, check out my post on whether to leave the skin on or off your homemade bacon.
From here, you’re ready to hot or cold smoke depending on your style—I’ll share some tips for that next.
Smoking Bacon After Equilibrium Curing or Brining
Once your bacon has been equilibrium cured—either dry or wet—you’ve got a few options for how to finish it. Each method produces different textures and flavors depending on how it was cured.
- Green Bacon – no smoke, just cured and dried
- Hot Smoking – smoked while being cooked
- Cold Smoking – smoked without heat, low and slow
Green Bacon (Unsmoked)
Sometimes I skip the smoke entirely and just dry the bacon in the curing chamber or fridge. This is what I call “green bacon.” It has a clean, savory cured flavor and works great diced into soups or pasta.

Hot Smoking
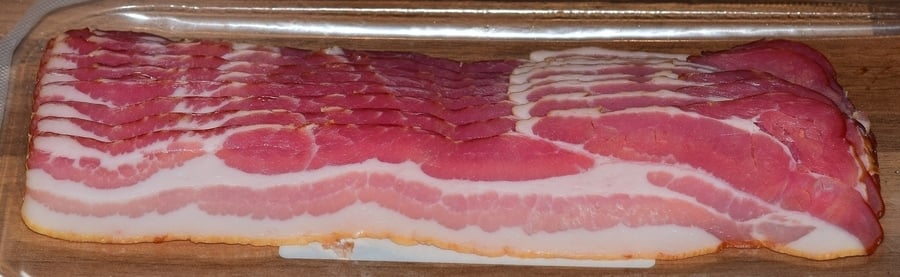
Hot smoking cooks the meat as it smokes—ideal if you want ready-to-eat bacon straight off the smoker. I find that wet-brined bacon holds moisture better in this method and comes out juicy even after pan-frying later.
I tend to smoke at 90–100°C (195–210°F) until the internal temp hits about 65–68°C (150–155°F). After cooling, I refrigerate or vacuum seal for storage. The texture is softer than cold-smoked bacon, and there’s no drying time needed afterward.
Cold Smoking
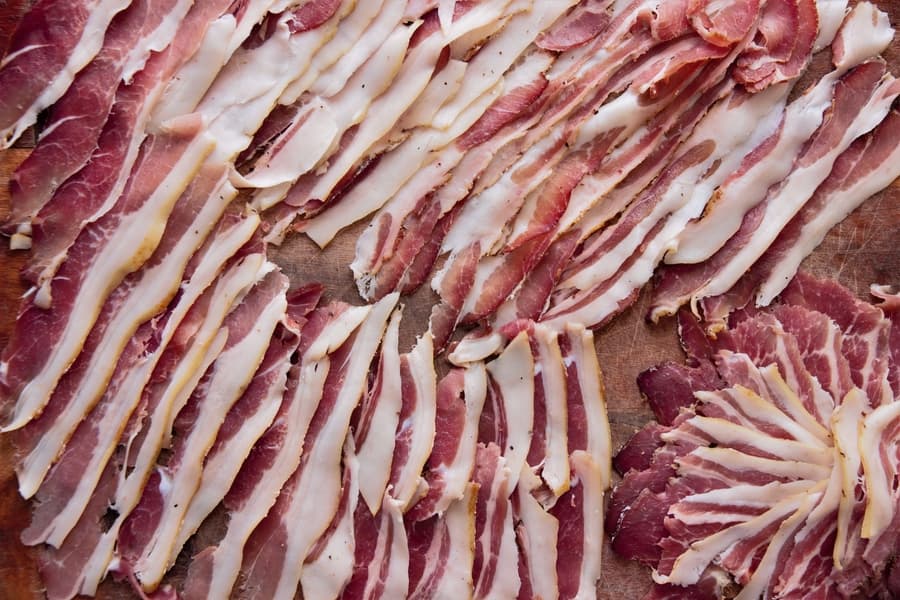
Cold smoking is where dry equilibrium curing really shines. Because the meat isn’t being cooked, it benefits from the firmer texture and drier surface you get with a dry cure. I cold smoke bacon in multiple short sessions—usually 6 to 20 hours total.
Dry-cured slabs develop a pellicle quickly in the fridge, making them perfect for absorbing just the right amount of smoke. I aim for a subtle aroma, not overpowering smoke. Think airflow, humidity, and patience.
Which Method Works Best?
Personal preference works best; it’s your choice.
For me, If I’m making hot-smoked bacon, I typically use a wet brine. It helps retain moisture and gives the meat a gentler cure. For cold smoking or long drying, I stick with dry curing. The flavors come through stronger and the texture is ideal for slicing thin.
You can experiment with both methods and see what matches your style of cooking—or how you like to eat your bacon. I enjoy swapping between them based on the time of year, the cut of pork, or just for variety.
Advantages and Challenges of Each Method
Advantages of Equilibrium Dry Curing
- Bold, concentrated flavor that develops with cold smoking
- Shorter curing time compared to brining
- Works well for thin slabs of pork belly
Challenges of Equilibrium Dry Curing
- Requires precise digital scales and grinding for accuracy
Advantages of Equilibrium Wet Brining
- Helps retain moisture when cooking hot smoked bacon
- Even salt and spice distribution across large cuts
- Can scale up for multiple pieces or large batches
Challenges of Wet Brining
- Longer total time due to dilution and curing phase
- Requires more fridge space (or cool area) and a suitable container (weighed down under water surface also)
Can I cold smoke after wet brining?
Yes, but make sure the meat is well dried first. Wet-brined bacon retains more surface moisture and takes longer to form a pellicle. Air-dry in the fridge for at least 24 hours before cold smoking.
What’s the ideal salt percentage for bacon curing?
A common target is 2–2.5% total salt, including 0.25% pink curing salt. This gives a balanced flavor without over-salting. Use a digital scale and curing calculator for best results.
Do I need to rinse bacon after curing?
Rinsing is optional. I usually pat the meat dry and only rinse if there’s excess spice. Some people leave the cure on for a stronger flavor during smoking.
Can I add sugar to the cure?
Yes, you can add up to 1% sugar by weight for a sweeter finish. This complements pork and helps caramelize during hot smoking.
If you’re cold smoking and want strong cured flavor, dry curing is hard to beat. If you’re hot smoking or want hot smoked bacon, wet brining gives better outcomes in my opinion. I often switch between both depending on the cut, my spice blend, and the end use.
The most important thing is to get the salt ratios right and work by weight, not volume. With accurate scales and a good curing container or bag, you’ll get great results batch after batch.

Tom Mueller
For decades, immersed in studying, working, learning, and teaching the craft of meat curing, sharing the passion and showcasing the world of charcuterie and smoked meat. Read More
Hi Tom
How long would you cure or how long can/should you dry out bacon in the DIY meat chamber.
I have made my own chamber and ive been curing bacon now for a while im wanting to dry it out as i understand you get more flavour and it can last longer.
Ive not tryed my DIY chamber yet im just fine tuning the temperature and humidity at the moment.
Thanks in advance for any information you could give me.
Craig.
Hey Craig,
It depends on size and fat. It could be 2-4 weeks or much longer. The drying intensifies the flavor! So quality meat helps too.
Awesome glad to hear you’ve got a setup! I kind of cold smoke in the evenings and stick the bacon slab in the curing chamber during the day the first 2-5 days. Then it has taken on a fair bit of smoke flavor. So on with the drying for a while. Since you are going to cook it you can choose the level of drying too. Sometimes I just get hungry and what to try it!
Actually I just got a chunk of pork belly today! havent had a crack for a while. salute!
Tom
Hi, when curing corned beef, should i follow the 2.5% salt?
As most recipes i found are 5%.. wondering if the 2.5% only applies to sausages and bacon.. also have you used sodium erythorbate? I dont know if i should calculate the ppm from the meat weight, brine weight only, or total weight?
Ahoy! i don’t comment on others recipes, but I don’t use 5% because its mad salty, unless you are soaking/boiling it later to remove it again. For dry Curing i use 2 to 2.5%. For fresh sausages (that will be cooked/grilled) I use between 1.3-1.5% equilibrium salt dry cure.
sodium erythorbate =no, I don’t know it
i don’t use ppm
i calc from meat weight fresh for dry equilibrium curing, i calc meat weight fresh plus water for eq wet brining.
Cheers
T
Also in terms of Curing Time for Equilibrium Curing = I go by about 1 week per 1 inch thickness of meat.
Is the curing time the same for wet and dry brining, about a week per inch?
eq curing/brining, I have more recently been injecting the eq brine for universal penetration. Fat content could also affect this. For wet brine eq curing, I haven’t gone more than 3 weeks since the water can get very funky! Cheers Tom
Great stuff!
I’ve been doing wet brined cured brisket (like pastrami) for a few years, and while I submerge in about 100% water (i.e. 1kg of brisket using 1kg of water) and weigh salt and sodium nitrite separately, my ratios are EXACTLY what your calculator spits out for 2.5% salt! So happy to see. I usually inject and brine for 5 – 7 days.
Now here’s my newest challenge. I bought a vacuum tumbler to reduce the curing time to within a couple of hours and I need to rework all the numbers. Thinking I wouldn’t need as much water with a vacuum tumbler, I tried my exact same brine recipe ratios, but reduced the brine quantity to 25% (i.e. 25% water, spices, salt, sodium nitrite). But after vacuum tumbling and cooking, it was pretty flavourless. How do you think the calculations would change, if at all? Or, should I just use the calculator, set the water at 25%, keep salt at 2.5%, and use the values for salt and pink salt? Since the meat isn’t covered by brine in the vacuum tumbler drum at 25%, I’m hoping the vacuum action will suck the brine into the meat evenly while it tumbles and penetrate deep enough given enough time.
Sorry, long winded question(s). Really just looking for a starting point as meat is expenses and I don’t want to toss out too much.
Hey thanks
Tumbler, never heard of or used one!
Since these eq calcs are based on equalizing, I wonder if the tumbler can apply enough ‘pressure’ to equalize faster? Which is your theory I think. With eq brining, I do it often in either vacpac bag or tight container. Vac Packing of course is applying more ‘equalizing force’ for what is inside the meat and outside the meat but in the vacpac bag.
Do you use an injector? Often for Ham these days, I inject 10-15% of the equilibrium brine to speed things up.
I remember many years ago (20yrs I think) I knew a commercial butcher with a 6 figure cold smoker that worked under pressure, I remember him boasting it could cold smoke what took 10 hours in 20 minutes! This was dry/cold smoking not the curing/brining stage though. The other Dutch butcher locally I knew, piled up sawdust and lit it in a big iron smoke house….contrasts…..I preference would always be the latter.
Another more expensive route would be to buy a pH meter with a salinity meter built-in, (Apera do some) then you could use a spearhead probe to ‘test’ the salt content inside the meat after ‘tumbling’. $250 USD+
Sorry I don’t have any straight answers, just some thoughts! 🙂
Cheers
Tom
Hello,
I love this guide Super informative and precise, just the way I like to work in the kitchen. I’m curious, you don’t use sugar in your brines, and I have been other ones typically use it. Is there a reason? Pros/cons? Is it purely for flavor, or is the sugar also going to affect the moisture/texture?
Heya, yep flavor from my perspective. Apart from bacon, I don’t often use any type of sugar in the eat I cure. People think it has an impact on ‘curing’ but from what I have learned over 20 years, it’s purely flavor. Cheers T
Why does it need to be in an air sealed bag? Instead, could it sit in an open plastic or glass dish like a glass baking dish?
you equalize by having the meat and salt squeezed together, its more effective if no air is around, a bit of air hasn’t made much different and over the years most of my eq curing has been in bags rolled up so most of the air is removed. a bowl or dish doesn’t achieve this.
Hi. I am really enjoying your content.
I have a question for you. I was able to pick up some 12oz cured salt pork packs for a song a while ago.
Is there a way to further the cure to make them shelf stable? They were cured with water, salt, sugar, dextrose, sodium erythorbate and sodium nitrate with instructions to heat to internal temp of 160F
Thank you for your response.
Heya, I cure at home, if it’s salt pork – its just salt and pork. With other additives, I’m not sure. Those types are products arent made for long term preservation like traditional style. Freeze for 6 months, is what I’d do if you need to.
Cheers
Tom
Tom,
Have you ever put ice cubes to equal the 40% water into the bag so that you can really vacuum seal? I’ve read about it, but not done it. I think I’ll try it this time with you proportions and recipe. Thanks for all the good, geeky info.
Hey thanks, ice? not sure, never tried . Personally, I want the brine universal across all the liquid when it starts. All the best, Tom
Hi Tom! Great advice, and I love the calculator. I used your calculator to get the 2.5% total salt weight, and I also used 1/2 cup of Maple syrup as a binder to get the salt to adhere to the pork belly. I used a vacuum bag and sealer to seal up the individual meat portions, and let them sit in the fridge for 1 week, flipping them over daily. I then smoked it with hickory in my Bradley, and Wow, what a taste. The Maple syrup only added flavor throughout, and not so much the candy type flavor. If that makes sense Lol. I am thinking of adding the spices you talked about as well, but am not sure how they would go with the maple flavor. Thanks for all the great advice, my family love the bacon and think I’m a pro now Lol!
Awesome! great to hear, and happy to help. Sounds like your on the right track! Look forward to hearing more, kindest regards, Tom