After years of experimenting with different cuts — from butchery-standard selections to whole animal breakdowns — I’ve come to appreciate the cuts that consistently deliver the best results for dry curing. Whether it’s pork, beef, or wild game, the specific muscles you choose have a huge impact on the drying time, texture, and overall quality of the cured meat.
I’ve worked with all the classic cuts, but I’ve also created custom ones that better suit my curing projects. Every part of the animal behaves differently once salt and time are applied. Some pieces are ideal for long-term curing, while others are better suited to quick-dry methods or cooking preparations.
Through harvesting wild animals like deer, Himalayan tahr, rabbits, ducks, turkeys, and other game, I’ve learned to identify which parts are worth the effort. One key lesson: wild game flavors intensify with curing. That gamey character becomes more pronounced — sometimes too much — depending on the animal’s age, fat content, and what part you’re curing.
You can technically use almost any piece of meat for dry curing — within reason. But over time, I’ve realized that certain muscles simply perform better, especially when aiming for consistency, safety, and excellent flavor. In this guide, I’ll walk through the best cuts for salt-based dry curing, based on firsthand experience.
Whether you’re making pancetta, coppa, guanciale, or something completely your own, understanding the fat content, muscle structure, and overall thickness of the cut helps you achieve better outcomes. These factors influence how the meat dries, how it’s sliced, and ultimately, how it tastes.
This guide is especially useful if you’re new to dry curing and want to avoid wasting time and meat. Pork will feature prominently here, as it’s traditionally the most forgiving and versatile meat in classic salt-based curing — but I’ll also cover beef and wild game cuts that work well too.
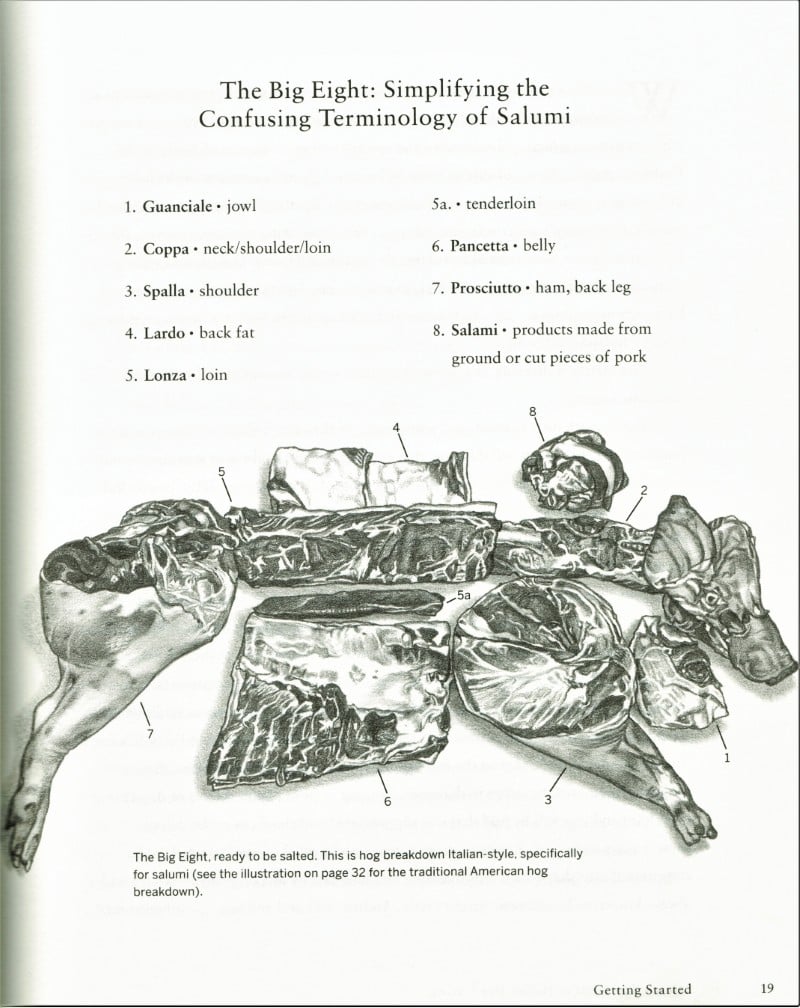
To set the stage, here’s a simplified visual of traditional Italian pork cuts commonly used for salumi. This version, originally from Ruhlman’s book Salumi, helped me identify the key muscles when I first started working with whole pigs.
Ideal Meat Cuts for Dry Curing
In my experience, pork has the best combination of fat, muscle structure, and yield when it comes to dry curing. The proportion of meat to fat is ideal, and pigs raised well tend to have consistent quality across the board.
Another big advantage is flavor. Pork fat tends to have a neutral, clean taste, unlike beef or mutton, which can be overpowering or tallowy. Of course, this depends on the animal’s diet. In Spain, high-end Jamón Ibérico comes from pigs that eat acorns, giving the fat a nutty, sweet depth. Unfortunately, due to climate change and oak tree dieback, acorns are less available — and alternatives like sunflower-based feed are being used.
I’ll talk more about fat in the next section, but one important point to note here is that the age of the animal affects fat quality and thickness. Older pigs have thicker, more developed fat caps, which changes how you trim and cure the meat. Younger animals tend to be leaner and may not have the same insulation or moisture retention during drying.
Good Fat-to-Meat Ratio
Fat plays a massive role in how dry-cured meat tastes, feels, and behaves during drying. It adds richness and mouthfeel, but it also serves as a protective layer during the moisture loss phase.
In traditional Italian and Spanish curing, a balanced fat layer is seen as essential — not too thick, but enough to cover and protect the muscle. It slows down moisture loss and helps develop the right textures over time.
Marbling
While outer fat caps can be useful, what really improves cured meat is intramuscular fat — that marbled look you see in well-raised pork or beef. That fat melts on the tongue and gives cured slices their signature depth.
One of my favorite examples is the upper pork loin — it often has excellent marbling and fat lines running through the center. I’ve had Italian producers tell me this is one of the most desirable cuts for that very reason.
It’s also the reason coppa (or capocollo) is so popular. That particular muscle runs from the neck to the shoulder and has the perfect balance of lean and fat in tight spirals.
Fat-to-Meat Ratio
Every cut has a different fat-to-meat ratio. For example, a pork belly from a well-fattened pig can be 70–80% fat. In contrast, younger pigs tend to yield bellies that are 30–50% fat.
The hind leg also has a thick fat cap under the skin, which is useful for projects like prosciutto or fiocco. Most of the inner leg is lean muscle, though, so it dries slower and needs more attention to humidity balance.
With leaner cuts, especially when working with beef, it becomes even more important to control moisture loss carefully. That’s when understanding the what pink curing salt does and when it’s needed can really help, especially for food safety and color development.
Uniform Muscle Structure
The best cuts for dry curing are whole muscles with a consistent structure. Ideally, you want a cut that’s solid — no flaps, seams, or internal crevices that could hold moisture or promote spoilage.
That’s because muscle fibers themselves create a natural internal barrier. When the surface is intact and the grain is unbroken, the drying process becomes much more predictable.
- Cuts with uniform thickness and little connective tissue dry more evenly.
- Muscles with many seams or sinew tend to cure unevenly and can create risk spots.
- A clean muscle shape also gives better slicing results later on.
This is something I pay close attention to when I’m doing long-term storage curing. Uneven cuts or exposed crevices can drastically affect the outcome.
Size and Thickness Considerations
Size and thickness also matter a lot. A good rule of thumb is to work with cuts that are no more than 2–4 inches (5–10 cm) thick. Anything thicker can be cured, but you’ll need to monitor airflow and humidity much more carefully.
- Thick cuts dry slower and can develop case hardening if airflow is too strong.
- If a cut tapers at one end, it helps to trim it or tie it to create a more consistent shape.
- Flat cuts like pork belly are easier to manage, especially for beginners.
If you’re ever unsure about a cut, go back to the main ingredients for curing meat and consider how salt and fat interact in the drying process.
Best Pork Cuts for Dry Curing
Classic Cuts for Traditional Charcuterie
Coppa / Collar Butt / Neck Fillet
One of the best cuts for beginners and seasoned curers alike. This cut is naturally marbled and its cylindrical shape makes for even drying and slicing. Most of my coppa projects dry within 2–6 months depending on size and conditions.
Pancetta (Pork Belly)
This cut is rich in fat and easy to work with. You can cure it flat (pancetta tesa) or roll it for a classic spiral look. Either way, it responds well to spice rubs, and in some cases, a touch of cold smoke adds depth.
Lonzino / Lonza (Pork Loin)
This leaner muscle is forgiving and ideal for shorter curing projects. The uniform shape makes it great for consistency, and the flavor can be light or bold depending on your spice mix.
Guanciale (Pork Jowl)
A fatty, flavorful cut used in Italian dishes like carbonara. It needs careful trimming and balance in the cure mix. I often get the whole pig head for a good price and harvest both cheeks and tongue — the latter makes a fantastic slow-cooked dish.
Regional Names and Butcher Translations
Names for the same muscle can vary depending on country and butcher tradition. Here are a few worth clarifying:
- Boston butt: A common term in the U.S. for the upper pork shoulder, often used for coppa-style cures.
- Pork belly: Recognized everywhere, but trimming styles vary. Some keep the skin; others remove it entirely.
- Loin: Sometimes confused with tenderloin. The loin runs along the outside of the spine, while the tenderloin is smaller and lies beneath the ribs — not ideal for dry curing due to its shape and size.
If you’re unsure, bring a photo to your butcher or explain that you’re after a whole, untrimmed muscle with a good fat cap and minimal sinew — especially if you’re aiming to make something like pancetta or lonza.
Dry Curing with Beef Cuts
Beef Cuts That Are Suited
Bresaola (Eye of Round)
This classic Italian cured beef is typically made from eye of round — a lean, dense muscle that slices cleanly and holds its shape. It’s one of the few well-known cured meats made from beef instead of pork.
Topside / Silverside
Popular in the UK and similar to top round in the U.S., these cuts can also be used for dry curing. They require trimming to remove sinew and outer silverskin, but the result is a solid, flavorful cured meat.
Ribeye or Sirloin
Less traditional but still viable. These cuts have more internal fat, which can be advantageous for flavor but require more attention to trimming and drying control.
For more detail on what makes bresaola special and why lean beef is chosen, this guide from Volpi Foods explains it well.
Tips for Working with Beef
- Beef cuts are typically leaner and may benefit from more aggressive seasoning.
- Because the muscle can be denser, monitor for case hardening — a condition where the outside dries too fast.
- Cold smoking before or after drying can add complexity to the flavor without cooking the meat.
Regardless of the cut, pay close attention to the freshness and structure of the meat. The quality of the final product always reflects what you start with.
Expert Tip: Use the Whole Cut, Not Trimmed Pieces
Try to source full, untrimmed muscles whenever possible. Trimmed cuts may look tidy but often lose the protective outer layers that help with drying and moisture retention. If you’re not sure what to ask for, request the whole piece as-is and trim it yourself based on your project needs.
Alternatives if You Can’t Find the Ideal Cut
If your butcher doesn’t carry certain cuts or only stocks pre-trimmed portions, try making smaller batch projects with what’s available. Even lean cuts can produce great results when cured carefully with the right balance of salt and humidity control.
Can I dry cure meat without a curing chamber?
Yes, but you’ll need a stable, cool, and moderately humid space, such as a basement or converted fridge with airflow control. Inconsistent temperature or humidity can lead to spoilage or case hardening.
What cuts should I avoid when dry-curing meat?
To begin with, avoid cuts with lots of sinew, bone, seams, or multiple muscle groups (like shank or shoulder blade), unless you’re experienced at tying or trimming. These can cure unevenly or harbor moisture.
Can I use beef instead of pork for dry curing?
Absolutely. Cuts like eye of round, topside, or sirloin are great choices.
How do I know when the cured meat is ready?
Weight loss is often best when cured meat is typically ready when it’s lost 30–40% of its starting weight, feels firm but not hard, and has no overly soft or wet spots. Use a scale and trust your senses.
What should I ask my butcher when buying meat for dry curing?
Ask for whole, untrimmed muscles with a balanced fat cap and minimal sinew. Bring photos or explain your goal — whether it’s coppa, pancetta, or another salumi — to help them cut accordingly.
Have a favorite cut or technique I missed? Leave a comment below — always keen to hear what others are curing.

Tom Mueller
For decades, immersed in studying, working, learning, and teaching the craft of meat curing, sharing the passion and showcasing the world of charcuterie and smoked meat. Read More