Over the years, I’ve explored many aspects of salt curing with different types of meat. Lately, I’ve been diving deeper into fish curing — something rarely discussed in detail. It’s become one of the most fascinating and rewarding parts of my curing journey.
My curiosity began after discovering Mojama, a traditional Spanish delicacy made from dry-cured tuna. Often called “the ham of the sea,” it opened up a whole new world of salt-curing possibilities.
I’ve cured thousands of pounds of pork, venison, and game over decades — but fish offered something entirely different.
Dry-cured tuna, called Mojama, is one of the most emblematic foods from the Mediterranean coast of Spain, especially in Andalusia, Murcia, and Valencia. It’s produced using time-honored methods that carefully balance salt, temperature, and airflow.
Physicochemical and Microbiological Changes Associated with Processing in Dry-Cured Tuna
What I’m talking about here isn’t “salt fish” — the rock-hard, salt-saturated style often rehydrated before cooking. This is more delicate: salt-curing that draws out moisture, concentrates flavor, and slightly dries the fish until it loses 30–50% of its original weight.
When done right, salt curing transforms the fish. It firms the texture, deepens color, and locks in natural oils that develop complex savory and nutty notes. I’ve found it to be the perfect technique for oily fish like tuna, salmon, or kingfish.
Why Salt-Curing Fish Is Different
After years of experimenting with dry-curing pork, game, and even wild birds, I eventually turned to the sea. Fish behaves very differently from red meat — it cures faster, holds more natural oil, and changes texture quickly once moisture is drawn out.
I wanted to understand how Mediterranean producers were achieving such balance in flavor and preservation. Learning about Mojama, the “Ham of the Sea” taught me that less can be more. Just high-quality fish, sea salt, time, and patience — no sugar, no additives, and no shortcuts.
The goal is simple: use salt to control moisture and bacteria while enhancing flavor and shelf life. The salt concentration reduces the water activity within the fish, creating a natural preservative barrier. Once cured, gentle drying at cool temperatures completes the process, producing a clean, pure taste with a firm yet tender texture.
What Makes a Good Fish for Salt Curing
Most fish suitable for salt curing are rich in omega-3 oils and have firm, meaty flesh. Through trial and error, I’ve learned that oil content plays a huge role in how well a fish cures and dries. The more oil and less water it contains, the better the results.
That’s why species like tuna, salmon, trout, and kingfish perform beautifully when salt-cured. Their natural fat provides richness and prevents excessive dryness during the drying phase. In contrast, lean fish can shrink too rapidly and lose texture.
In Spain, Bluefin and Yellowfin tuna are prized for Mojama because they’re dense in long-chain omega-3 fatty acids. That oil gives the finished product its signature translucent sheen and savory umami depth. Other Mediterranean coasts use similar methods with mackerel, mullet, and even swordfish.
Closer to home, I’ve had great success with yellowtail kingfish and kahawai — both abundant and oily enough to withstand a long dry cure. These local fish respond well to the same techniques that have been refined for centuries around the Mediterranean.
A Simple Way to Think About the Process
Salt-curing fish can sound intimidating, but the principles are straightforward. The salt pulls moisture out while firming the meat. During drying, that moisture loss continues slowly until the flesh becomes supple and sliceable — not brittle or leathery.
Depending on the thickness and type of fish, I aim for roughly 40–50% weight loss. That’s when the texture and flavor balance reach their peak. I’ll go into exact curing ratios and chamber conditions next, including how to choose between the saturation and equilibrium methods I use most often.
Step-by-Step Process for Dry Salt Curing Fish
There are two main paths you can take when curing fish — saturation curing and equilibrium curing. I’ve used both many times, and each serves a purpose depending on how precise you want the outcome to be.
Traditional Saturation Curing
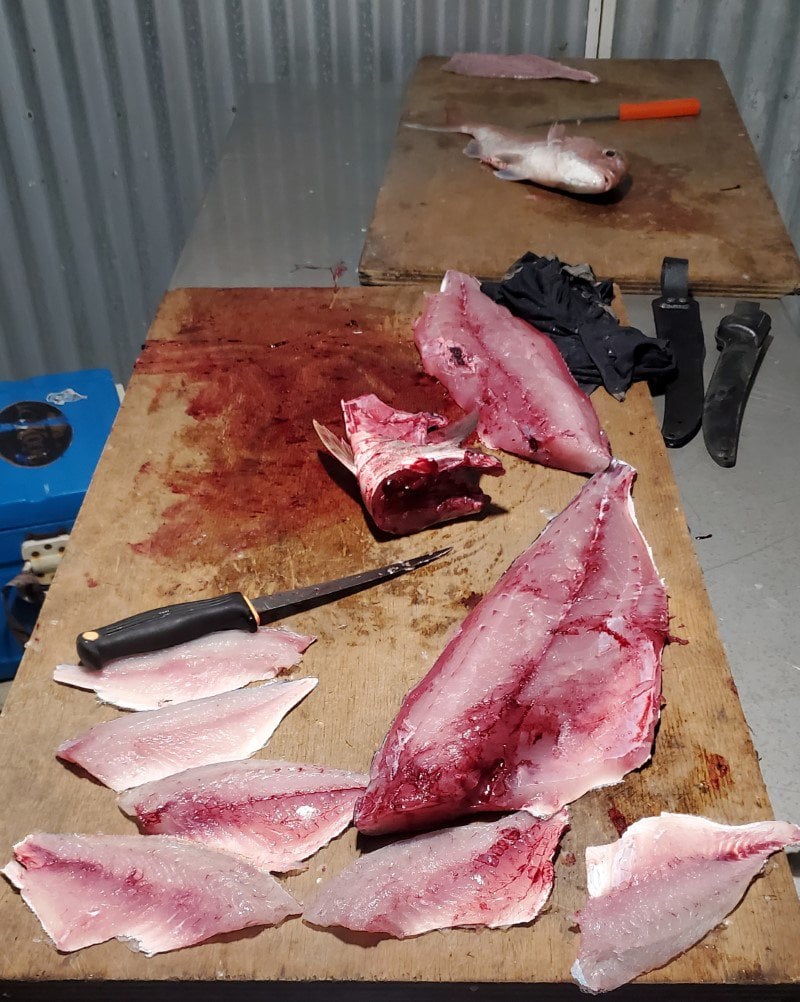
The traditional saturation curing method is the one you’ll find in many old European recipes. It simply involves burying the fish fillets in salt — one layer on the bottom of a non-reactive dish, fish on top, then another layer of salt covering everything completely.
This approach allows salt to penetrate from both sides until the fillet becomes firm. For dense fish like tuna or kingfish, it may take 24–36 hours; for smaller or thinner pieces, half that time is often enough. When the fish feels evenly firm through the center, remove it, rinse lightly in cold water, and pat completely dry.
Saturation curing is simple and forgiving, but it can sometimes push too much salt into the meat. If left too long, the result can become overly dry or salty. That’s where the equilibrium method shines — it lets you dial in precision and consistency.
Equilibrium Curing for Precision
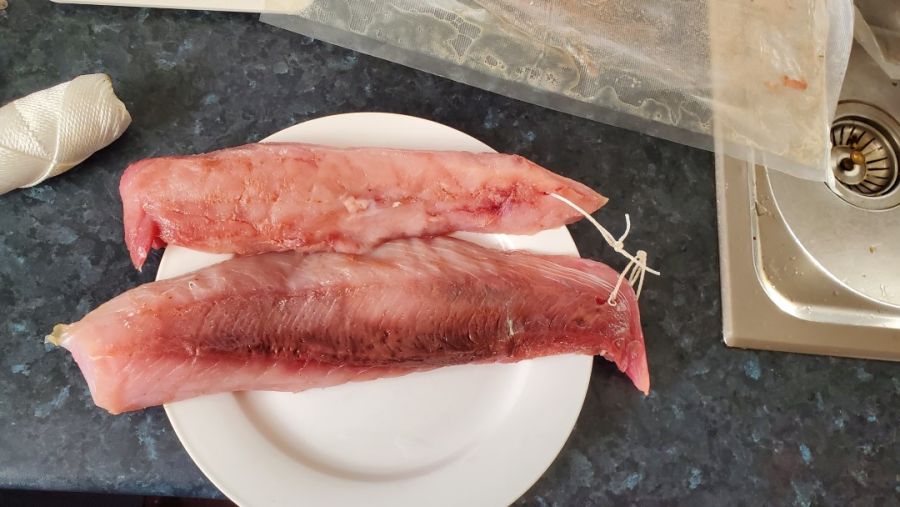
The equilibrium curing guide describes the more modern, accurate technique I now rely on for most projects. It involves weighing the fish and adding an exact percentage of salt — usually 2% of its total weight.
For example, a 1 kg (1000 g) fillet needs 20 g of fine sea salt. That’s enough to season, preserve, and draw moisture without overshooting. I combine the salt with the fish in a tight container or vacuum-sealed bag so that the brine created by osmosis circulates evenly around the meat.
This method takes longer — often 3 to 7 days in the fridge depending on thickness — but the control it offers is worth it. The result is perfectly seasoned fish that needs no soaking before drying and develops deep, balanced flavor throughout.
Understanding the Role of Salt
Salt does more than season; it changes the chemistry of the flesh. By reducing water activity, it prevents bacterial growth while tightening the protein structure. The meat becomes translucent, slightly elastic, and ready for controlled drying.
Always choose pure sea salt without additives or anti-caking agents. I prefer finely ground varieties because they dissolve evenly and start drawing out moisture immediately.
Drying the Fish After Curing
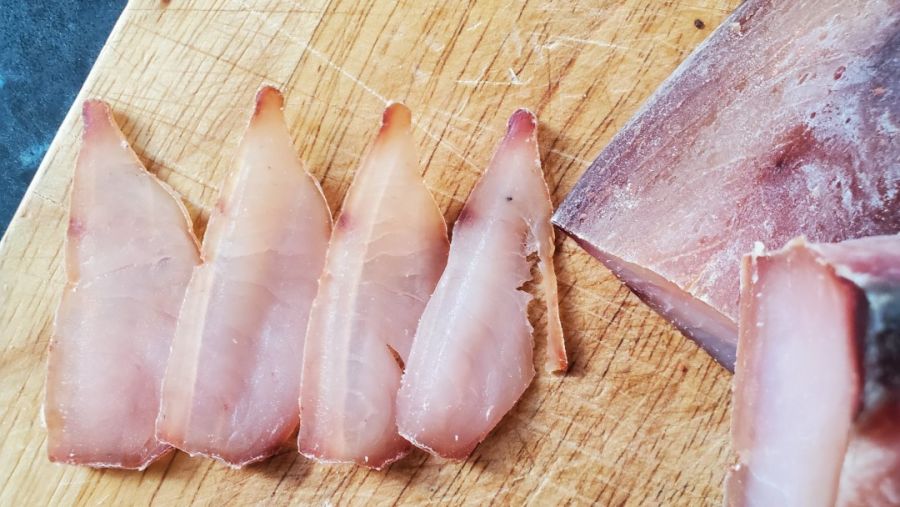
Once cured, the fish is ready for gentle drying. This stage concentrates flavor and stabilizes texture. I usually aim for 30–50% weight loss, which yields a firm, sliceable consistency similar to aged prosciutto.
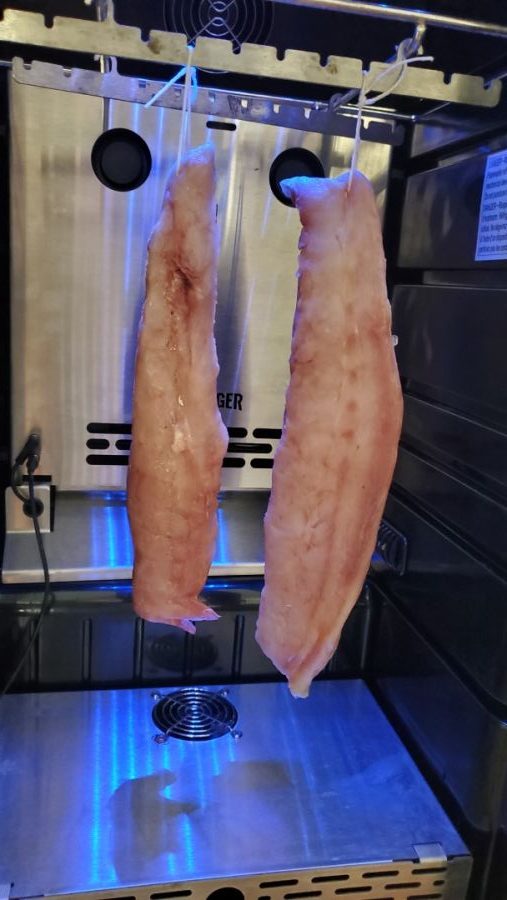
The easiest way to dry is inside a controlled fridge or converted curing chamber. I keep mine between 2 and 5 °C (35–40 °F) with 70–80% relative humidity. Those conditions slow down drying enough to avoid hard exteriors while keeping bacteria growth in check.
My setup uses plug-and-play temperature and humidity controllers that switch the fridge, humidifier, and dehumidifier on and off automatically. It’s the same type of system described in my article on how to build a DIY curing chamber.
If you don’t have that equipment, you can still achieve good results using a spare frost-free fridge and periodic checks. A small fan can help with even airflow, and hanging the fish on hooks keeps surfaces exposed for balanced drying.
Essential Tools and Equipment
Non-Reactive Dish
For saturation cures, glass or stainless-steel trays work best. Avoid aluminum or reactive metals, which can create off-flavors when in prolonged contact with salt and moisture.
Digital Scales
Precision matters. A scale accurate to one-tenth of a gram makes equilibrium curing much easier and ensures consistent salinity in every batch. This simple tool eliminates guesswork and waste.
Drying Chamber or Fridge
Whether you use a purpose-built fridge or a custom chamber, maintaining temperature and humidity balance is the key to even drying and beautiful texture. A digital hygrometer helps you track changes so you can make adjustments as needed.
Best Types of Fish for Salt Curing
Not all fish behave the same once you start curing them. Oily species — those high in omega-3 fats — tend to cure beautifully. Their natural oils slow moisture loss and help the flesh stay supple instead of brittle.
Through trial and error, I’ve found that fish such as tuna, kingfish, salmon, and trout deliver the most consistent results. They hold their structure and take on a rich, savory depth as they dry.
Lean fish, on the other hand, lose moisture too quickly. The texture can become chalky or stringy. I’ve had mixed results with snapper and gurnard, for example — they cure safely, but they don’t develop the same luxurious mouthfeel.
Spain’s long tradition of curing Bluefin and Yellowfin tuna is proof of how well fatty fish respond to salt and airflow. These varieties are dense with omega-3 oil, giving Mojama its silky, translucent sheen and deep umami taste. Even on the other side of the world, I’ve had similar success with kahawai or Australian salmon, both oily and plentiful in New Zealand and Australia.
One interesting discovery is that oil distribution inside the flesh influences drying behavior. Fish storing oil throughout the muscle — not just in the liver — handle extended drying more evenly. Those with lower fat content tend to shrink quickly and risk tough edges before the center has fully cured.
Flavor Additions and Seasoning Ideas
Traditional Spanish Mojama relies on nothing more than high-grade sea salt. Simplicity keeps the focus on the quality of the fish. But there’s room to experiment once you understand how salt and moisture work together.
A small amount of sugar — up to 0.5 % of the fish weight — can help balance the intensity of stronger fish like kahawai or mackerel. It softens the saltiness and rounds out flavor during drying. I occasionally include black pepper, citrus zest, or smoked paprika for a subtle twist that complements cold-smoked finishes.
Just remember that every added ingredient affects how moisture leaves the surface. Fine powders like spices can slightly slow evaporation, so avoid thick layers or sticky marinades during the curing phase.
I also sometimes give cured fillets a short cold smoke — about four hours — to add complexity. The smoke interacts beautifully with the salty, oily flesh, creating layers of flavor that remind me of Mediterranean sea breezes and oak-smoked meats.
Storage and Shelf Life
After the fish has dried and lost roughly half its starting weight, I like to vacuum-seal it. This equalizes small differences in internal moisture, stabilizes the surface, and maintains a consistent texture throughout. Stored in the fridge, vacuum-sealed cured fish can last several months without noticeable quality loss.
If you prefer to keep things more traditional, wrapping pieces in parchment and hanging them in a cool, airy room also works well in mild climates. I’ve hung fillets through New Zealand’s cooler months, slicing small pieces off as needed. Just keep them away from insects and direct sunlight.
For short-term storage, an uncovered plate or wire rack in the fridge keeps the surface firm. Covering the fish or sealing it too early can trap moisture and encourage mold. If you ever spot a white or fuzzy bloom, wipe it off with vinegar and dry the surface again before resealing.
Comparing dry-cured fish to pork is interesting — pork fat has less water and stays stable for longer, while fish fat remains more fluid and aromatic. Because of that, cured fish shouldn’t be left hanging indefinitely; it’s best enjoyed within a few months while the oils are fresh and flavorful.
Food Hygiene
Even though salt curing naturally protects the fish, it’s still essential to control temperature and cleanliness throughout the process. I always cure fish inside a fridge or chamber kept between 2 °C – 5 °C (35 °F – 40 °F). This range slows microbial activity and ensures even diffusion of salt.
Use clean utensils, trays, and gloves, and avoid cross-contamination with raw products. Once cured and dried, the fish is technically preserved but should still be handled like other ready-to-eat foods — keep it cool and sealed to retain its delicate flavor and texture.
These small details make all the difference. After curing meats and fish for decades, I’ve found that consistency and patience always pay off. When you taste that first slice of deep red, translucent fish, you’ll understand why the Mediterranean has treasured this craft for centuries.
Expert Tips for Successful Fish Curing
After decades of experimenting with meat curing, these are the habits that make every batch of salt-cured fish more consistent and enjoyable.
- Start small. Work with short fillets until you understand how your fridge or curing setup behaves.
- Keep records. Note fish type, starting weight, curing duration, and final weight loss — this helps you refine every run.
- Monitor humidity daily. Fluctuations above 85 % or below 65 % can cause either surface mold or case-hardening.
- Let the fish rest after drying. Vacuum-seal and refrigerate it for a week or month before slicing; the internal moisture will balance out for a cleaner cut.
Alternatives and Serving Ideas
If you can’t access tuna or kingfish, oily species such as mackerel, sardine, or salmon work beautifully. Lightly smoked variations also pair well with olive oil, lemon, or shaved fennel. Slice thinly, serve at room temperature, and drizzle with extra-virgin olive oil to bring out the nutty richness of the cure.
For something more adventurous, try layering thin pieces over warm potatoes or fresh pasta — the heat softens the fat and releases aromas similar to fine prosciutto.
How long should fish be salt cured?
For oily fish such as tuna or kingfish, curing takes between 3 and 7 days using the equilibrium method. Thinner fillets may be ready sooner, while thicker pieces benefit from the full week to ensure even salt penetration.
How do I know when my fish is properly cured?
The fillet should feel firm throughout and show a slightly translucent color. If the surface remains soft or damp after curing, extend the time or increase airflow during drying.
How long does salt-cured fish last?
Vacuum-sealed and refrigerated, salt-cured fish can last several months. For traditional hanging storage in cool, dry conditions, consume within 1 – 2 months for the best flavor.
What kind of salt should I use for curing fish?
Choose pure, additive-free sea salt or kosher salt. Avoid table salt with anti-caking agents, which can affect texture and leave a bitter aftertaste.
Have you tried salt-curing fish at home? Share your results, ask questions, or leave a comment below — I always enjoy hearing about other curing experiments and regional traditions.

Tom Mueller
For decades, immersed in studying, working, learning, and teaching the craft of meat curing, sharing the passion and showcasing the world of charcuterie and smoked meat. Read More
I would like to cure and then smoke fish such as mackerel, and others like tilapia fillets. I am still confused if equilibrium dry curing would work, and for how long to cure.
Hey ,depends on if you want to salt cure then smoke/cook = hot smoking. Or salt cure then dry/cold smoke. Here is a link to hot smoking fish , and here is a link to cold smoking. All the best, Tom
Hi Tom, great article, I do a lot of dry curing mackerel and tuna in particular, (we are based in Arnhem Land in the NT, Australia), I am giving the equilibrium curing a crack at the moment, I have some mackerel fillets cryvacced in the fridge. Just wondering where on the 3-7 days scale they would be? I made sure they were not too thick, about 40mm maximum. I dont want to take them out too soon, but keen to get them curing as soon as possible!
Something else I do is a quick cure on the yacht when we catch something and want to have something with drinks at sunset! I slice the mackerel fillets fine, about 5mm like thick sashimi, then a normal dry cure, 50/50 salt & sugar, for an hour, rinse & dry. Serve with a ‘dukkah’ made with whatever i have on hand, ideally lime zest, kaffir lime leaf, chilli thai basil flowers & dill, dip fish pieces in a bowl with a little mirin in it, dip in dukkah, sit on a wafer cracker and a dob of sour cream on top.
Just picked up on this… well 40mm – I would say 3 days per 10mm to be sure = 12 days or more sounds awsome – yeah you do like a quick gravlox nice! I did a crazy trip once from townsville to bamaga – we had a boat up there, wow what an adventure! was trip of a lifetime! Wild stuff up the top end! Take care, Tom (was based in FNQ for sometime). Back in NZ now.
Great article, Tom. I found it while looking for fish curing resources to learn how salted cod is made. In Cuban culture fritters of “bacalao” are a traditional comfort food. We often don’t find the salted code in the store but frozen cod fillets are available. When they are in the store, they look and feel more like saturation method, super salty. You did not mention cod in this article. Have you ever tried curing it?
Thanks! I’ve done it with New Zealand fish I’ve caught (Kahawai) – its a fatty/oil type fish thats very undervalued. I want to try those fritters! 🙂 Cheers Tom