Salt pork and other salt-cured meats come from an old method that still works: you pack a piece of meat in a lot of salt, let the salt pull out moisture, then dry the meat until it firms up. I’ve used this approach on pork belly, venison, beef, and salmon. It’s fast, it doesn’t need fancy gear, and it gives you intense, savory flavor you just can’t fake with store-bought deli meat.
This style of curing is often called saturation curing, excess salt curing, or the salt box method. The idea is simple: the meat is surrounded by more salt than it could ever absorb. The salt moves in, draws water out, and makes the surface less friendly to bacteria. After the salt phase, the meat is rinsed, dried, and then hung to finish.
Traditionally, this is what people did before refrigeration. Salt pork, for example, goes back centuries and was a standard ration for long sea voyages and military campaigns. They weren’t doing anything delicate or “gourmet.” They were packing slabs of pork belly in salt and keeping it usable for a long time.
What I’m sharing here is how I do it at home now. This is for whole muscles or solid cuts — think pork belly, whole venison muscles, beef topside, salmon sides. It’s not for salami. Salami needs a measured salt percentage and a controlled fermentation step. Saturation curing is different: it’s more direct, more rustic, and quicker.
I like this method because it’s approachable. You don’t have to calculate salt by percentage on day one. You can learn it by feel, with your hands in the salt and your eyes on the meat. You’ll see the surface firm up, you’ll feel it tighten, and you’ll literally be able to watch the transformation from raw to cured to dried.
That said, this style of curing is not always perfectly consistent in how salty the final meat will be. You’re surrounding the meat with a lot of salt, so sometimes it ends up slightly saltier than expected. I’m quite sensitive to overly salty food, so I always build in a “test and adjust” step. I’ll talk about that later in the method, but it’s basically as simple as cutting off a small piece and cooking it to check salt level before you move on.
Why and When I Use This Traditional Method
There are two big reasons I use excess salt curing: speed and texture.
First, it’s fast. If I want a result in days instead of weeks, this is the method I go to. I’m not waiting around for a long equilibrium cure. I’m not doing a long controlled dry cure (here is my preferred method – equilibrium curing) with exact salt percentages. I’m packing meat in salt, letting it take what it needs, rinsing it, then hanging it to dry.
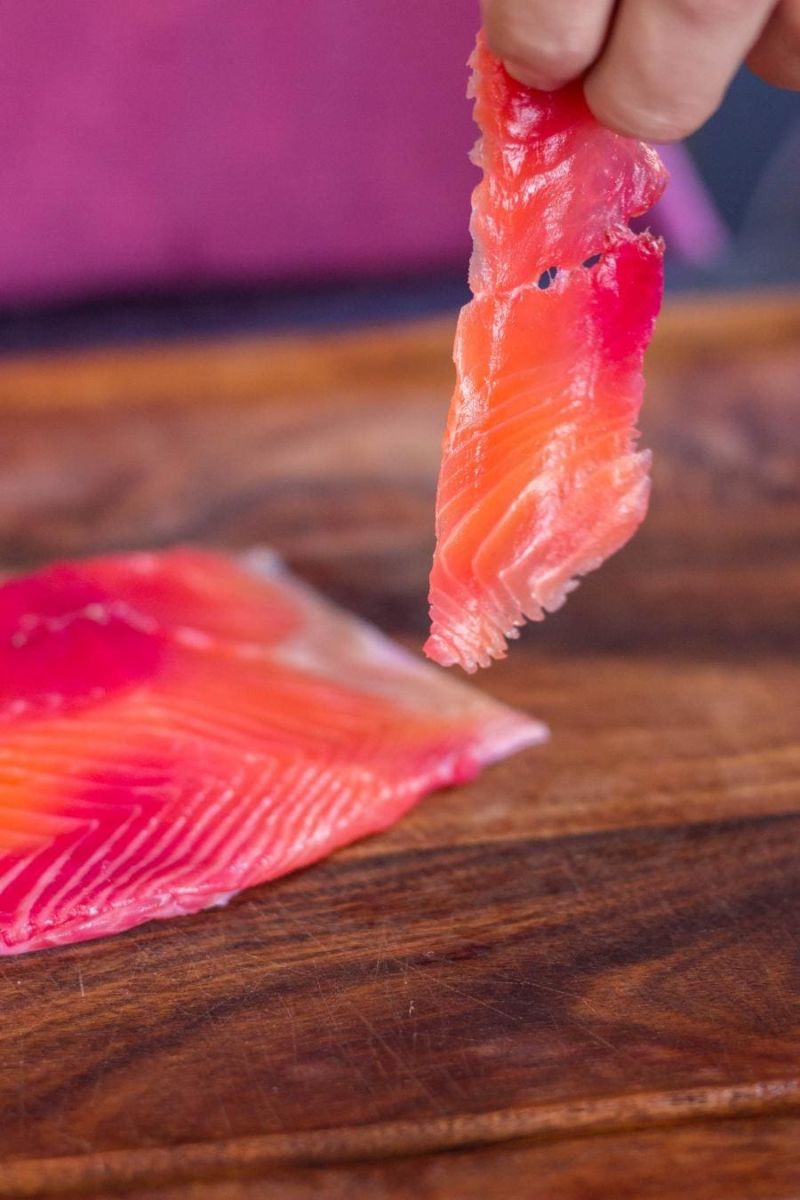
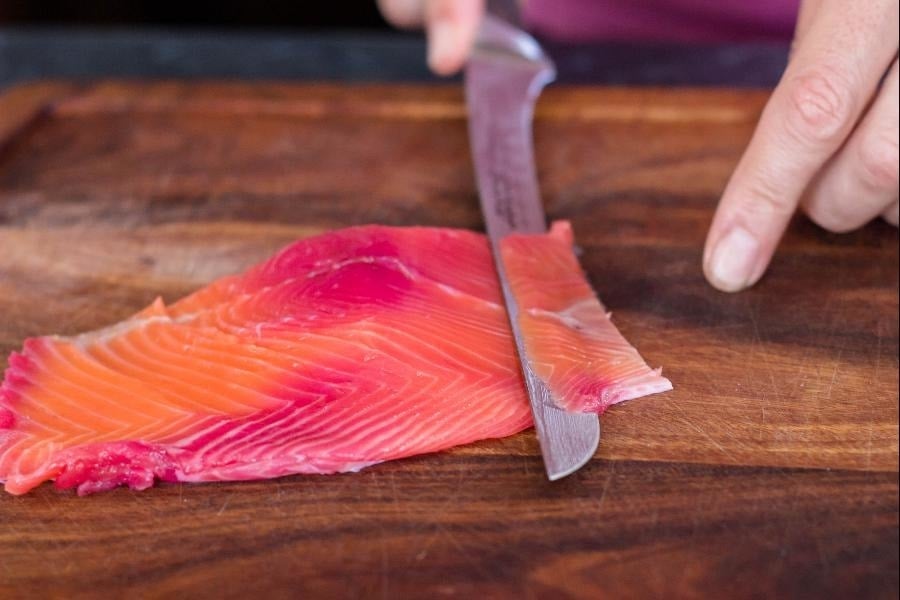
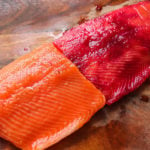
Second, it gives a firm, dense texture that I really like. This applies to more than just pork belly. When I make something like gravlax-style salmon, I’m doing a short version of the same logic: surround the salmon with a decent amount of salt, let it tighten and pick up seasoning, then slice it thin. With fish, it’s mostly about flavor and texture. With pork or game meat, it’s also about long-term keeping and using it later in cooking.
I also use a fast, high-salt approach for biltong-style drying. For biltong, I’ll do roughly one hour in salt, then about one hour in something acidic like Worcestershire or malt vinegar. That combination of salt and acidity gives you that deep, dark, beefy snack quality. After that, it goes to dry. It’s still the same basic rhythm: salt first, then dry the meat hanging in moving air.
On pork, especially fatty pork belly, the traditional salt pork style is very practical. After curing and drying, that meat can be sliced and used to build flavor in stews, soups, beans, slow braises — anywhere you’d normally add cured fat and richness. You’re not always eating it as thinly sliced charcuterie at room temperature on a board. Sometimes you’re cutting a chunk off and cooking with it because it’s pure cured flavor.
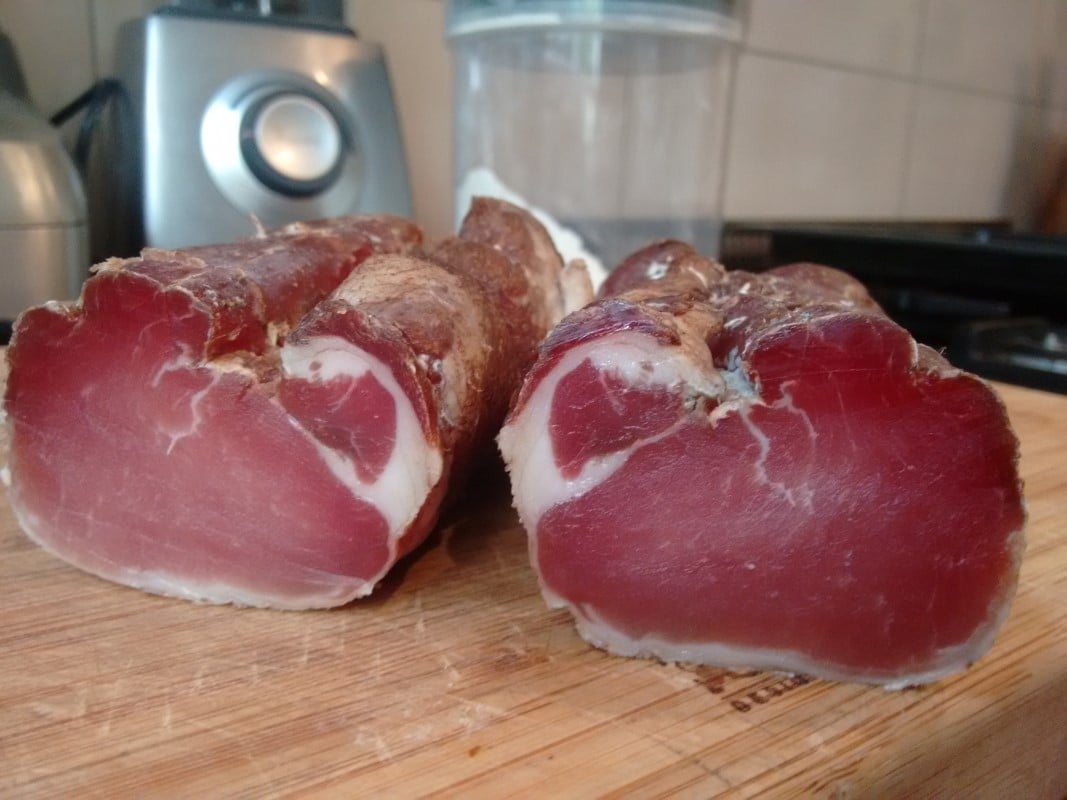
I’ve also done this with venison and beef. Leaner red meat dries down nicely and gives you that concentrated, almost beef-ham flavor when sliced thin. When you dry a whole muscle long enough and hit the target weight loss, it becomes something you can slice paper-thin and serve like classic dry-cured meat.
One thing I generally avoid for this style is poultry. Poultry can have a higher bacteria load and a softer structure that doesn’t behave the same way in the salt. I’m not saying it’s impossible, but for my own projects at home, I stick with pork, beef, venison, lamb, or salmon. Clean, fresh meat and good handling makes a huge difference no matter what you’re curing.
Humidity and drying control matter too. After the salt phase, the meat needs to hang and lose moisture evenly. If the air is too dry, the outside can harden too fast and seal up. If the environment is too damp or too warm, you’re not really drying — you’re just holding meat somewhere warm and wet, and that’s not what we’re doing here. So when I say “hang to dry,” I don’t mean “hang it anywhere and forget it.” I still want cool temperatures and steady airflow.
To me, the best part of this method is that it teaches you the fundamentals of curing meat with salt. You learn to weigh the meat, track time in the cure, rinse it, hang it, and monitor weight loss. You learn what 30% weight loss looks like, feels like, and tastes like. That skill transfers directly into more advanced curing later.
Next, I’ll walk through the core process I use: ingredients, basic equipment, and the step-by-step salt box method. This is the exact approach I follow when I’m making traditional salt pork or starting a long dry cure on a whole muscle cut.
Key Ingredients
For the salt box or excess salt curing method, you don’t need much. That’s the beauty of it — simple ingredients and time do all the work.
Sea Salt (no additives or anti-caking agents)
Always start with clean, unrefined sea salt. You want pure salt without iodine or chemical flow agents. These additives can alter the flavor and affect how moisture moves through the meat. I prefer coarse salt because it’s easier to spread and handle with your hands.
Meat (whole muscle cuts)
This method suits pork belly, beef, venison, or lamb — anything that can handle a strong salt pull. I usually go for pork belly when I’m making salt pork. The fat helps balance the dryness later, and it gives rich flavor when you cook with it. Beef topside or venison round work well too for something closer to bresaola.
Since I’m not doing equilibrium curing here, I skip poultry. Even though you could technically salt-cure chicken or duck, I find the texture less predictable and not worth the risk. With fresh red meat or fish, this process is much more reliable.
Equipment
There’s very little gear involved. You just need something leak-proof for the salting stage, and somewhere clean and cool for the drying phase.
Container or Bag for Salting
A food-safe tub, tray, or even a heavy zip-seal bag works fine. Make sure it doesn’t leak; you don’t want brine dripping into your fridge or workspace. I often use a tray lined with a bit of paper towel underneath to catch any liquid that seeps out.
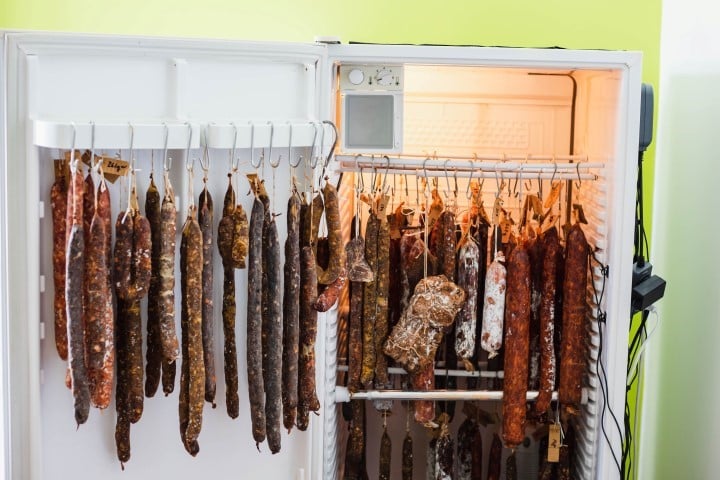
Where to Hang and Dry
Once cured, the meat needs to hang somewhere with steady airflow and moderate humidity. The ideal environment is cool and dry, around 10–15°C (50–60°F), with about 70% humidity. If the air is too dry, the outside can crust over too fast. If it’s too damp, mold can take hold before the surface dries.
Cellar, Basement, or Garage
If you’re lucky enough to have a basement or a cool corner of the house that stays around the right temperature, that can work for small pieces like pancetta or bacon-sized cuts. You just need good airflow and no strong odors in the space.
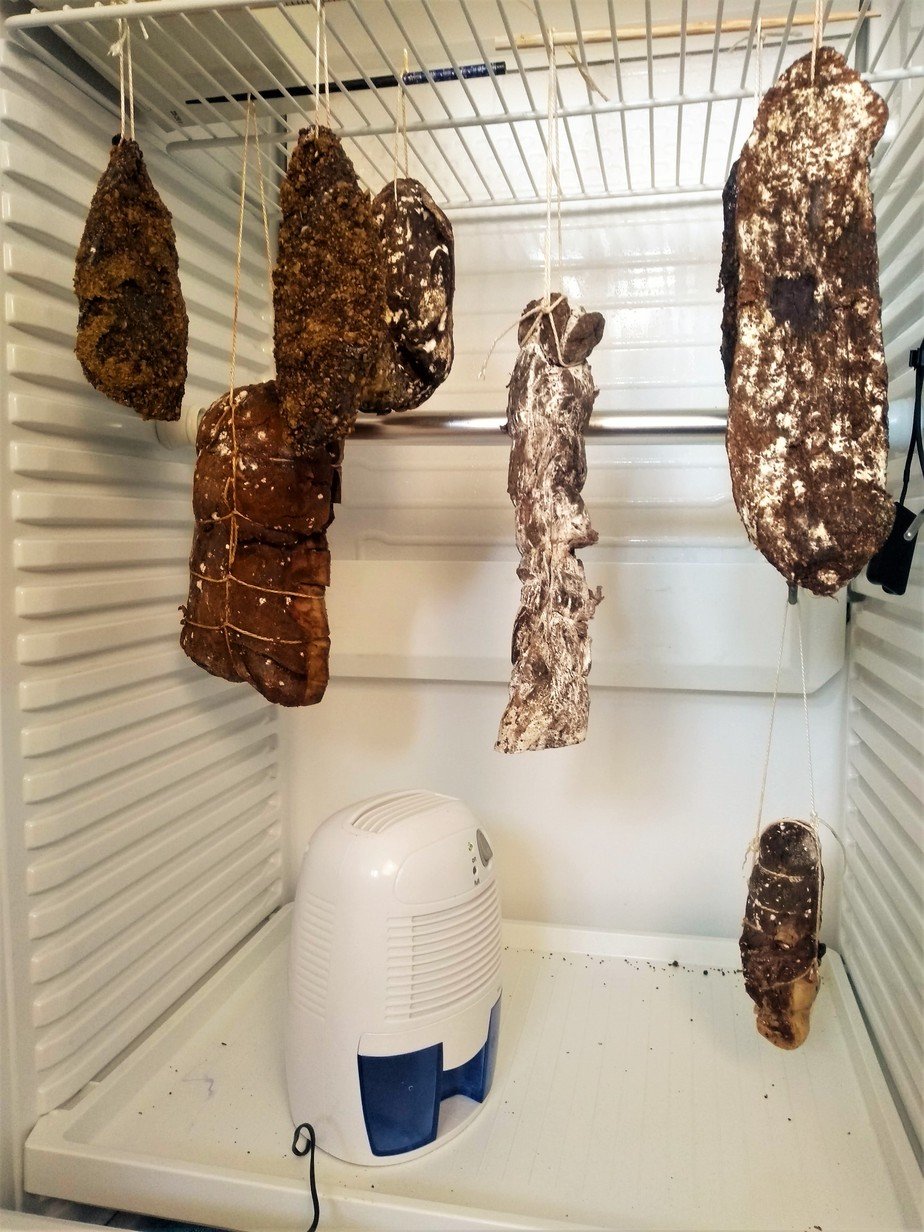
For those of us without naturally cool spots, a spare fridge or converted wine cooler is the next best thing. The tricky part is humidity control — most fridges run around 30–50%, which is too low for long drying. To solve that, I use a small humidifier and controller to keep it stable.
Building a simple DIY curing chamber is one of the most effective ways to maintain proper drying conditions. A small humidifier, controller, and steady airflow make a big difference to the quality of the end product. It’s the same setup I use for bacon, pancetta, and other dry-cured meats.
How to Cure with the Salt Box Method
This is the basic process I follow every time I use saturation curing. It’s hands-on, but straightforward — salt, time, rinse, dry, and check. Clean meat, steady temperature, and patience are all that’s required.
1. Weigh the Meat and Calculate Cure Time
Weigh your piece of meat before curing. Write down the starting weight on a card or tag. You’ll use this later to track drying progress. I usually figure on roughly ½ to 1 pound of meat per day in the cure, depending on how thick the cut is. Fattier or thicker pieces can take longer because salt moves more slowly through the fat.
Trimming the meat to a uniform shape helps it cure more evenly. A tubular or compact shape dries evenly and makes slicing easier later. On that same card, note your target weight loss — usually around 30% for softer results or 40%+ for something drier and firmer.

Calculating Cure Time
The general guideline I follow is one day in salt for each half to one pound (250–500 g) of meat. That’s only an estimate — I still check the texture partway through the cure. A well-salted piece will feel firmer, slightly denser, and noticeably drier on the surface.
Don’t overthink it. As you practice, you’ll develop a feel for how quickly salt pulls moisture from different cuts. The meat will tell you when it’s ready.
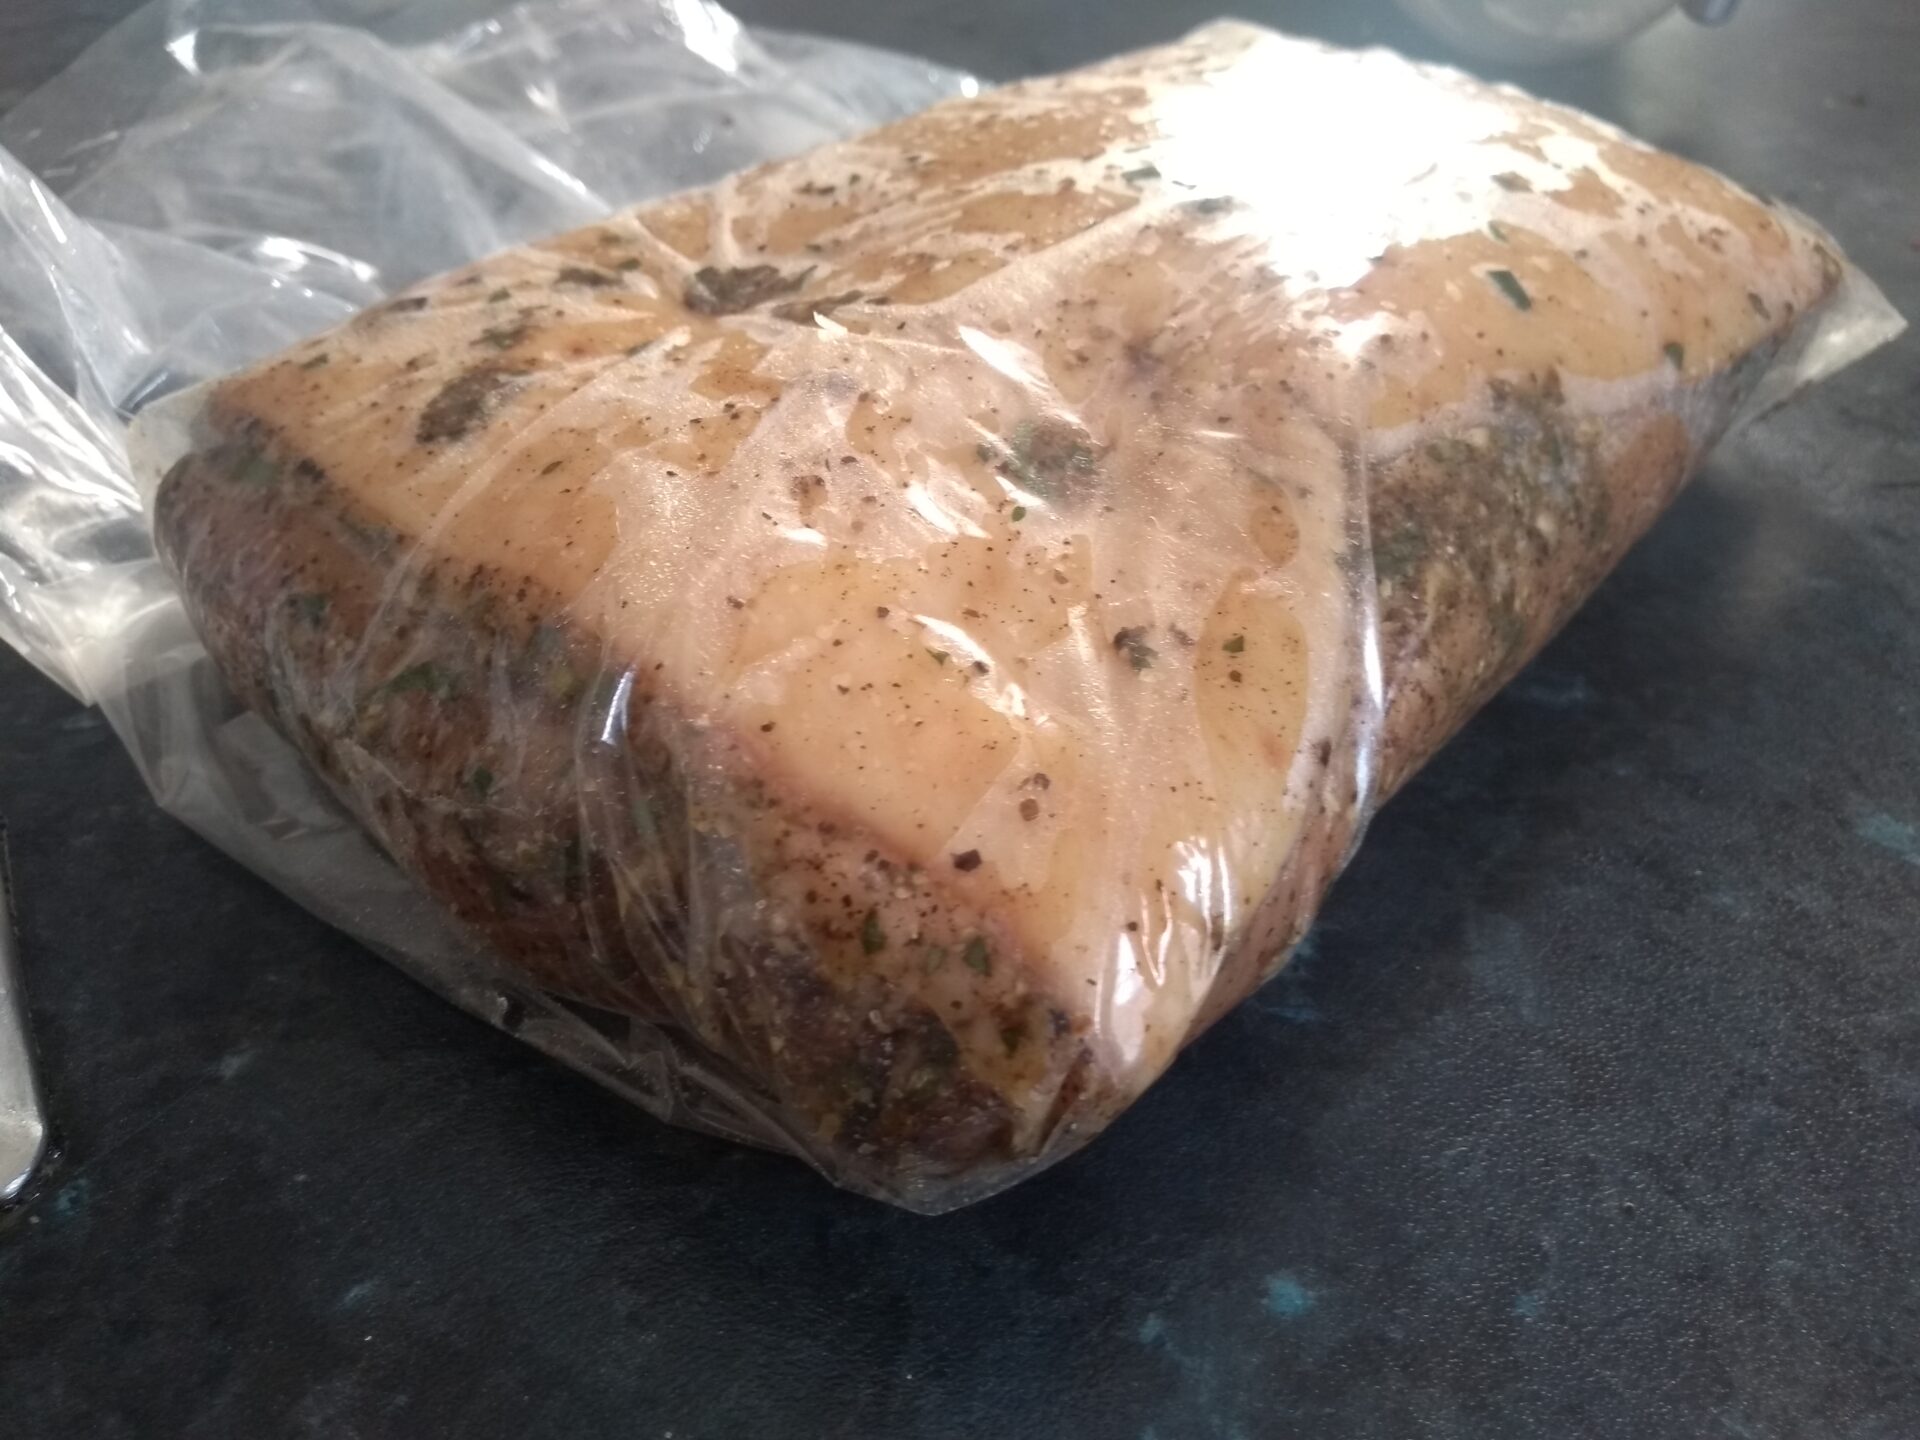
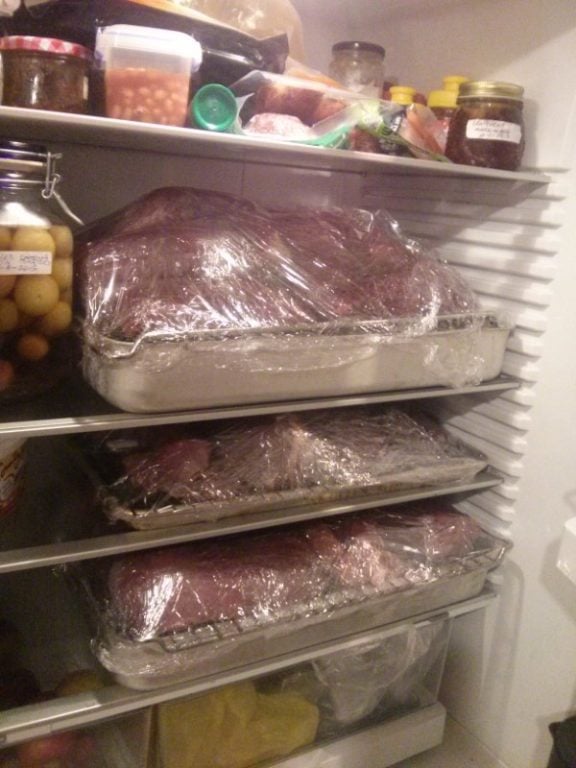
2. Cover the Meat Above and Below with Salt
Lay a thick bed of salt in the bottom of your container, then place the meat on top. Cover it completely with more salt so that no part of the surface is exposed. The salt should be at least half an inch thick on all sides — enough that moisture can move freely into the salt without pooling in the bottom.
I like to rub the salt in with my hands to make sure every crevice is coated. After that, I put the container in the fridge or a cold area and leave it undisturbed until the curing time is done. If I’m doing more than one piece, I keep a card on top of each with the date and time it went in.

Next, we’ll move to curing in the fridge, rinsing, and drying — where the real magic happens.
3. Place in a Cool Fridge Temperature to Cure
Once the meat is fully surrounded by salt, it needs to sit somewhere cold for the salt to do its work. I keep mine in a refrigerator, or in winter, a naturally cold space. The steady, cool temperature allows the salt to draw moisture out without spoiling or uneven curing.
Each day, a small amount of liquid will come out of the meat and collect in the bottom of the container. That’s normal. The salt is pulling water from the muscle, creating its own brine. As long as the meat stays covered, the salt continues to absorb and circulate that moisture evenly.
During this stage, I sometimes flip the meat halfway through if I’m curing a thick cut. That ensures both sides get even contact with the salt. When it feels firm to the touch and the outer layer is noticeably tougher, it’s ready for rinsing.
4. Remove From Salt and Rinse
After curing, take the meat out of the salt and rinse it well under cool running water. This stops the curing process and washes away surface salt. Don’t soak it yet — just rinse and pat it dry with paper towels.
When I’m making bacon or salt pork, I always cut off a small test piece at this stage and fry it in a pan. That tells me immediately how salty it is. If it’s too salty for my taste, I’ll soak the whole piece in cool water for a few hours, changing the water once or twice. Then I dry it again before hanging. That quick check saves a lot of guesswork.

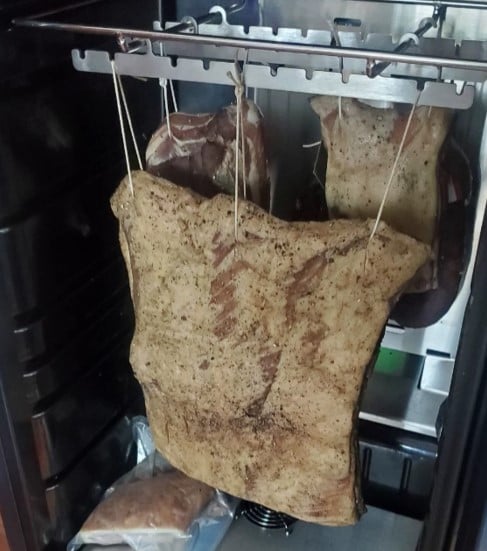
5. Hang to Dry Until Weight Loss Is Achieved
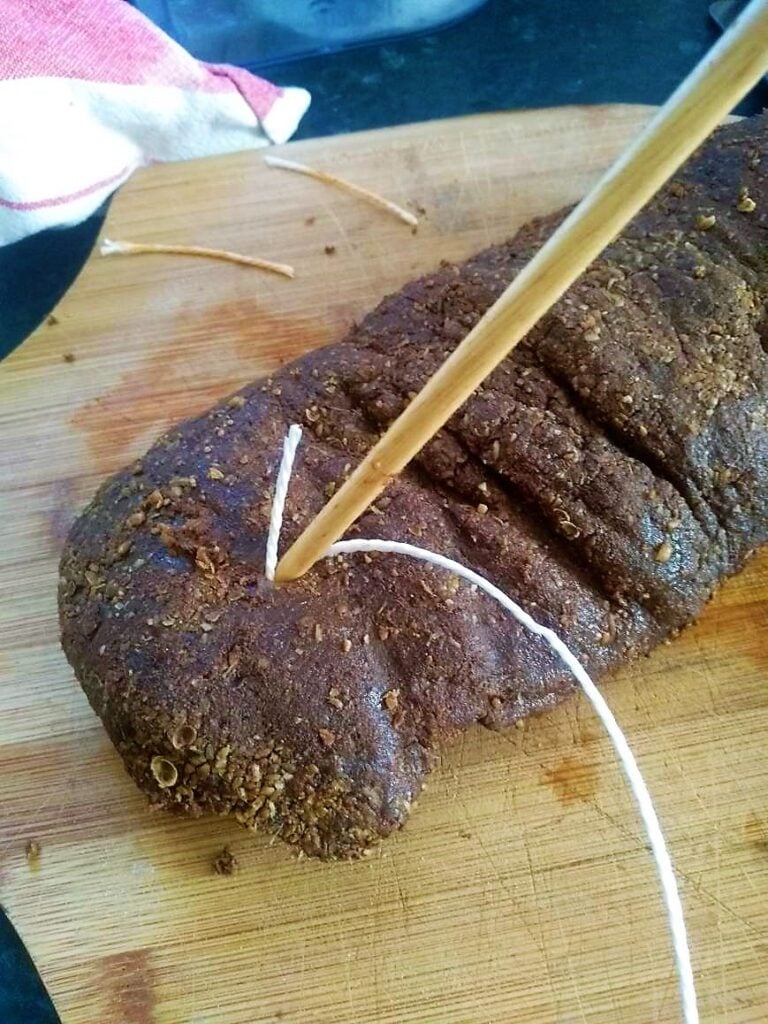
Once rinsed, it’s time to hang the meat so it can dry. I use S-hooks, butcher’s twine, or stainless wire to hang pieces so air moves evenly around them. Avoid letting meat rest on trays or racks at this stage — any surface contact can trap moisture and cause spoilage patches.
I aim for a weight loss of around 30% for soft, sliceable meat like pancetta or salt pork, or 40–45% for firm, dry styles like bresaola or cured venison. Write your target number on that same tag from the first step and weigh it every few days. It’s a simple way to track progress and develop consistency.
Airflow and patience do the rest. The meat should not feel sticky or wet on the outside. It will slowly firm up, darken, and develop a dense texture. At this stage, the smell becomes clean and savory — a good sign of steady drying. If you ever notice strong or sour odors, it usually means humidity was too high or air movement too low.
6. Check Periodically as Meat Dries
I like to check my meat every few days. I touch the surface lightly — it should be dry and firm, not tacky. As it dries, it will lose weight and shrink slightly. When it reaches the target weight loss, it’s ready to slice or store.
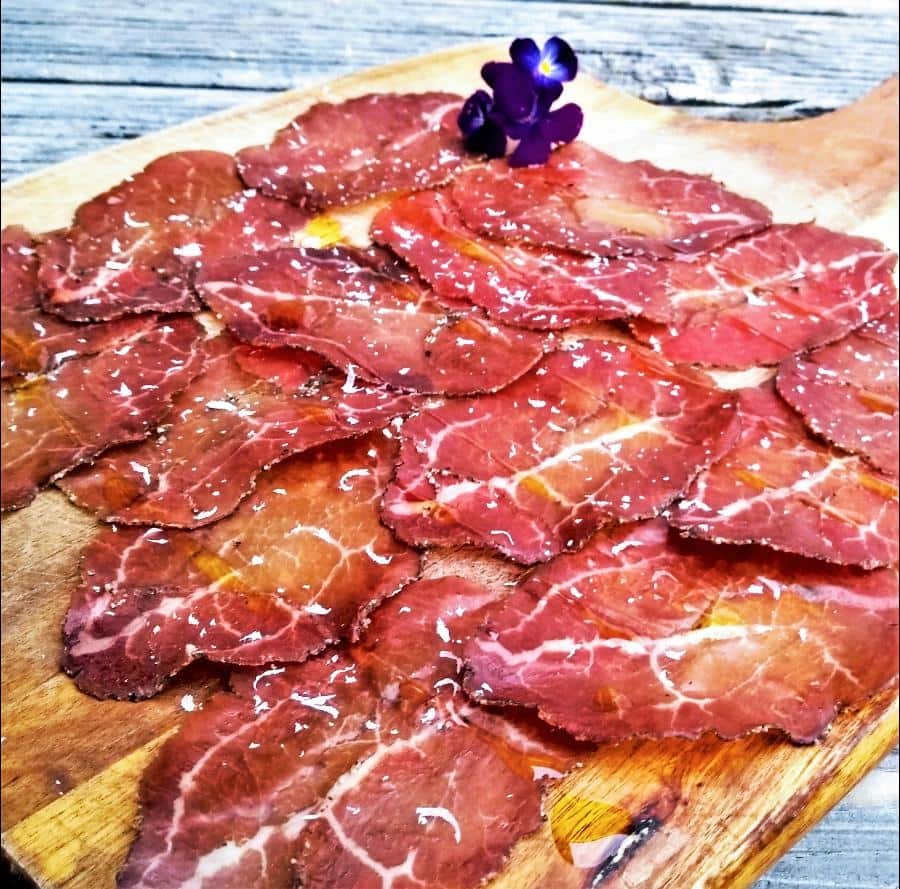
For thinly sliced cured meats, the key is a sharp knife or a good deli slicer. Par-freezing the meat for about half an hour before slicing helps you get even, paper-thin cuts without tearing. When it’s cut that fine, you taste the salt, fat, and texture together in perfect balance.


Expert Tips
The most common mistake with the salt box method is over-salting. Meat varies a lot depending on fat content and thickness. If it ends up too salty, a short soak in cold water (even just an hour) can pull the edge off the saltiness. Taste and adjust — that’s part of the craft.
I’ve also learned that this process uses a lot of salt. While salt is cheap, I still prefer the accuracy of equilibrium curing for regular charcuterie projects. But when I need something fast, rustic, and foolproof, excess salt curing still has a place in my process.
Variations
Gravlax is one of my favorite quick salt cures. I use fresh salmon fillets, coat them generously with salt, sugar, and dill, and let them sit for about 24 hours before rinsing and slicing. I’ve tried beetroot gravlax too — the deep color is beautiful, though the flavor isn’t much different from the classic version.
For longer-term styles, I use the same salt saturation method for venison, fish, or pork before hanging them for drying. Each meat behaves differently, but the same principle applies: salt in, moisture out, patience all the way.
Storing the Finished Dry-Cured Meat
After curing and drying, the meat keeps improving. I often leave it hanging a little longer for a drier texture and concentrated flavor. Fatty meats shrink less and stay supple even as they dry.
For storage, I usually vacuum-seal the finished meat. It pauses the drying process and prevents oxidation. Stored this way, the cured meat keeps for months — sometimes longer — and the flavor deepens over time.
Serving Ideas
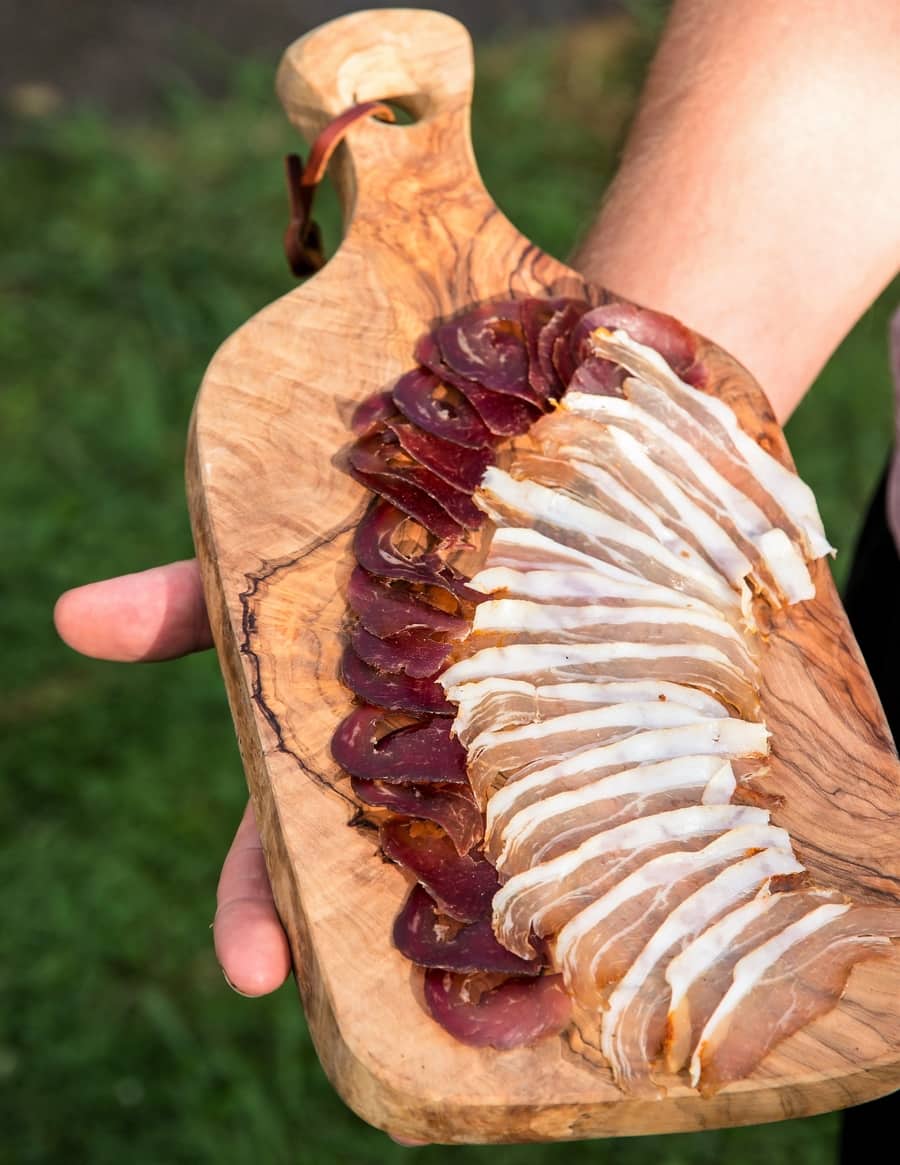
Salt-cured meat can be enjoyed in different ways depending on how dry it is. For softer pieces, slice thinly and serve at room temperature as you would pancetta or prosciutto. For firmer or saltier meat like classic salt pork, cut small cubes to flavor soups, beans, or stews — the salt seasons the whole dish.
I often add thin slices of cured beef or venison to fresh salads, or pair gravlax-style salmon with rye bread and lemon. Once you’ve mastered this process, you can experiment endlessly with how you serve and store it.
How to Dry Cure Meat at Home (Excess/Saturation)
Equipment
- Weighing Scales For the initial weight and finishing weight.
- Meat Drying Area / Chamber Cellar, Shed, Wine Cellar, DIY Fridge Converison
Materials
- 1 meter Butcher Twine or Jute strong enough to hold the meat whilst drying
- 1 piece Bag, Container for Curing
- cardboard Recording Starting and Finished Weight
Instructions
Salt Dry Curing Phase
- For every peice of meat to cure, weigh meat and rcord both starting and finishing weight (70%).

- Make cure salt Mixturemuniformly – spices/pepper or whatever is being used evenly distributed.

- Cover meat with salt cure – cover all sides evenly and in crevices.
- Place in fridge and fully cure, 1 Day Per 1-2 Pounds / 0,5-1 kilogram of meat


Drying Phase
- Remove from bag and hang in appropriate drying area/chamber. Using S hook, or other method advised above.
- Check meat regularly for mold and visual/smell signs, leave haning until target weight achieved (minimum 30% weightloss from starting weight)

Notes
Frequently Asked Questions
What’s the reason to use excess salt vs. equilibrium salt curing?
Excess or saturation curing is faster and simple to do by hand — you surround the meat with salt and let it draw out moisture naturally. Equilibrium curing is slower but more accurate since the salt percentage is measured by the exact weight of the meat.
Why should I salt-cure meat?
Salt curing preserves meat, builds flavor, and changes the texture. It draws moisture out, concentrates flavor, and makes the meat last longer.
Is salt curing meat hard to do at home?
Not at all — with clean handling and patience, it’s simple. It’s more about paying attention than about special equipment. The hardest part is waiting for the drying to finish.
How do I know when cured meat is dry enough?
I track the weight loss — at least 30% for softer cures, 40% or more for drier styles. It should feel firm and have a pleasant cured aroma, not raw or damp.
Please feel free to leave a comment or ask any questions below. I always enjoy hearing how others approach traditional salt curing — every cut, environment, and batch teaches something new.

Tom Mueller
For decades, immersed in studying, working, learning, and teaching the craft of meat curing, sharing the passion and showcasing the world of charcuterie and smoked meat. Read More